Advanced settings
Use this guide if you want to add custom cart properties, switch how the offer handles the Shopify purchase option, inject custom CSS or JavaScript, override storefront button and modal text, or pin preorder widget elements to custom CSS selectors. The Advanced section of the offer editor collects these power-user and developer settings; most merchants won't need to change them. Some of them (cart properties, CSS/JS, text overrides) show up for customers, others are internal configuration only.
Before you begin
You need an existing preorder offer to reach the Advanced section. If you haven't created one yet, see Set up preorders.
Choose your setup
The Purchase option setting controls whether STOQ attaches a Shopify selling plan (purchase option) to preorder line items, or manages the preorder entirely through the storefront widget without one. Decide this before you configure payment and fulfillment, switching later resets both.
| Option | When to use |
|---|---|
| Use Shopify purchase option (Recommended) | Supports partial payments, fulfillments, and discounts. Shopify checkout shows the preorder selling plan to customers. Gift cards, store credits, buy X get Y discounts, and third-party product-options or customizer apps (Easify, Bold Options, Hulk, and similar) are not supported |
| Use without purchase option | Better compatibility with gift cards, store credits, buy X get Y, managed markets, split orders, and third-party product-options or customizer apps. Partial payments and payment-specific discounts are not supported in this mode |
If a product-options or customizer app (Easify, Bold Options, Hulk, and similar) writes custom properties or upcharges into the native add-to-cart form, those can be dropped under Use Shopify purchase option. Switch the offer to Use without purchase option so the properties and upcharges reach checkout.
Switching from Use Shopify purchase option to Use without purchase option resets the offer's payment setting to full payment with no discount, and its fulfillment status to Unfulfilled. The Scheduled fulfillment status requires the purchase option and is unavailable without it. On hold doesn't run through the Shopify selling plan in this mode either, but you can still hold preorder fulfillments without the purchase option using STOQ's own hold, see Hold preorders without the Shopify purchase option. Disabling the purchase option doesn't delete the existing Shopify selling plan group, it stops STOQ from syncing to it.
Partial payments, preorder-only discounts, and a scheduled ship date all rely on the Shopify purchase option. While an offer stays on Use without purchase option, STOQ clears any of these each time you save the offer, not just when you first switch, so a setting that can't take effect in this mode won't sit in the editor looking active.
What customers will see
When STOQ writes properties to a cart line item, it marks some as hidden by prefixing the key with an underscore (_). Shopify hides these from customers in the storefront cart and checkout; they're only visible to you in Shopify admin and in STOQ's order views.
| Property type | Key format | Where it appears |
|---|---|---|
| Visible | No leading underscore, e.g. Preorder, Payment, Shipping: ships Dec 25 | Storefront cart drawer and checkout order summary |
| Hidden | Underscore-prefixed, e.g. STOQ's internal tracking properties | Shopify admin order detail and STOQ's internal tools only |
The fulfillment timeline property (from Show fulfillment timeline in cart) and the payment breakdown property (from Show payment details & savings in cart) are visible by default. Your custom cart attribute follows whatever key you type; start it with an underscore to hide it from customers. The offer editor's cart preview reflects this: visible properties show inline on the line item, hidden ones show in a separate "Visible in admin" panel.
A few other Advanced settings reach the storefront too: with Use Shopify purchase option turned on, customers see the preorder selling plan at checkout, and any CSS, JavaScript, or text overrides you set (Out of stock text, Add to cart text, Continue/Cancel button text) apply on the product page as soon as you save and refresh.
Set it up
On a phone, this menu is collapsed. In the Shopify mobile app, tap the STOQ logo at the top of the screen to open it, then choose the section named below. There is no hamburger icon. See Finding the STOQ menu.
Open the offer editor
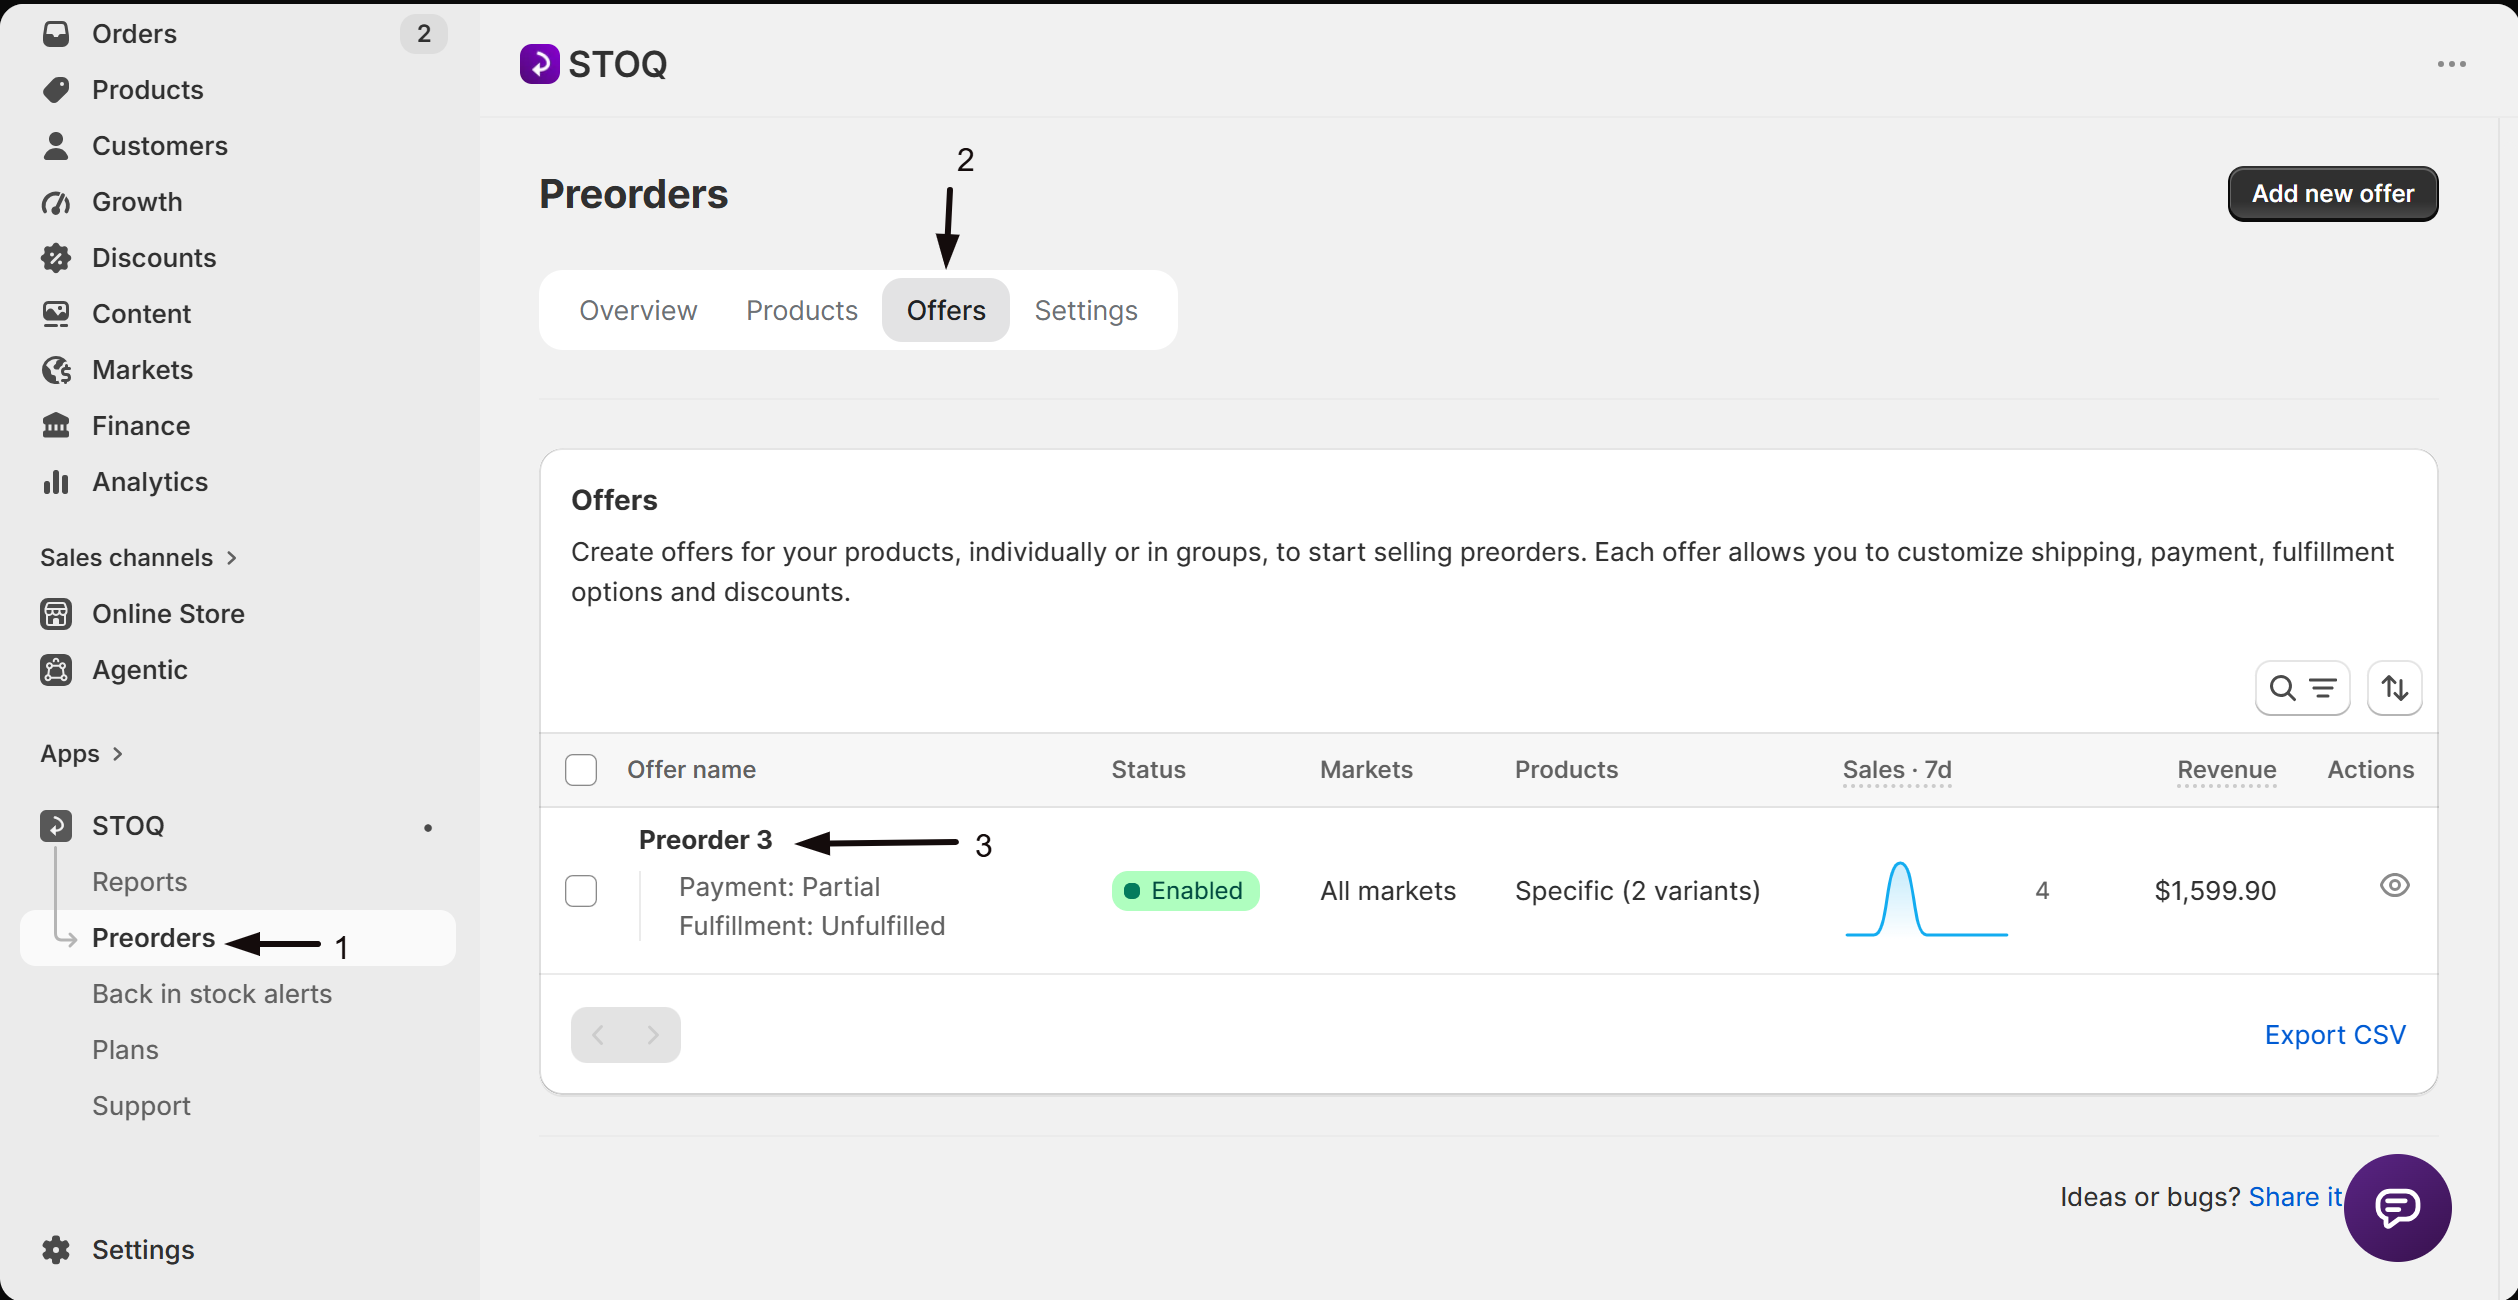
- In the left menu bar of the STOQ app, click Preorders.
- Click the Offers tab.
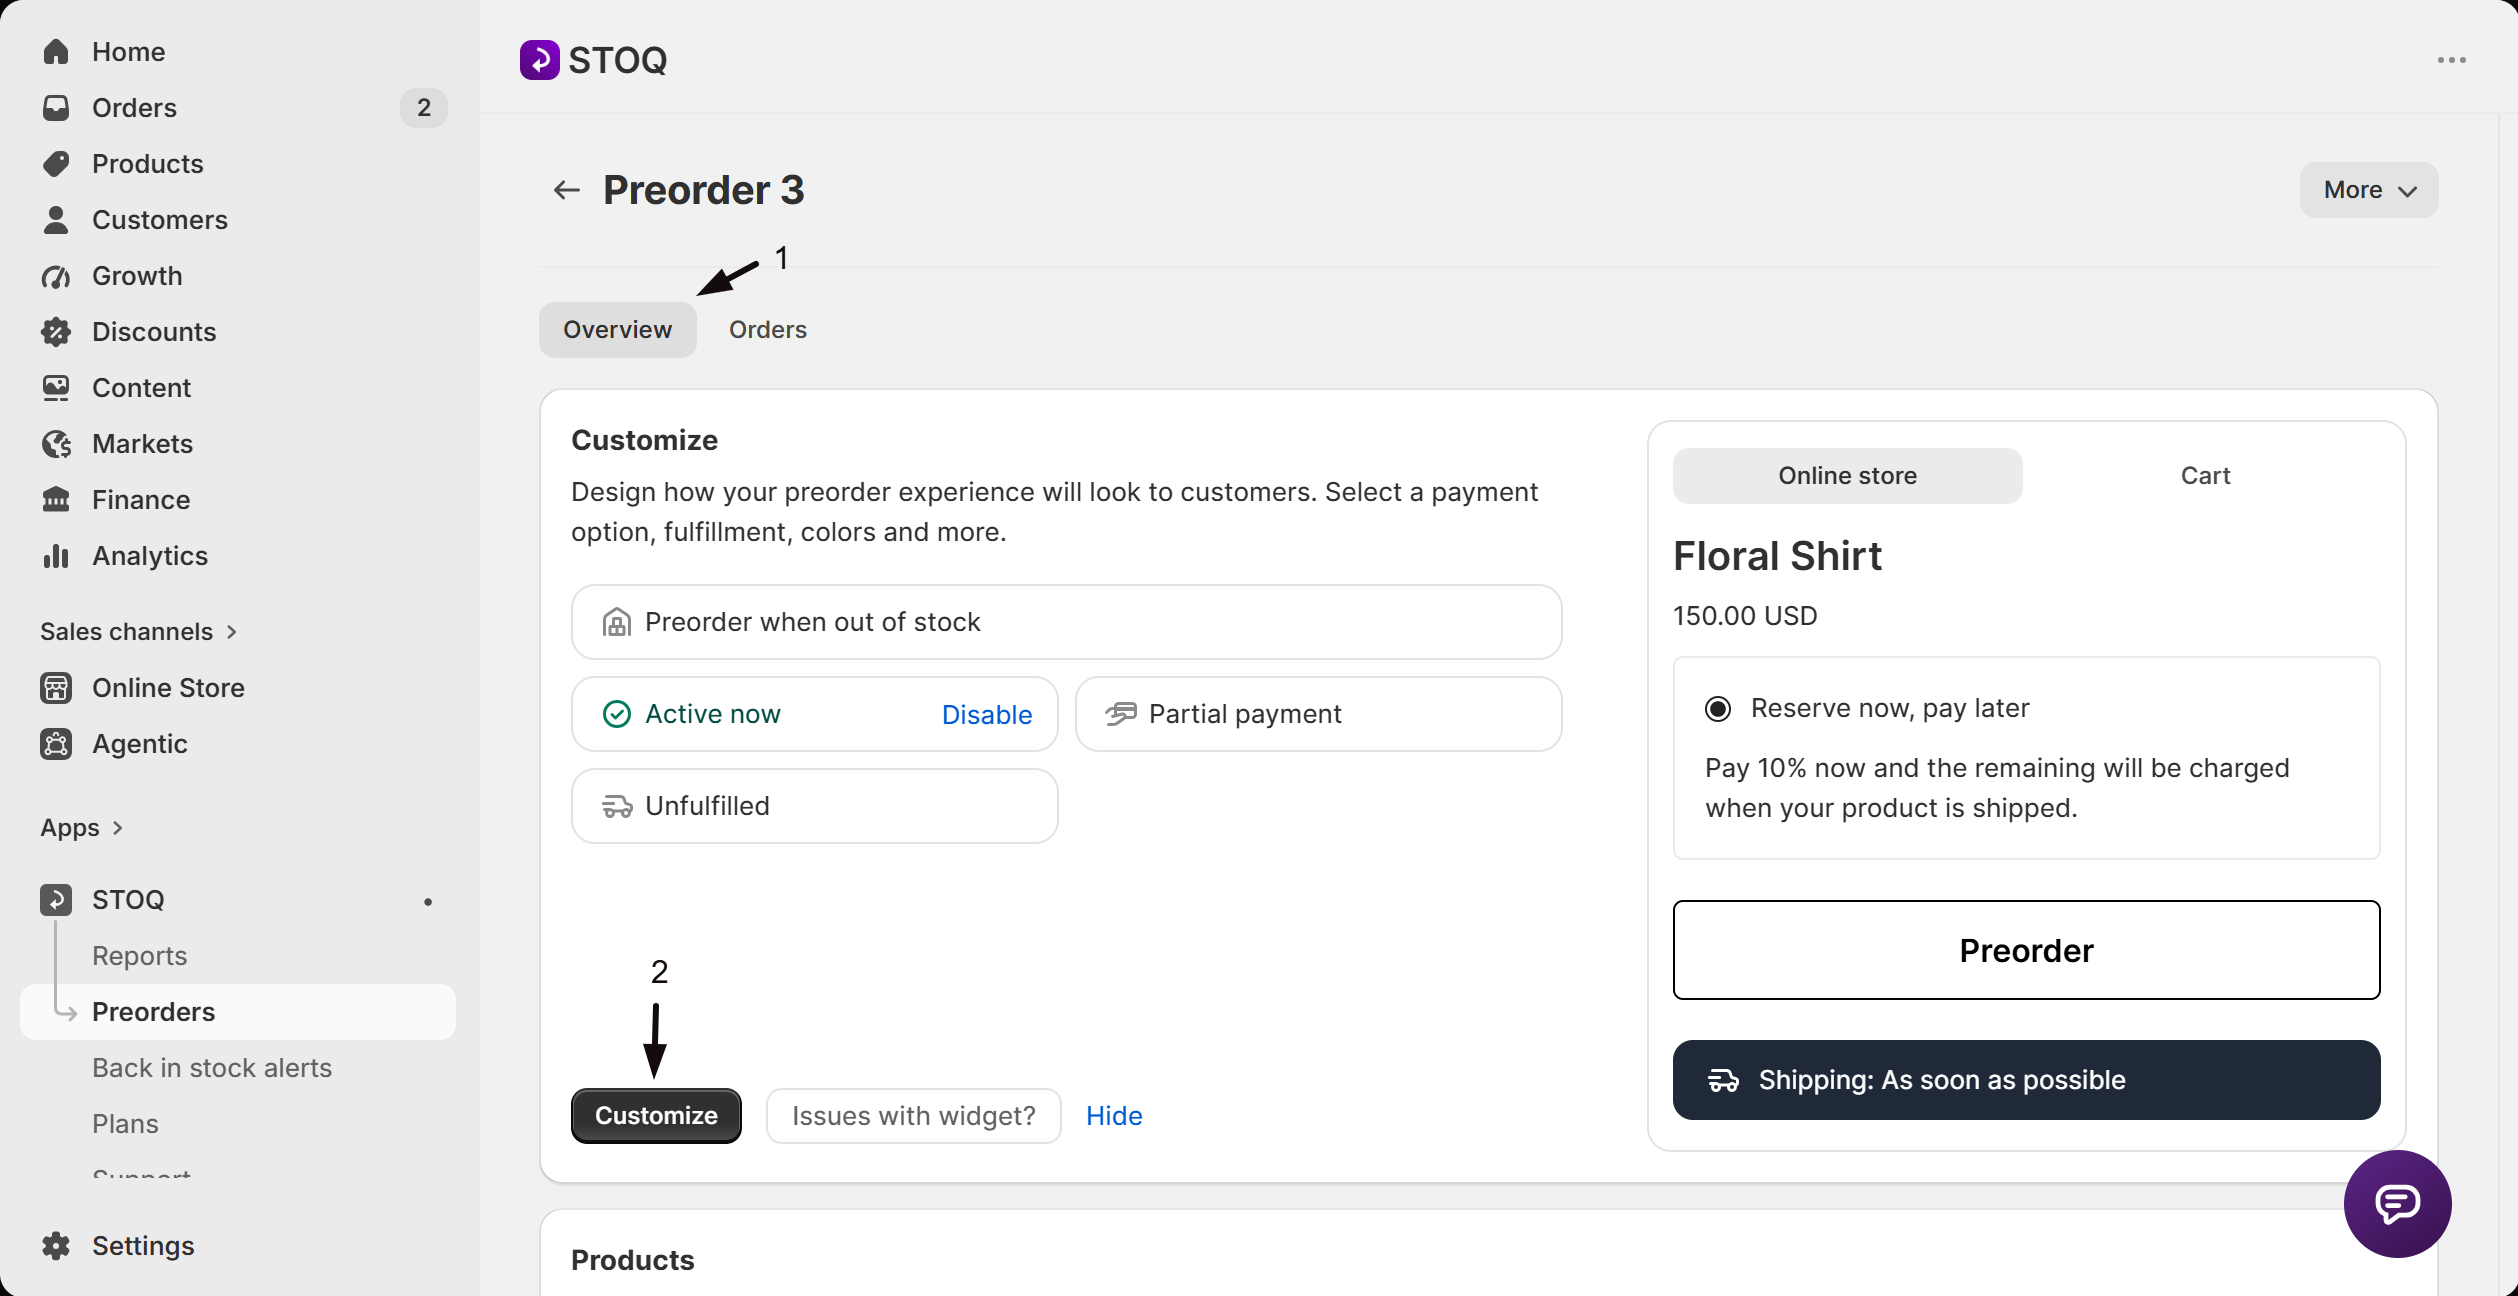
- Click the offer you want to edit to open its Overview tab (this shows the Customize button, a live preview, and the offer's Products section).
- Click Customize to open the offer editor.
Open Advanced
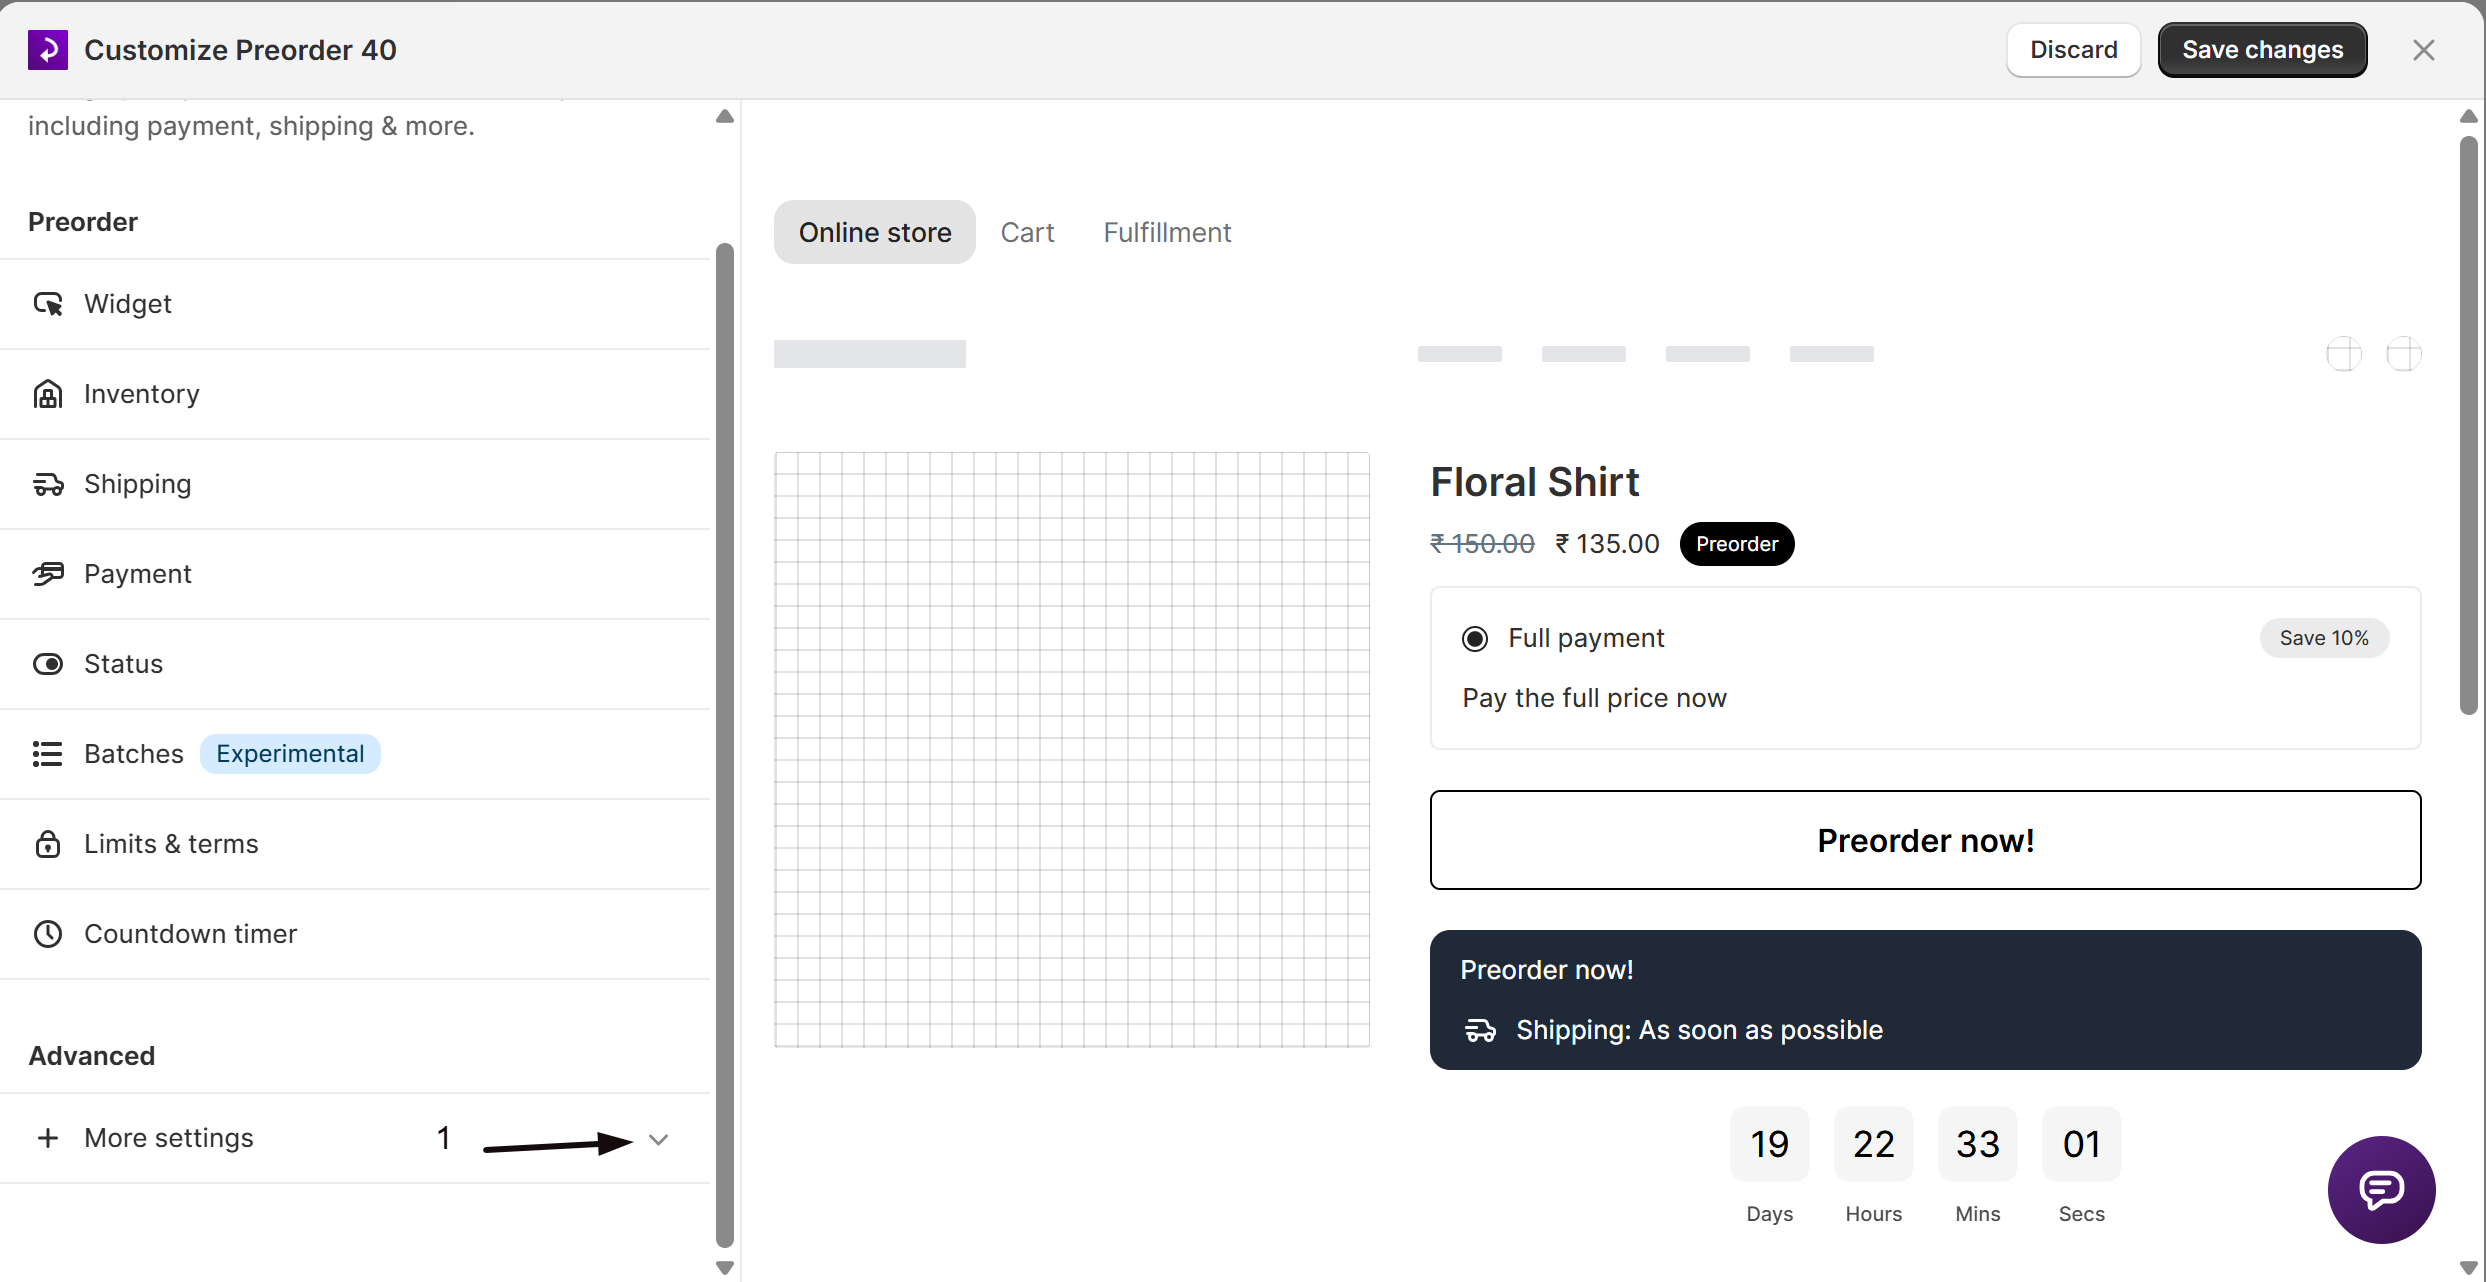
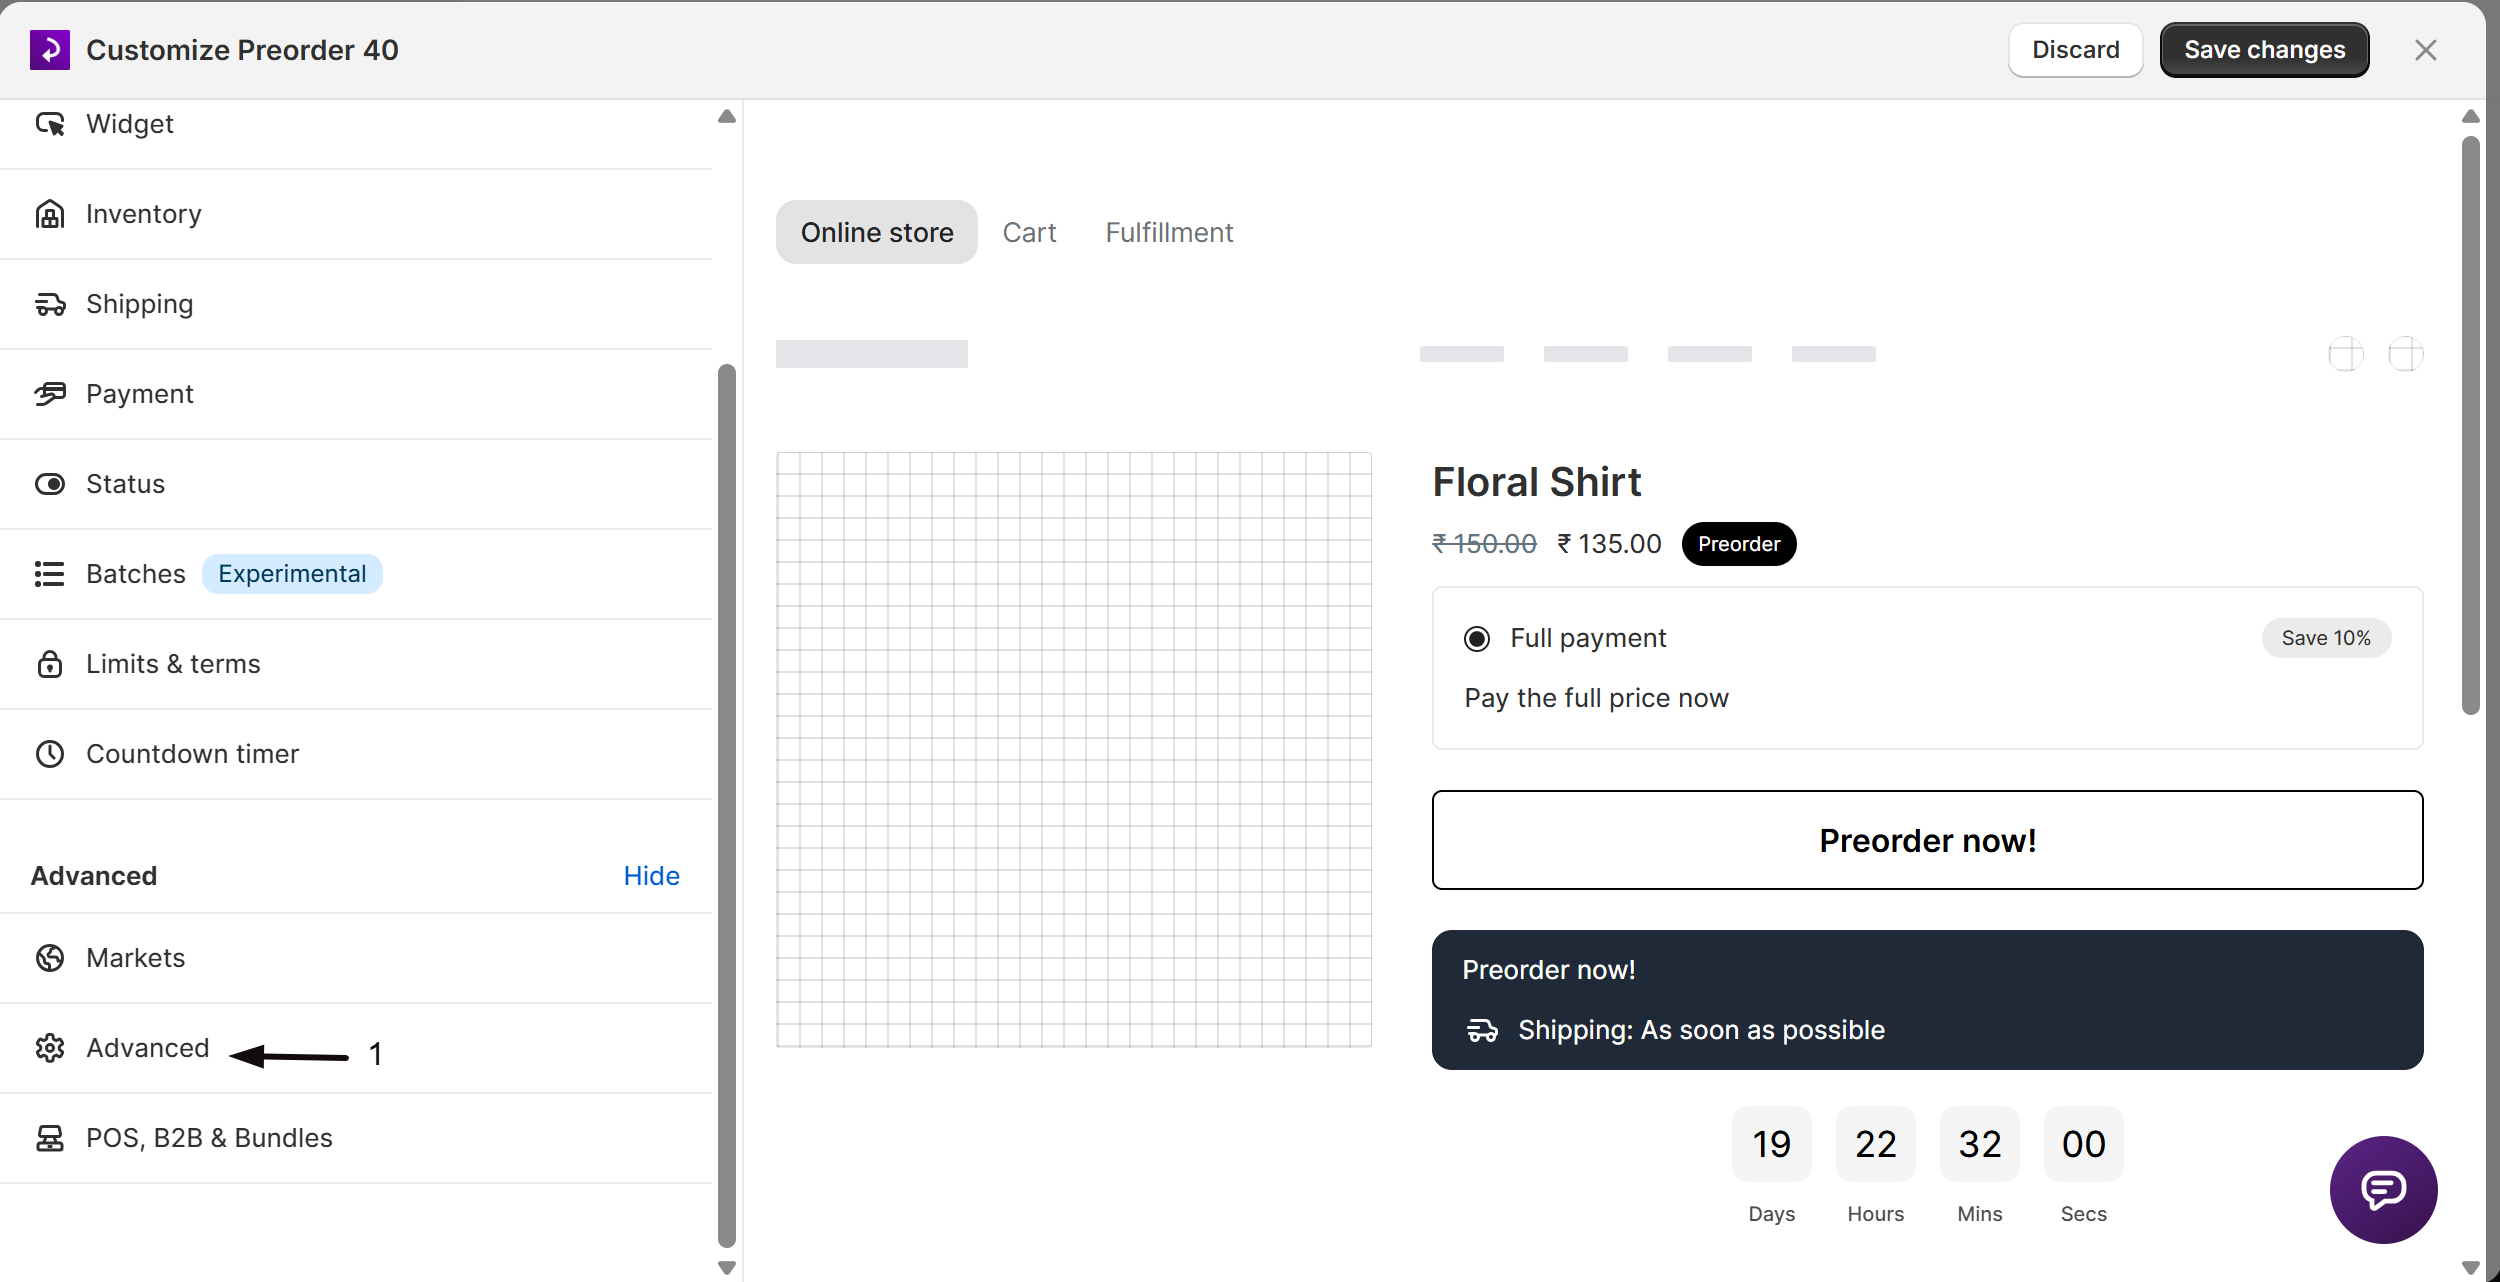
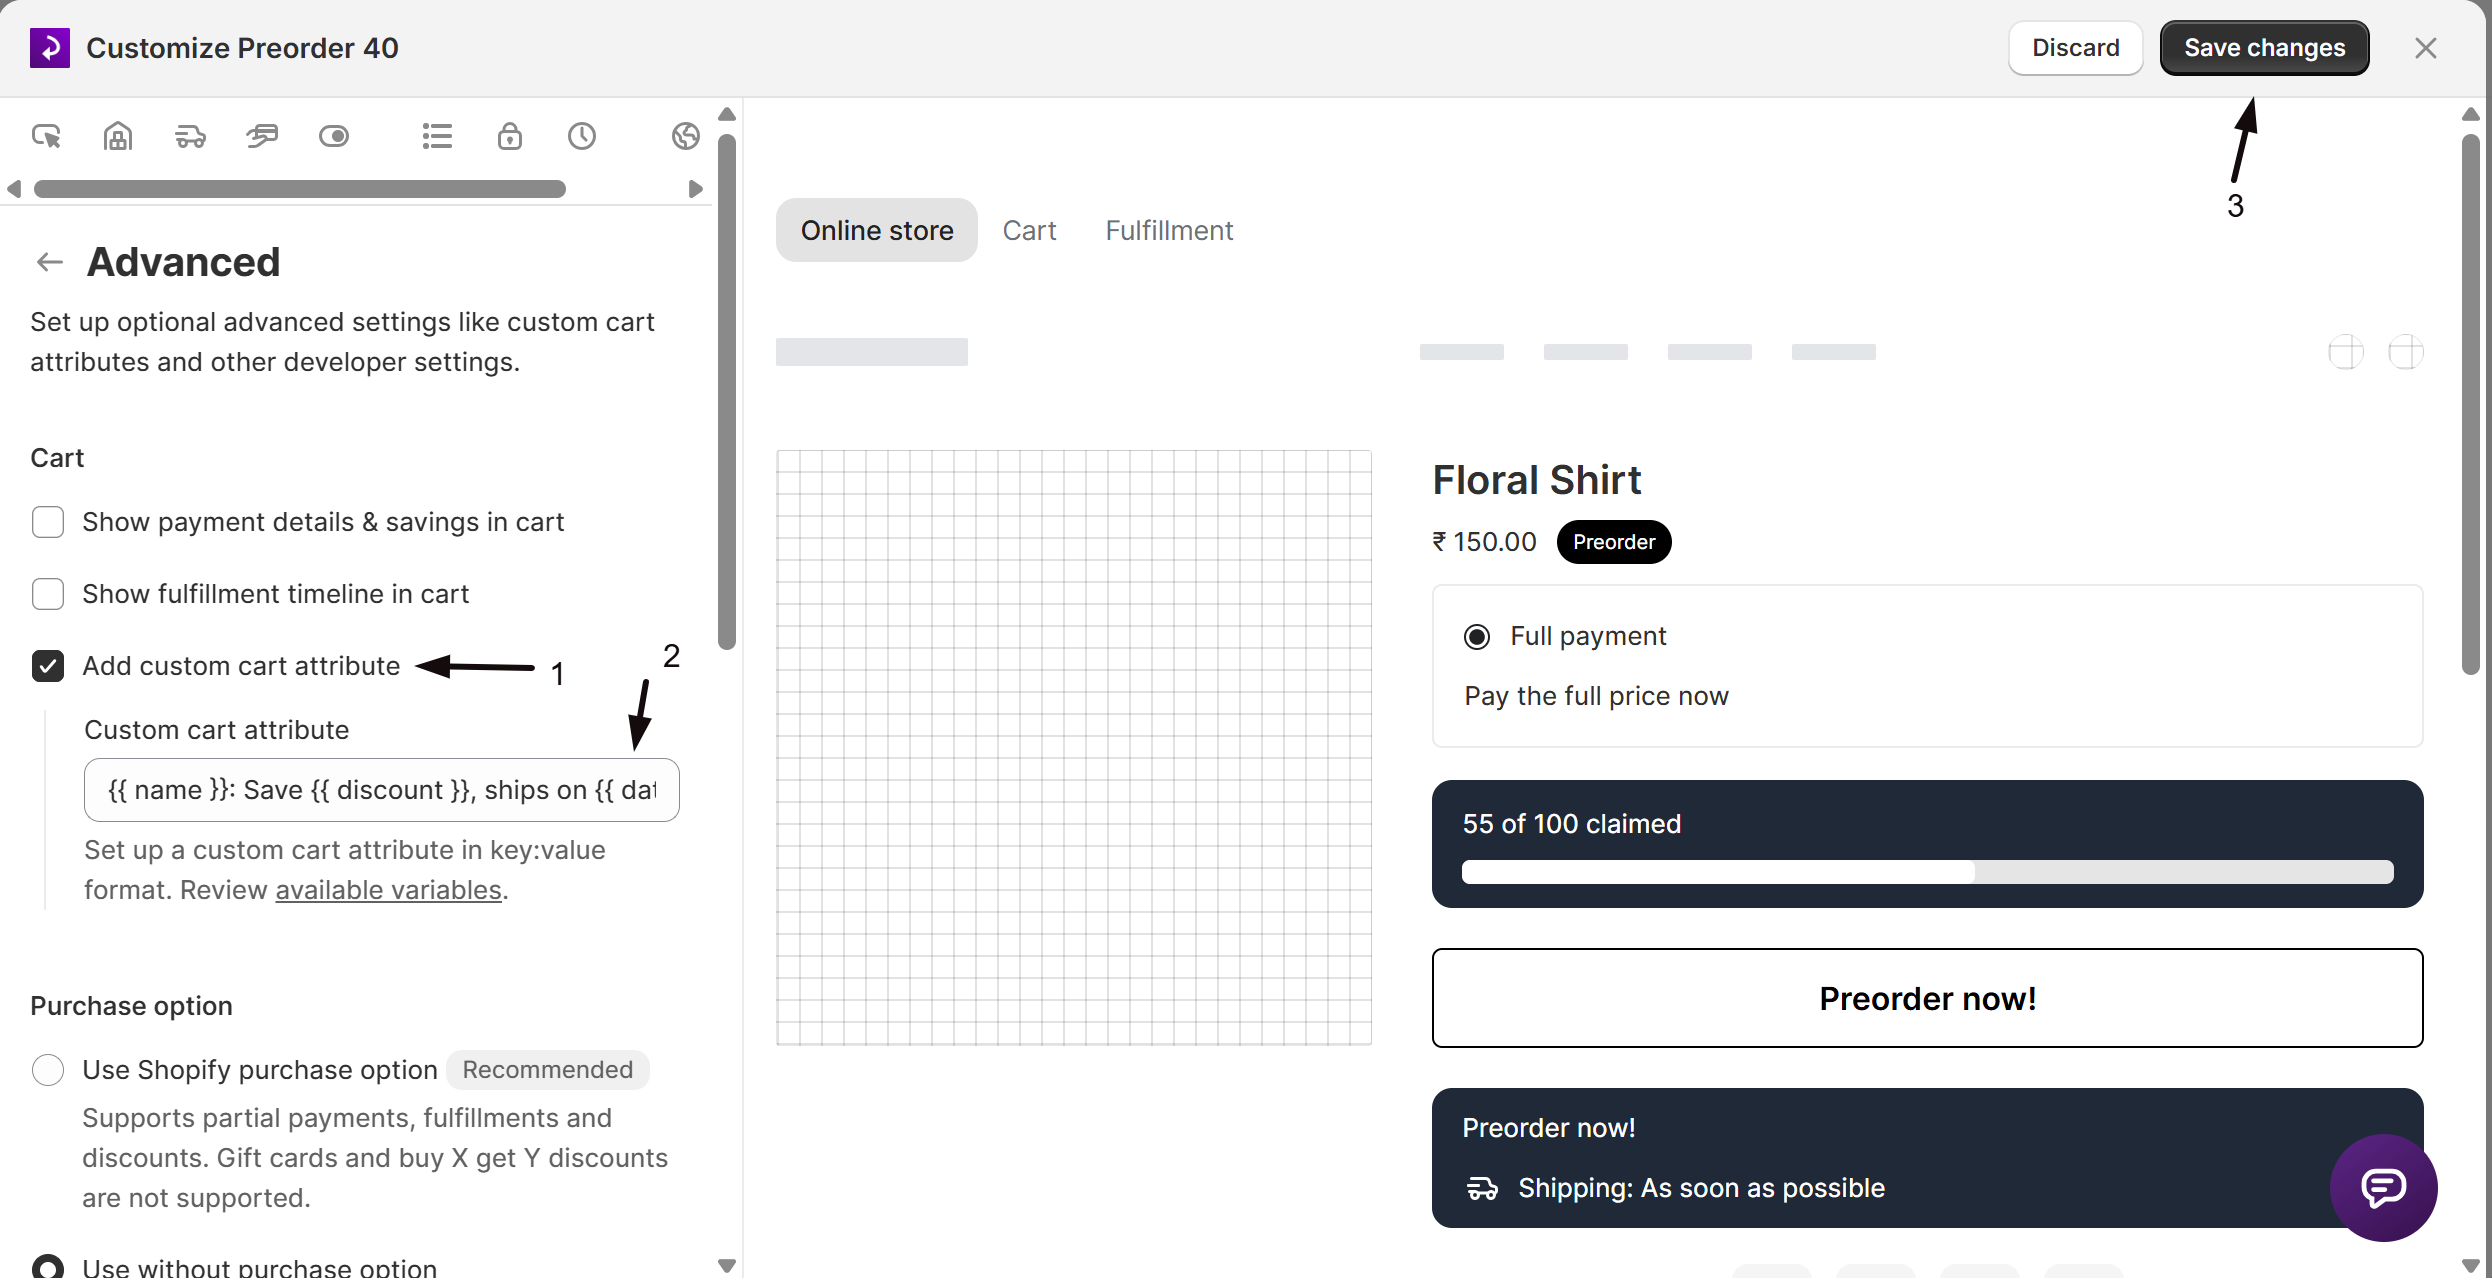
In the editor's settings list, click More settings to expand it, then click Advanced (gear icon). More settings is collapsed by default, so Advanced isn't visible until you expand it. The panel opens with four subsections: Cart, Purchase option, Currency & custom styles, and Developer settings.
Cart
Three checkboxes control what STOQ writes to each order line item in the cart:
| Setting | What it does |
|---|---|
| Show payment details & savings in cart | Adds a cart property showing the payment breakdown and any discount amount for this offer |
| Show fulfillment timeline in cart | Adds a cart property with the fulfillment timeline. Disabled automatically when Show shipping timeline is turned off in the Widget section, you must re-enable that setting first |
| Add custom cart attribute | Writes a freeform key:value property, which you compose, to the cart line item. When enabled, a text field appears in the offer editor for you to type it. Customers don't fill it in |
When Add custom cart attribute is checked, enter your custom text using the placeholder format key: value. The default placeholder is:
{{ name }}: Save {{ discount }}, ships on {{ date }}Click available variables to open a modal listing every variable you can embed:
| Variable | Value |
|---|---|
{{ name }} | The offer name (e.g. Preorder) |
{{ date }} | Full fulfillment date or message (e.g. Dec 25, 2024 or Shipping: As soon as possible) |
{{ month_year }} | Month and year only (e.g. Dec 2024) |
{{ year }} | Year only (e.g. 2024) |
{{ days }} | Number of days after checkout (e.g. 7, 14, 30) |
{{ disclaimer }} | The disclaimer text set on this offer |
{{ payment }} | Payment amount or percentage, if applicable (e.g. $25.00 or 10%) |
{{ remaining }} | Remaining amount of payment, if applicable (e.g. $25.00) |
{{ discount }} | Discount amount or percentage, if applicable (e.g. $5.00 or 10%) |
Click Add to field next to any variable in the modal to append it to your custom attribute text. This custom cart attribute text is translated per language when multi-language is enabled on your store.
Purchase option
Select Use Shopify purchase option or Use without purchase option; see Choose your setup above for which to pick.
Switching from Use Shopify purchase option to Use without purchase option shows a confirmation dialog and immediately resets the offer's payment and fulfillment settings (see Choose your setup above). Confirm you're ready before switching.
Currency and custom styles
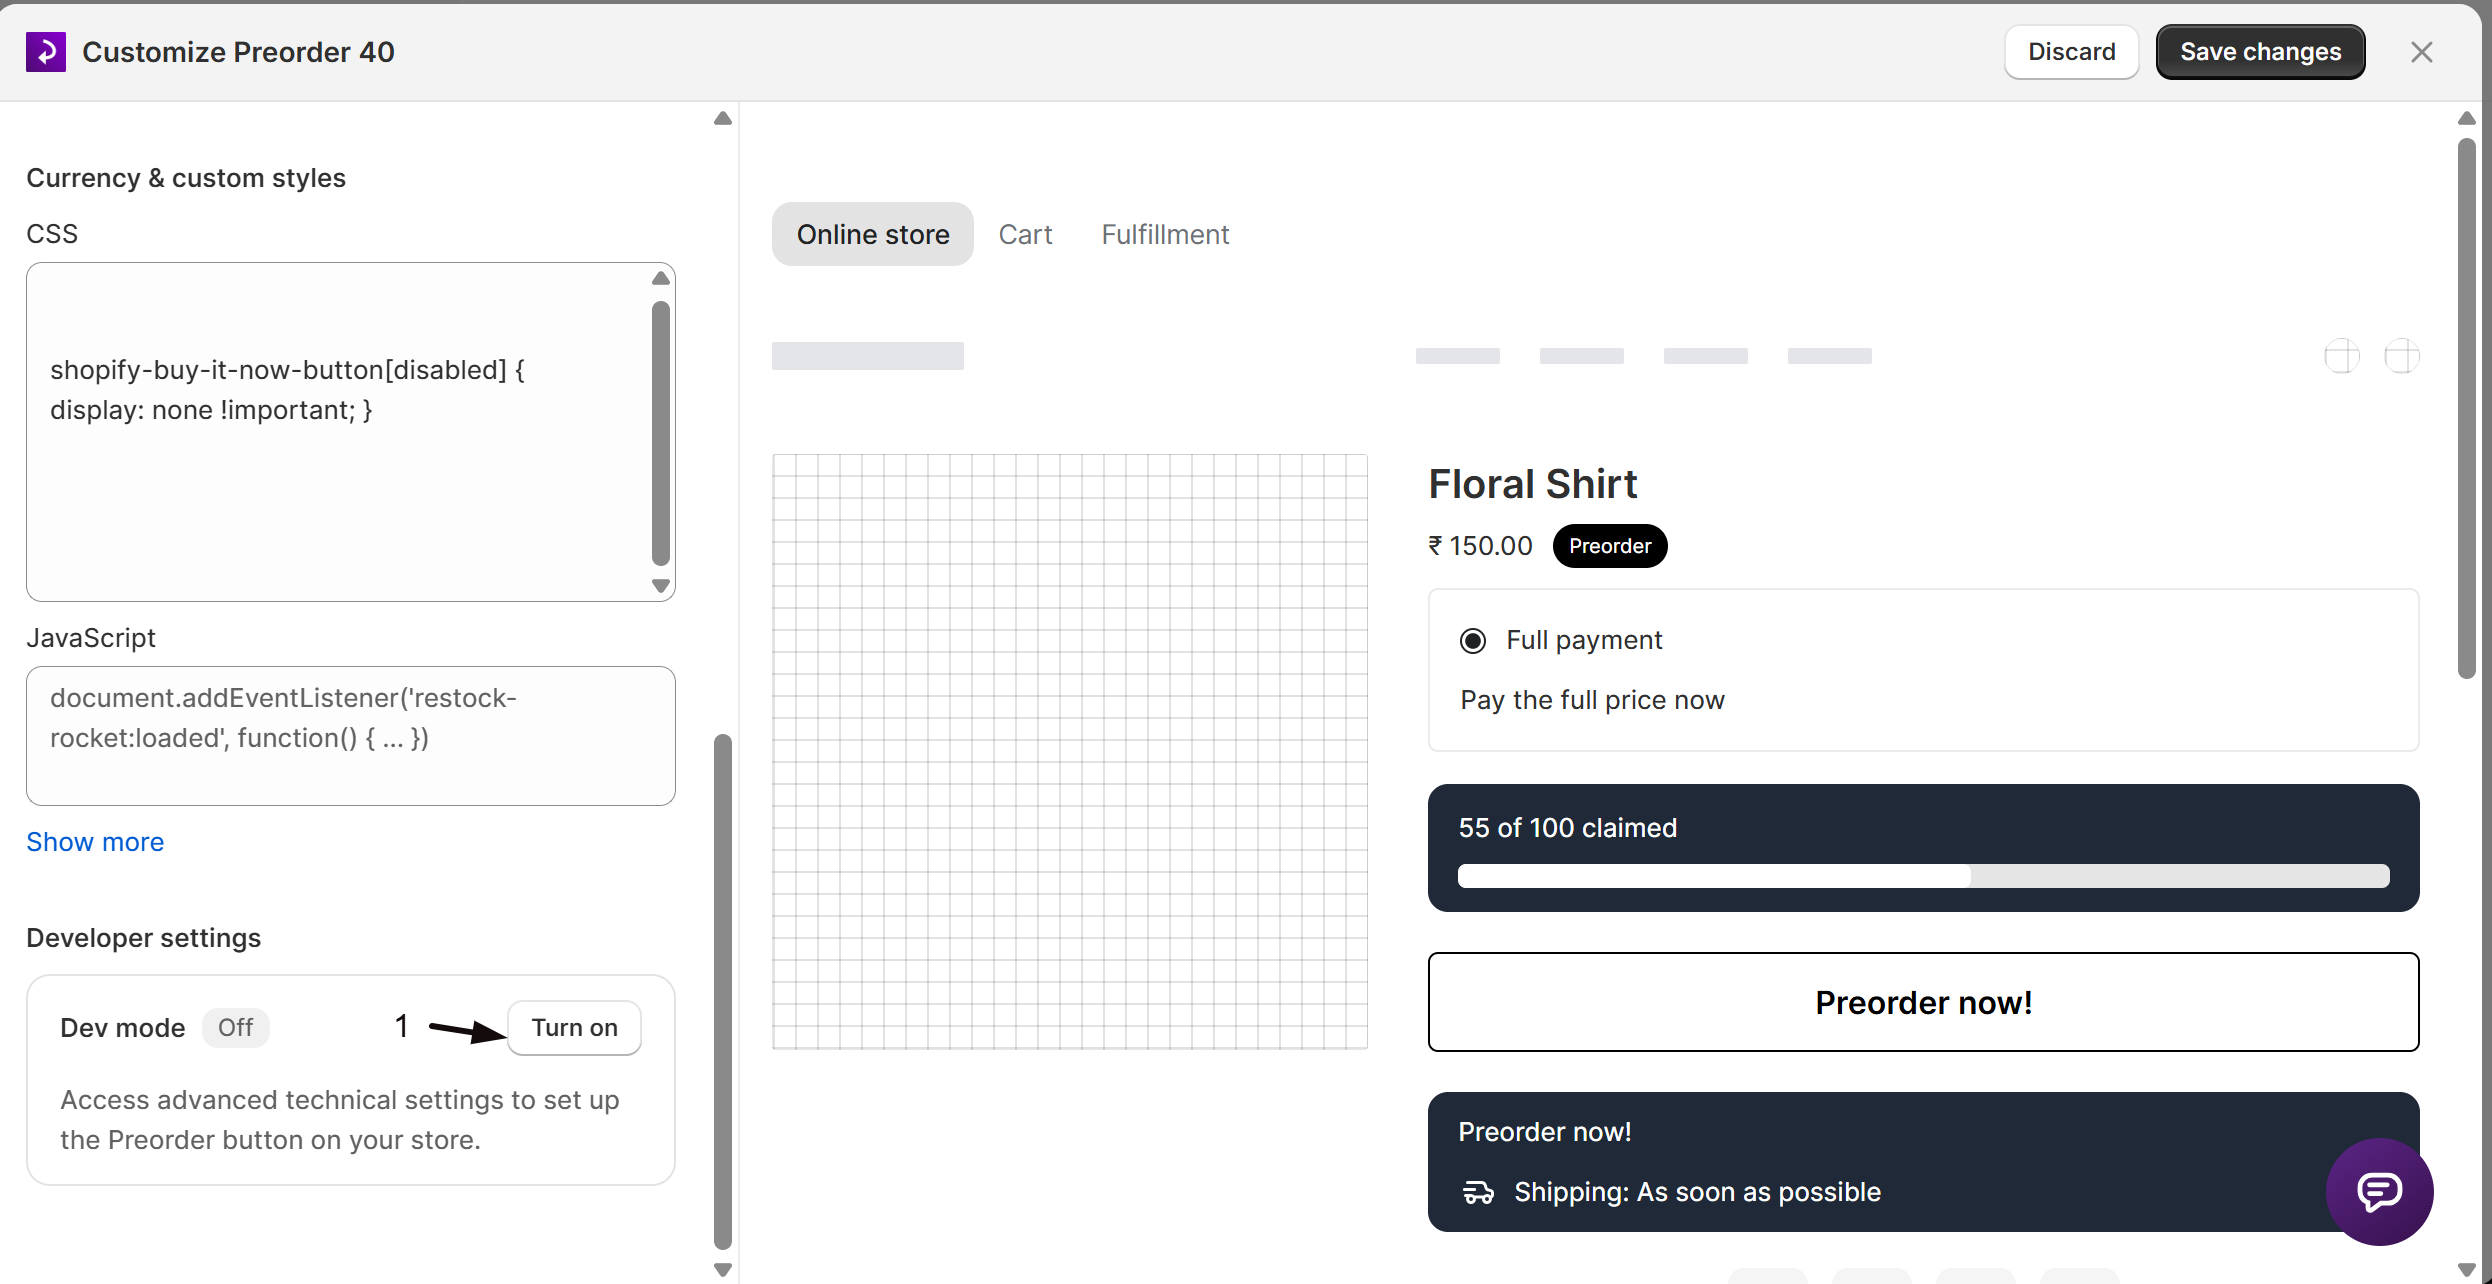
Enter any valid CSS to override the default preorder widget styles. The STOQ preorder button element uses the class .restock-rocket-preorder-button. Changes take effect after you save and refresh your storefront. For the full list of class names you can target, see Customize preorder elements with CSS.
.restock-rocket-preorder-button { ... }The CSS field is stored on your shop settings, not the individual offer. Any CSS you enter here applies to the preorder widget across all offers on your store.
Enter JavaScript that runs on the storefront. Use the restock-rocket:loaded event to hook in after the preorder widget initialises:
document.addEventListener('restock-rocket:loaded', function() { ... })Like the CSS field, this JavaScript field is stored on your shop settings and runs on every product page with a preorder widget, not just the offer you're currently editing.
Click Show more to reveal five additional text override fields. These are shop-wide defaults; they apply whenever the preorder widget is in the corresponding state.
| Field | Default | What it affects |
|---|---|---|
| Currency format | {{amount}} {{currency}} | How prices are displayed in the preorder widget. Supports {{currency}}, {{currency_symbol}}, and Shopify amount variables (link in the help text) |
| Out of stock text | Out of stock | Text shown on the button when the preorder limit is reached and the product becomes sold out |
| Add to cart text | Add to cart | Text on the button when the product is in stock and not in a preorder state |
| Continue button text | Continue | Text on the Continue button inside the preorder confirmation modal |
| Cancel button text | Cancel | Text on the Cancel button inside the preorder confirmation modal |
These fields are translatable when multi-language is enabled. To override button text for a single offer instead, use the per-offer Button text field in the Widget section.
Developer settings
Turn on Dev mode to access a set of advanced CSS selector fields that control exactly where STOQ inserts preorder widget elements on product pages. By default, STOQ locates the Add to cart button automatically; use Dev mode only if your theme's markup doesn't match the defaults and preorder elements are appearing in the wrong place.
When Dev mode is enabled, the following product page selectors appear inside a highlighted panel:
| Selector field | Purpose | Example default |
|---|---|---|
| Form section | The <form> element containing the Add to cart button | form[action='/cart/add'] |
| 'Add to cart' button | The button element inside the form that STOQ replaces with the Preorder button | button[type='submit'] |
| 'Add to cart' text selector | The child element that holds the button label text | span |
| Disclaimer position | Where to insert the preorder disclaimer text relative to a target element | None |
| Payment options position | Where to insert the payment options block, if enabled | None |
| Terms position | Where to insert the terms checkbox, if enabled | None |
| Badge position | Where to insert the preorder badge, if enabled | .product-title |
| Countdown timer position | Where to insert the countdown timer. Leave blank for the default position above the button | None |
| Progress bar position | Where to insert the inventory progress bar. Leave blank for default position above the button | None |
| Discounted price position | Where to insert the discounted price element, if enabled | .price__container |
| Original price section | The element containing the original product price | .price-regular |
Each position selector pairs with an Insertion type dropdown:
| Value | Meaning |
|---|---|
beforebegin | Before the target element (as a preceding sibling) |
afterbegin | As the first child inside the target element |
beforeend | As the last child inside the target element |
afterend | After the target element (as a following sibling) |
These selectors apply to all product pages for this shop. For collection, search, and other non-product pages, go to Preorders in the left menu, then the Settings tab, then the Pages sub-tab, and click Customize instead.
Check your setup
After saving, open your storefront product page and add a preorder item to the cart:
- If you enabled Show payment details & savings in cart or Show fulfillment timeline in cart, verify those values appear on the cart line item in the drawer and on the checkout cart page.
- If you added a custom cart attribute, confirm the key:value text shows in the cart attributes section of the order in Shopify admin after placing a test order.
- For CSS or JS changes, do a hard refresh on the storefront to clear any cached scripts.
- For Dev mode selector changes, confirm the button, disclaimer, badge, and other elements render in the intended locations.
Troubleshooting
Show fulfillment timeline in cart is greyed out
Turn on Show shipping timeline in the offer's Widget section first, then return to Advanced to enable it.
Your preorder button, badge, or other element is appearing in the wrong place on the product page
Turn on Dev mode under Developer settings and set the Form section and 'Add to cart' button selectors to match your theme's markup, using your browser's developer tools to find the right selectors.
Your CSS or JavaScript changes aren't showing up on the storefront
Hard refresh the page to clear cached scripts. The offer editor preview doesn't reflect CSS or JavaScript changes, only the live storefront does.
Scheduled fulfillment status is unavailable after turning off the purchase option
Scheduled requires the Shopify purchase option; switch back under Purchase option if you need it. On hold is different: you can still hold preorder fulfillments without the purchase option through STOQ's own hold. See Hold preorders without the Shopify purchase option.
A custom cart attribute isn't visible to customers
Check whether its key starts with an underscore (_). Shopify hides underscore-prefixed properties from the storefront cart and checkout; remove the underscore to make it customer-visible.
Limitations
- The CSS, JavaScript, and text override fields (Currency format, Out of stock text, Add to cart text, Continue button text, Cancel button text) are stored on your shop settings, not the individual offer, so they apply across every preorder offer on your store. Use the per-offer Button text field in the Widget section if you need different button text for one offer.
- Dev mode selector overrides apply to all product pages for this shop. For collection, search, and other non-product pages, use the Pages sub-tab under Preorders → Settings instead, then click Customize.
FAQ
Does adding a cart attribute notify the customer or charge them anything?
No. Cart attributes (line item properties) are data tags written to the order line. They appear in the cart and in Shopify admin but don't trigger any notification, email, or extra charge on their own.
Can customers type their own value into a custom cart attribute?
No. You compose the text in the offer editor, and STOQ writes the same key:value to every preorder line automatically. Customers don't fill it in, so it can't collect a per-customer value such as a chosen delivery date. The {{ date }} variable is the offer's fulfillment date, not a date the customer picks: STOQ has no customer-facing date picker.
Does switching to 'Use without purchase option' affect orders I've already placed?
No, only the offer's current payment and fulfillment settings. Existing orders keep the terms they were created with; you'll need to reconfigure payment and fulfillment on the offer going forward. See Choose your setup above.
My partial payment, discount, or scheduled ship date reset after I saved. Why?
Those three all rely on the Shopify purchase option, so they can't take effect on an offer set to Use without purchase option. STOQ clears them each time you save such an offer, rather than leave a setting in the editor that isn't doing anything. Switch to Use Shopify purchase option if you need any of them.
How do I hide a custom cart attribute from customers?
Start its key with an underscore, for example _Internal note: .... Shopify hides any line item property whose key starts with _ from the storefront cart and checkout; it still appears in the Shopify admin order detail and STOQ's internal tools.
Can I set different button or out-of-stock text for different offers?
Not from Advanced, its Add to cart text, Out of stock text, and modal button fields are shop-wide defaults. For a single offer, use the per-offer Button text field in the Widget section instead.
Related guides
Design the preorder widget
Customize button text, colors, badge, and disclaimer, the per-offer widget settings that pair with Advanced.
Preorder discounts
Set up offer-level discounts. Payment-specific discounts require the Shopify purchase option to be enabled.
Set up payment
Configure full payment, deposits, or deferred billing, options that interact with the purchase option setting.
Show the preorder button on store pages
Customize how and where the preorder button appears on collection, search, and other non-product pages.
Preorder countdown timer
Enable and position the countdown timer; the timer's CSS selector is also configurable in Dev mode.
Preorder multi-language
Translate cart attribute text and button overrides across all your store's active languages.