Design the preorder widget
Use this guide to customize what customers see on the product page before they click: the button text, optional custom colors, a badge, and a disclaimer message. By the end, customers will see your chosen button text, colors, badge, and disclaimer on preorder products, live as soon as you save.
Before you begin
- You need an offer already created. Open an existing offer (Preorders in the left menu → Offers tab → open your offer) or create one first, see Set up preorders.
- Changes here are per-offer and take effect immediately on the live storefront once you save.
What customers will see
The Widget settings render directly on the product page, replacing the theme's default "Add to cart" button and adding a badge and/or disclaimer next to it.
- Button: the "Add to cart" button's text is replaced with your Button text (default "Preorder"). If Use custom colors for button is on, the button's text and background colors are overridden with your chosen colors; otherwise it keeps the theme's default styling.
- Badge: if Add badge is on, a small label is inserted next to the product price, showing your Badge text, or the offer name if no badge text is set, styled with the badge's text and background colors.
- Disclaimer: if Add disclaimer is on, a styled text box appears near the button showing your disclaimer message, using the border radius, text color, and background color you set.
Exact placement depends on your theme: STOQ inserts the button, badge, and disclaimer next to existing theme elements, so spacing and position can vary between themes.
Set it up
On a phone, this menu is collapsed. In the Shopify mobile app, tap the STOQ logo at the top of the screen to open it, then choose the section named below. There is no hamburger icon. See Finding the STOQ menu.
Open the Widget section
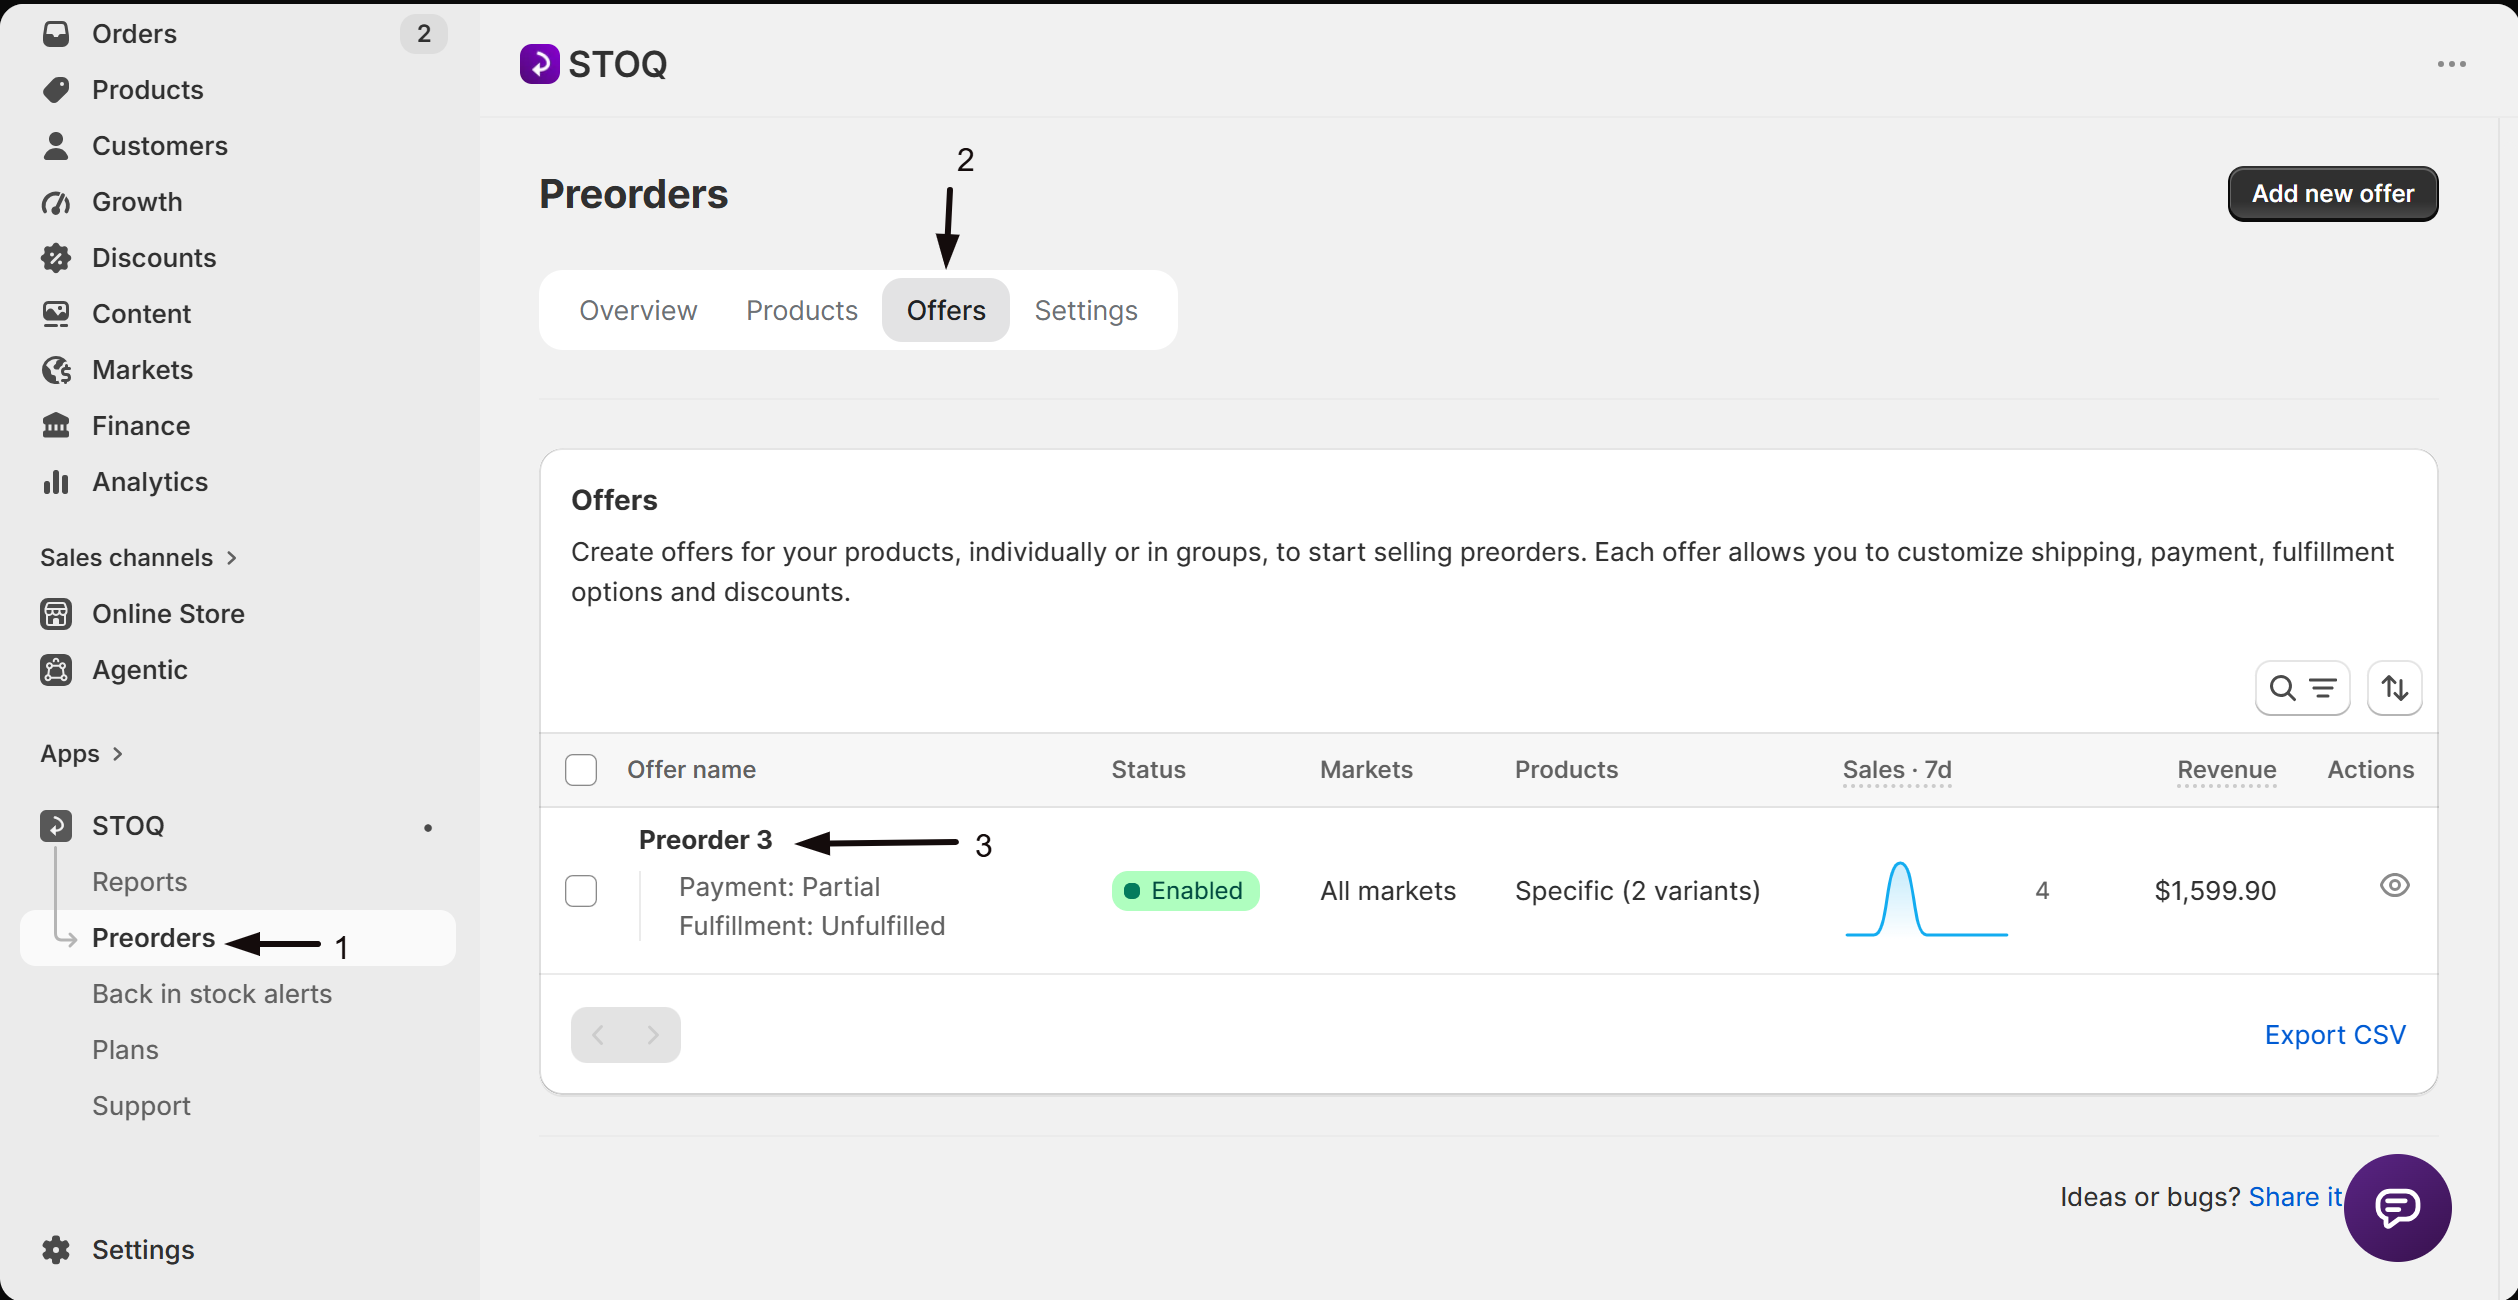
- In the left menu bar of the STOQ app, click Preorders.
- Click the Offers tab.
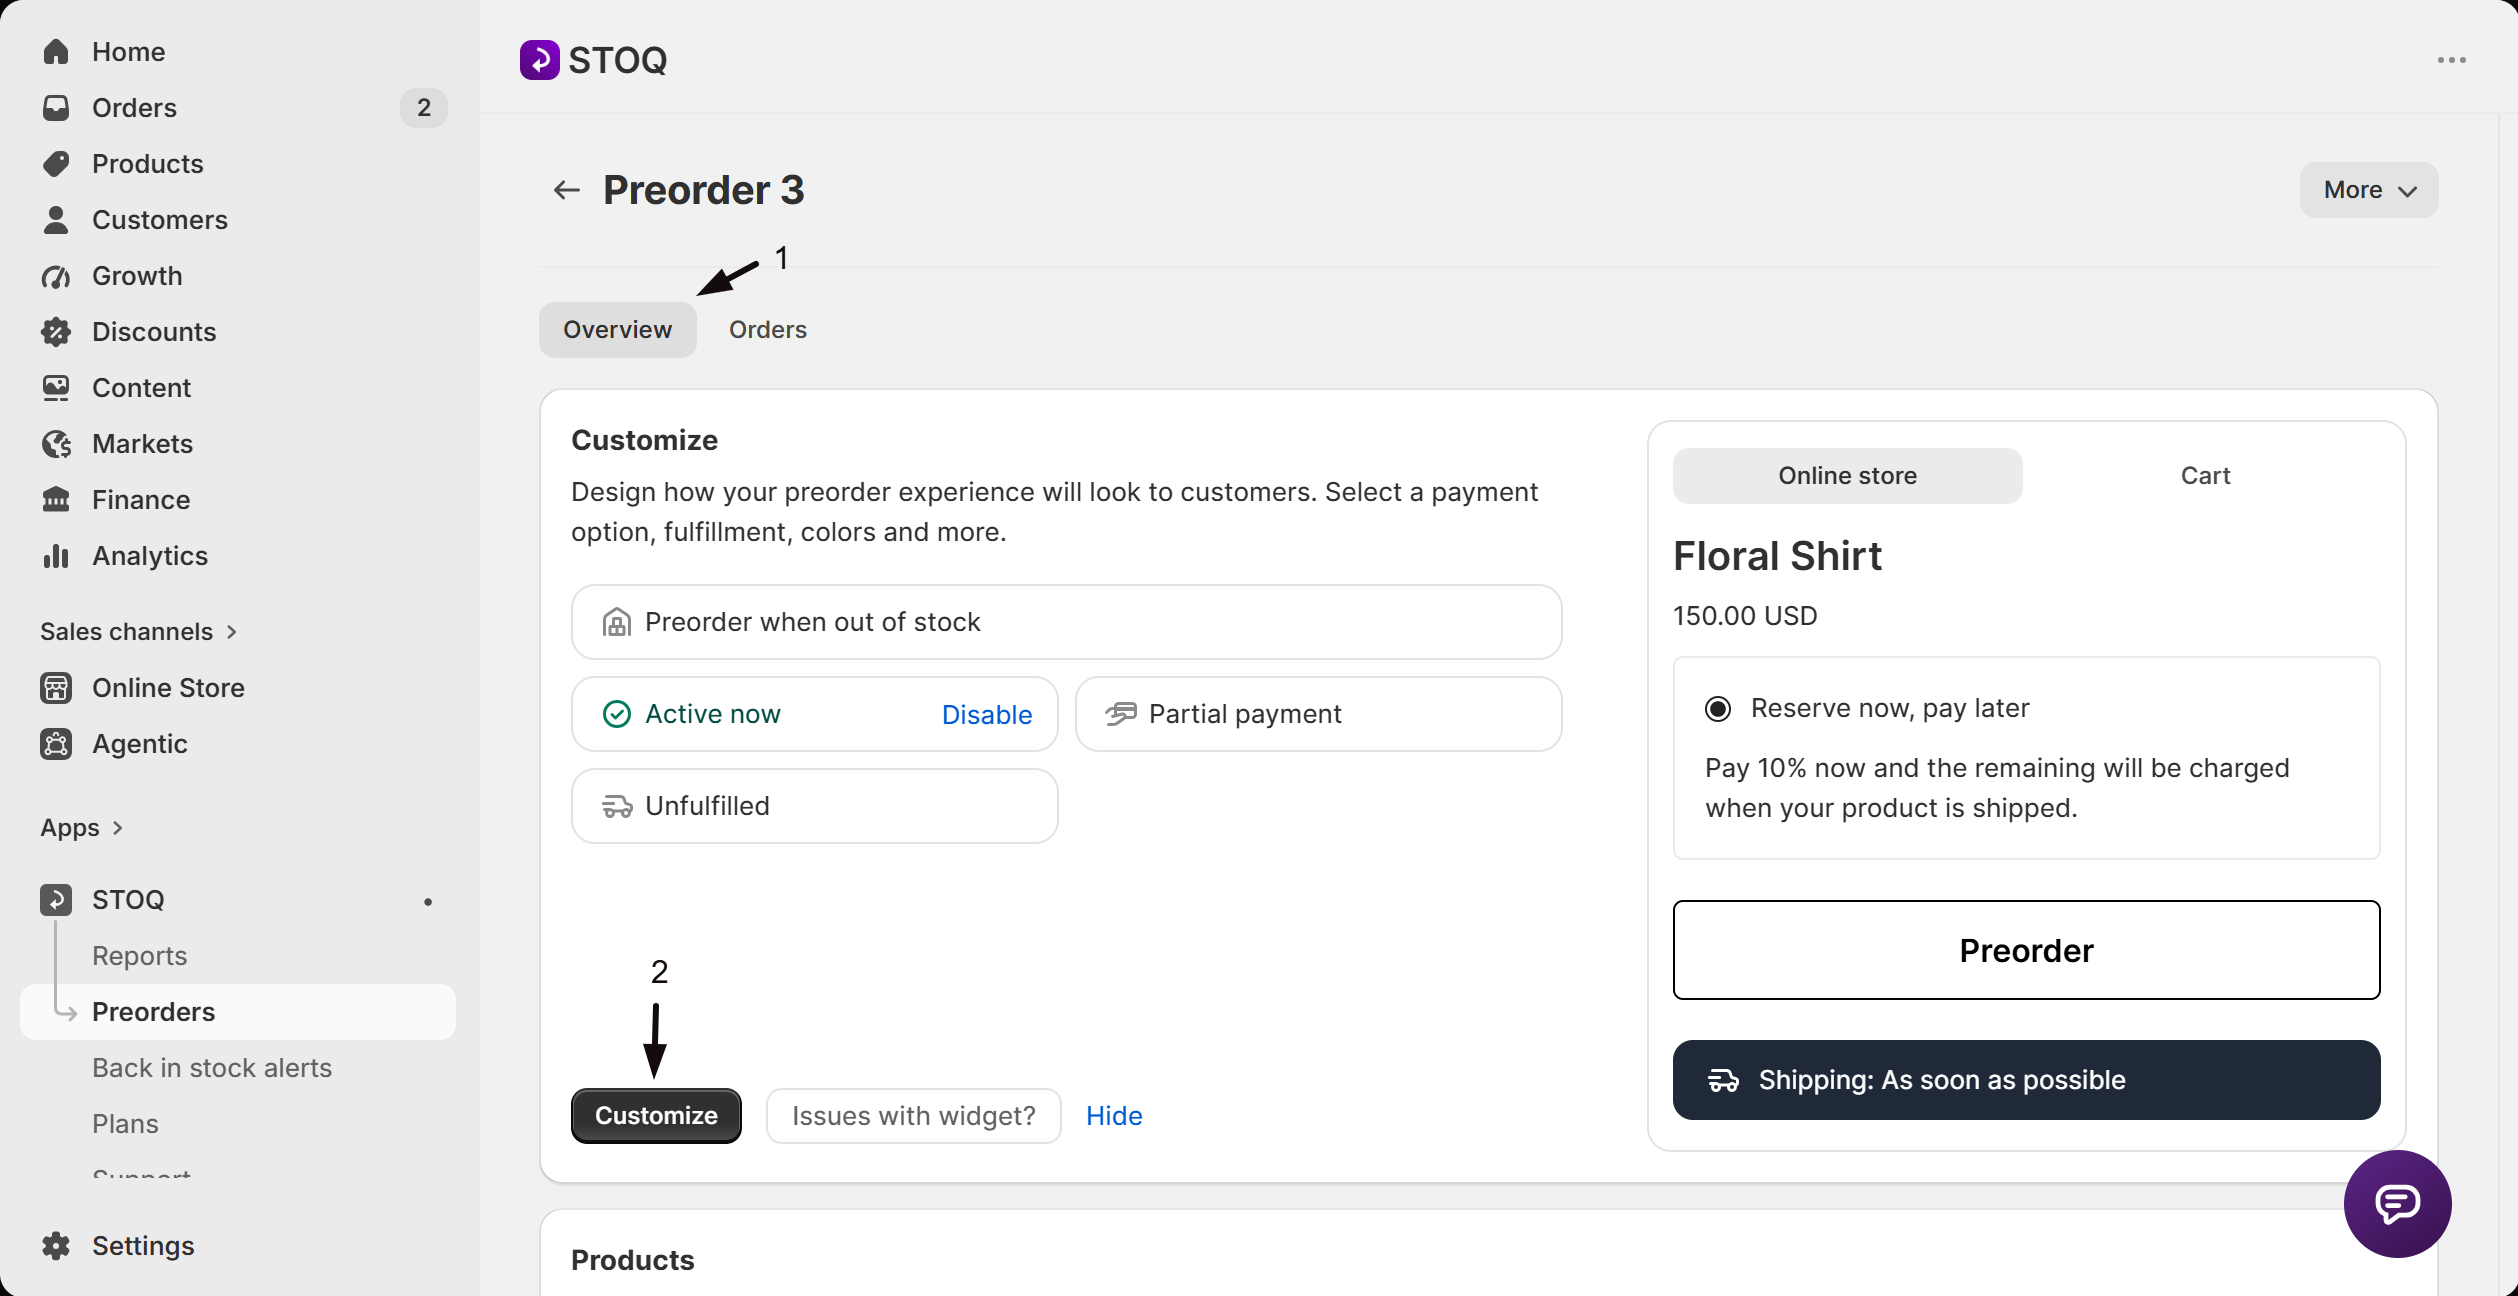
- Click the offer you want to edit. Its Overview tab opens, showing the Customize button, a live preview, and the offer's Products section.
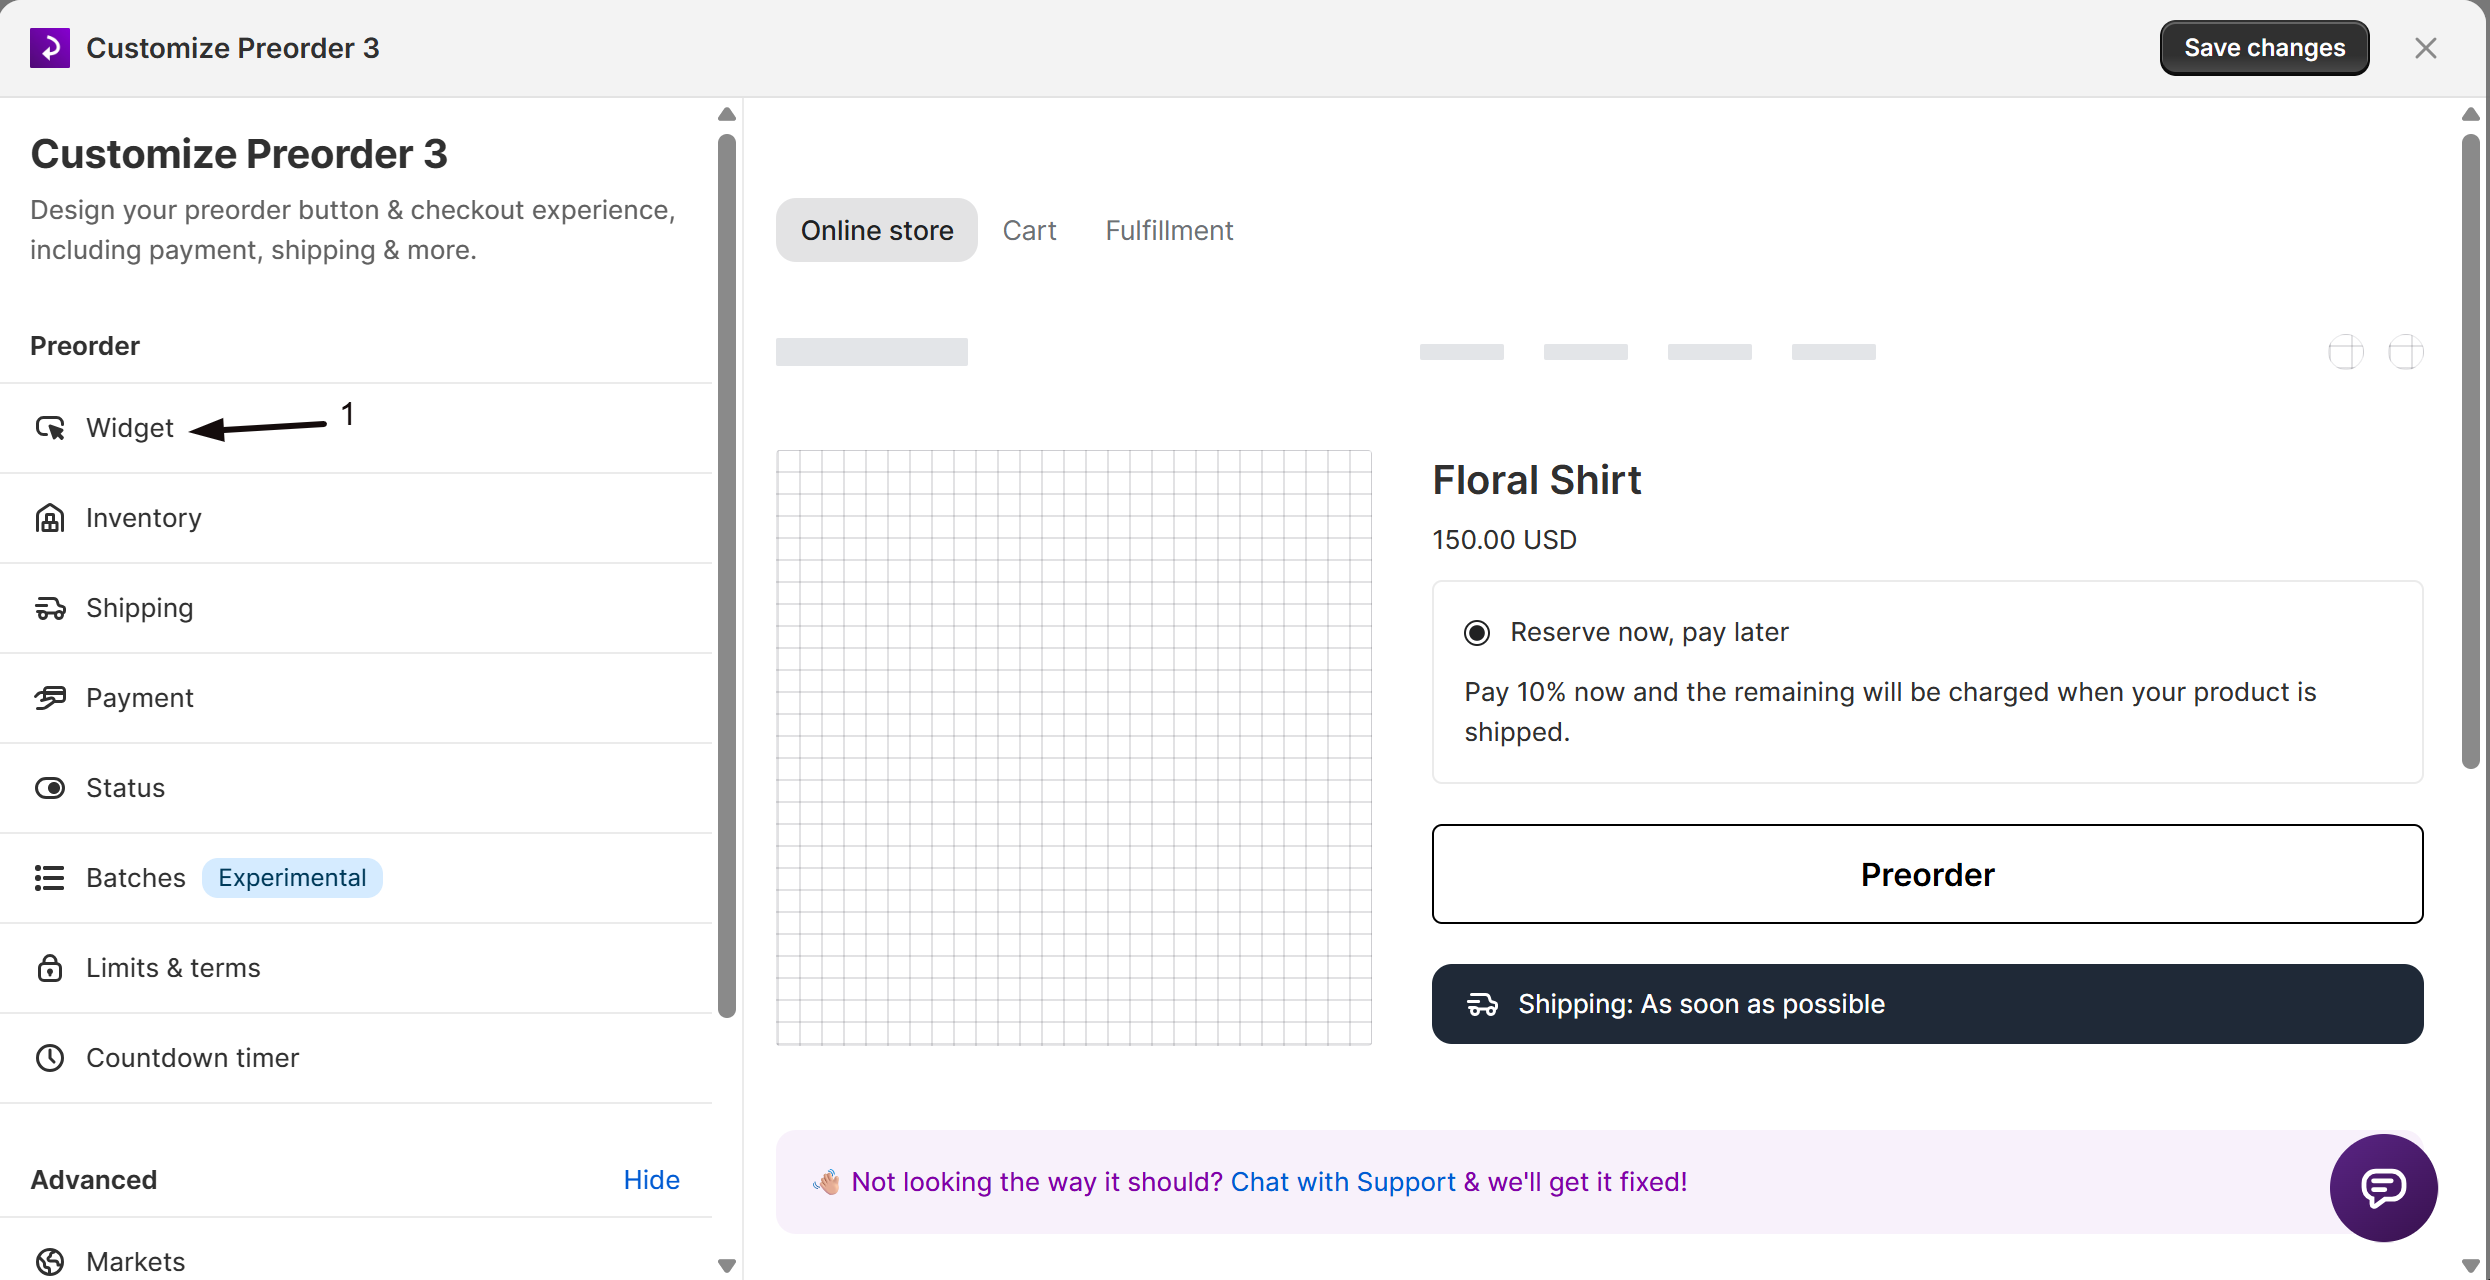
- Click Customize to open the editor, then in the editor's sidebar click Widget. The panel shows two groups of settings: Widget (button and colors) and Settings (names).
Set the button text
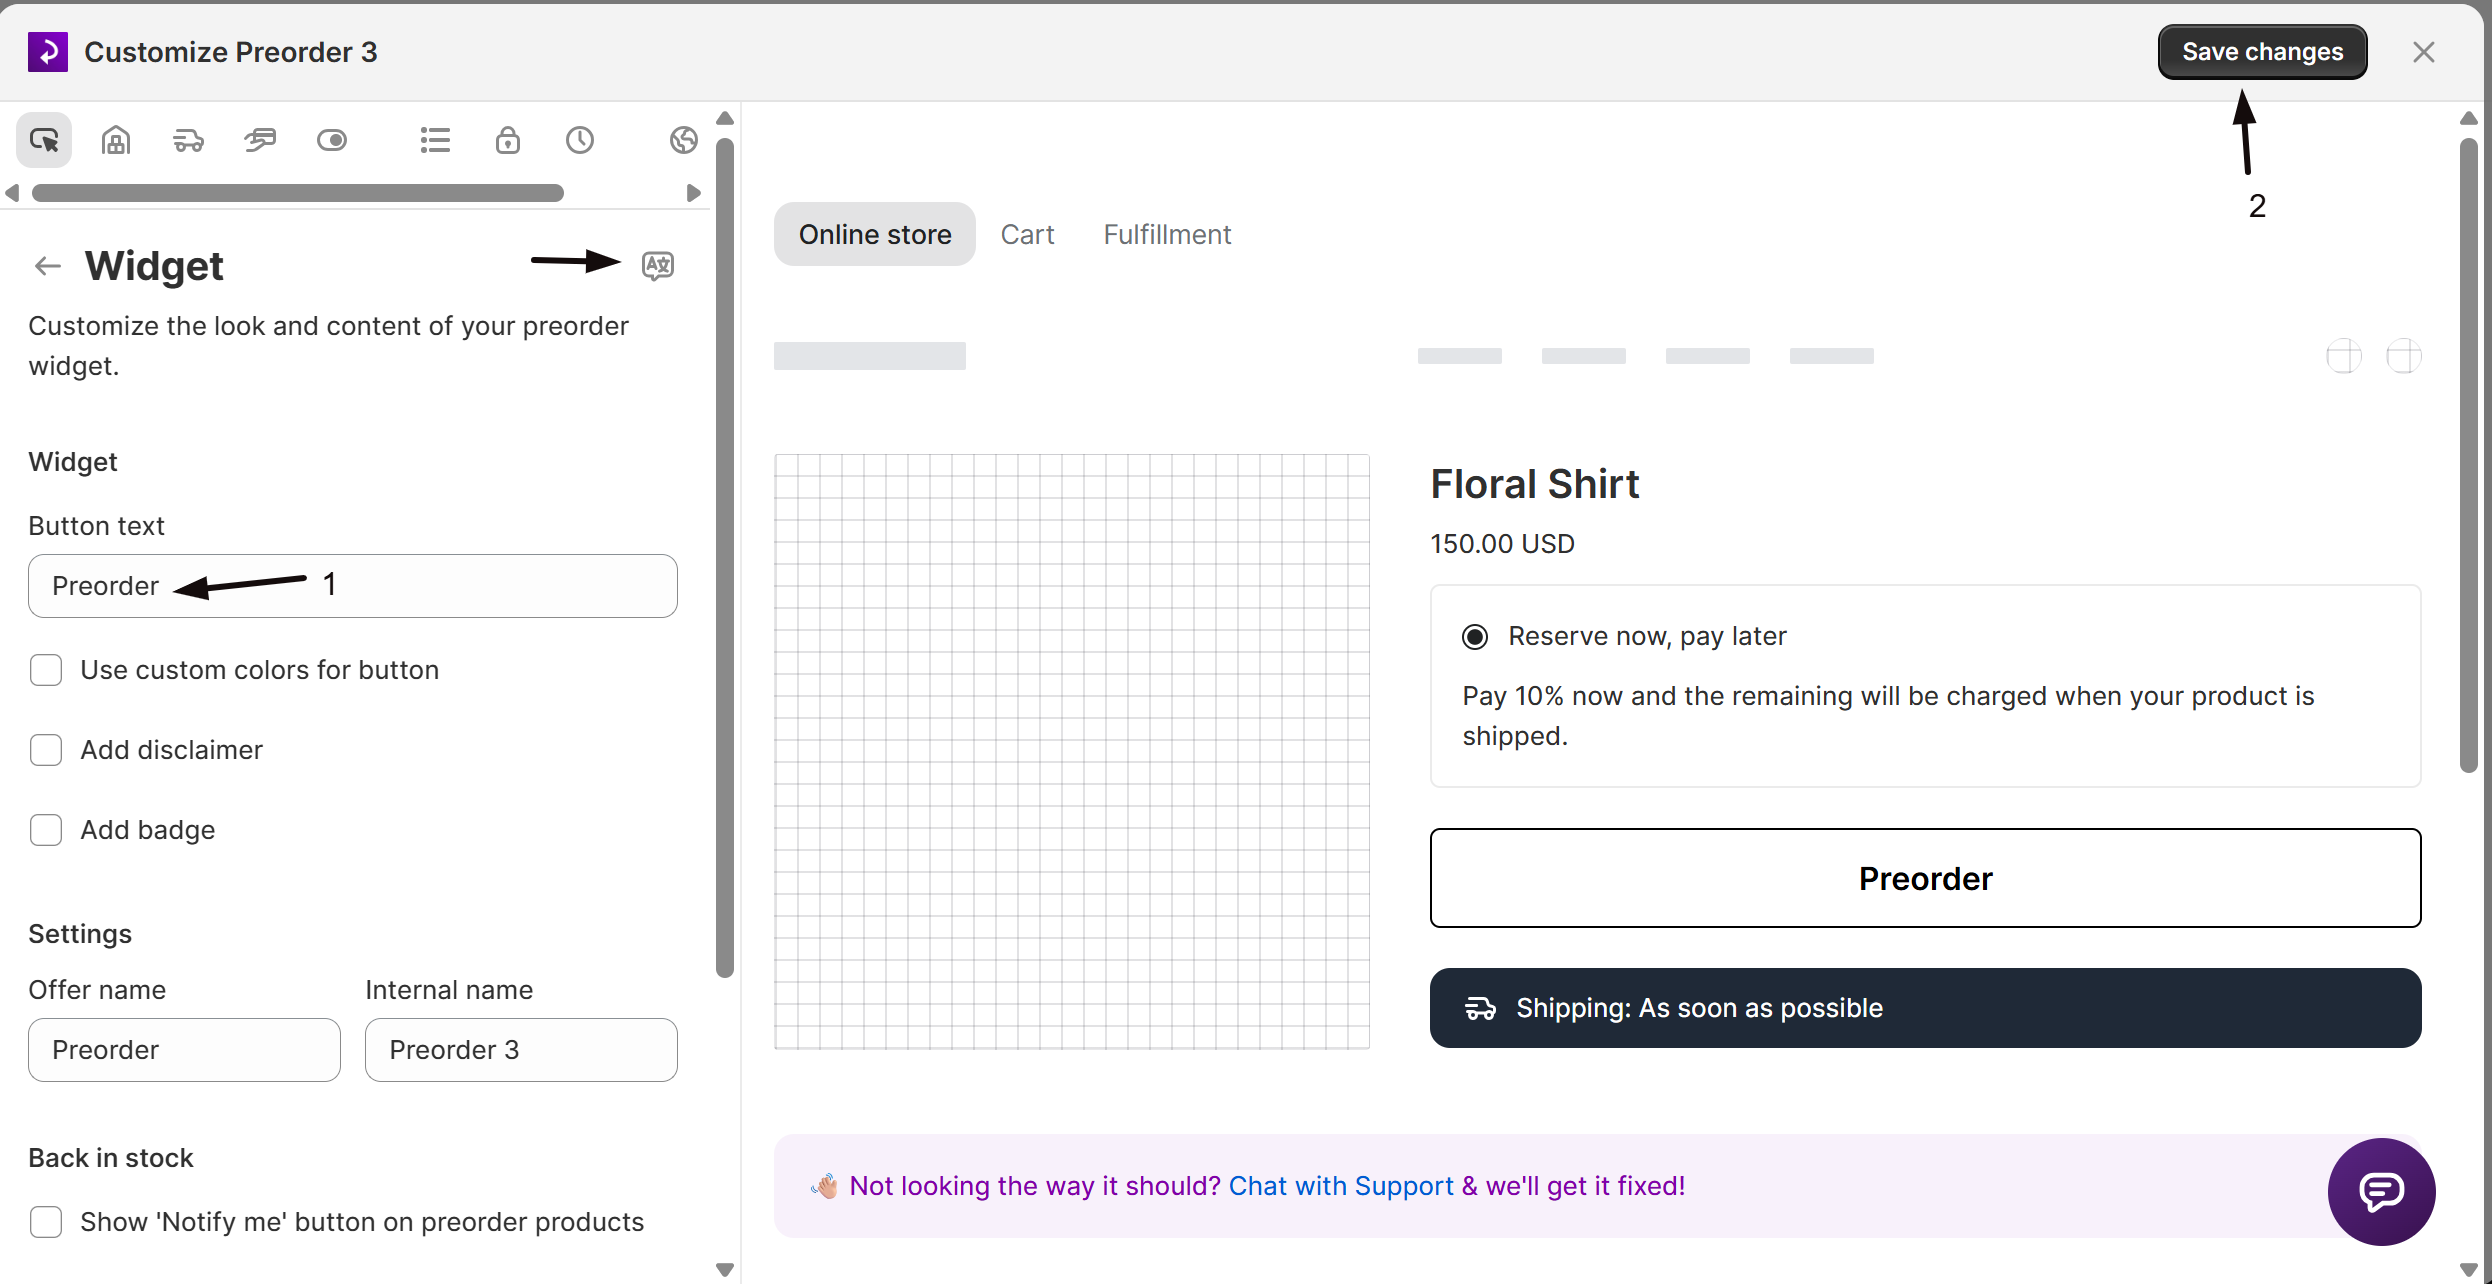
Under Widget, enter your text in the Button text field. The default is Preorder; this replaces "Add to cart" on products covered by the offer. This field is translatable: click the language icon at the top of the Widget panel to add translations for other locales.
(Optional) Customize button colors
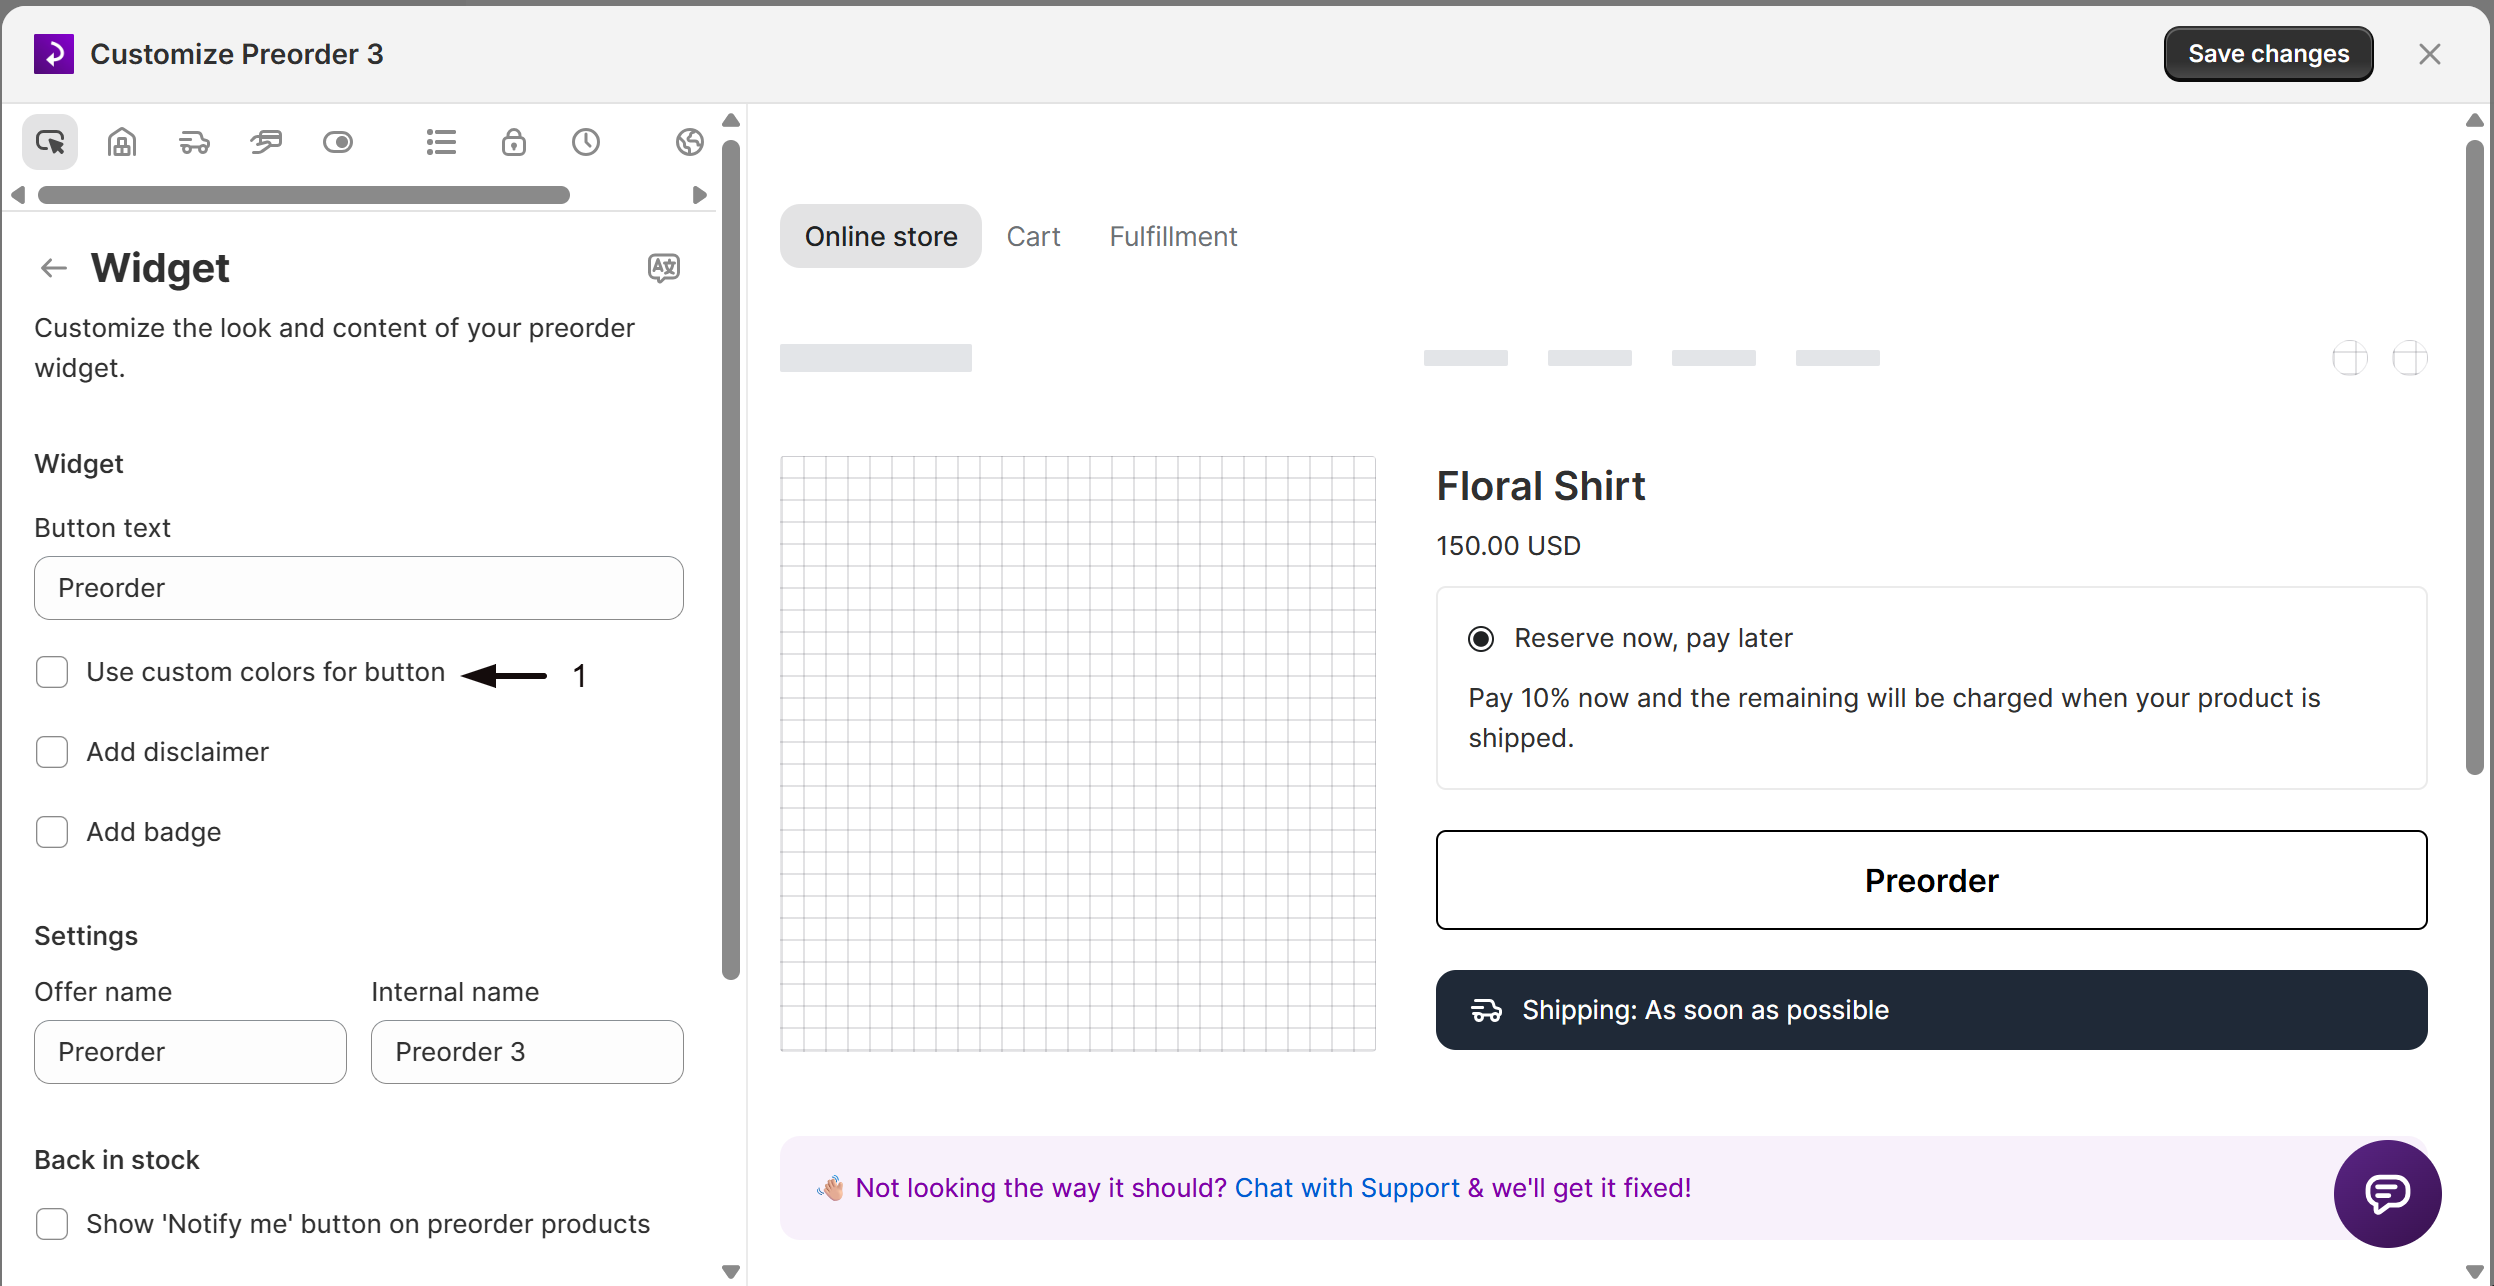
- Check Use custom colors for button.
- Click the Customize link that appears.
- Set the Text color and the Background color using the color swatches.
If left unchecked, the button keeps your theme's default colors and the custom color fields have no effect.
(Optional) Add a disclaimer
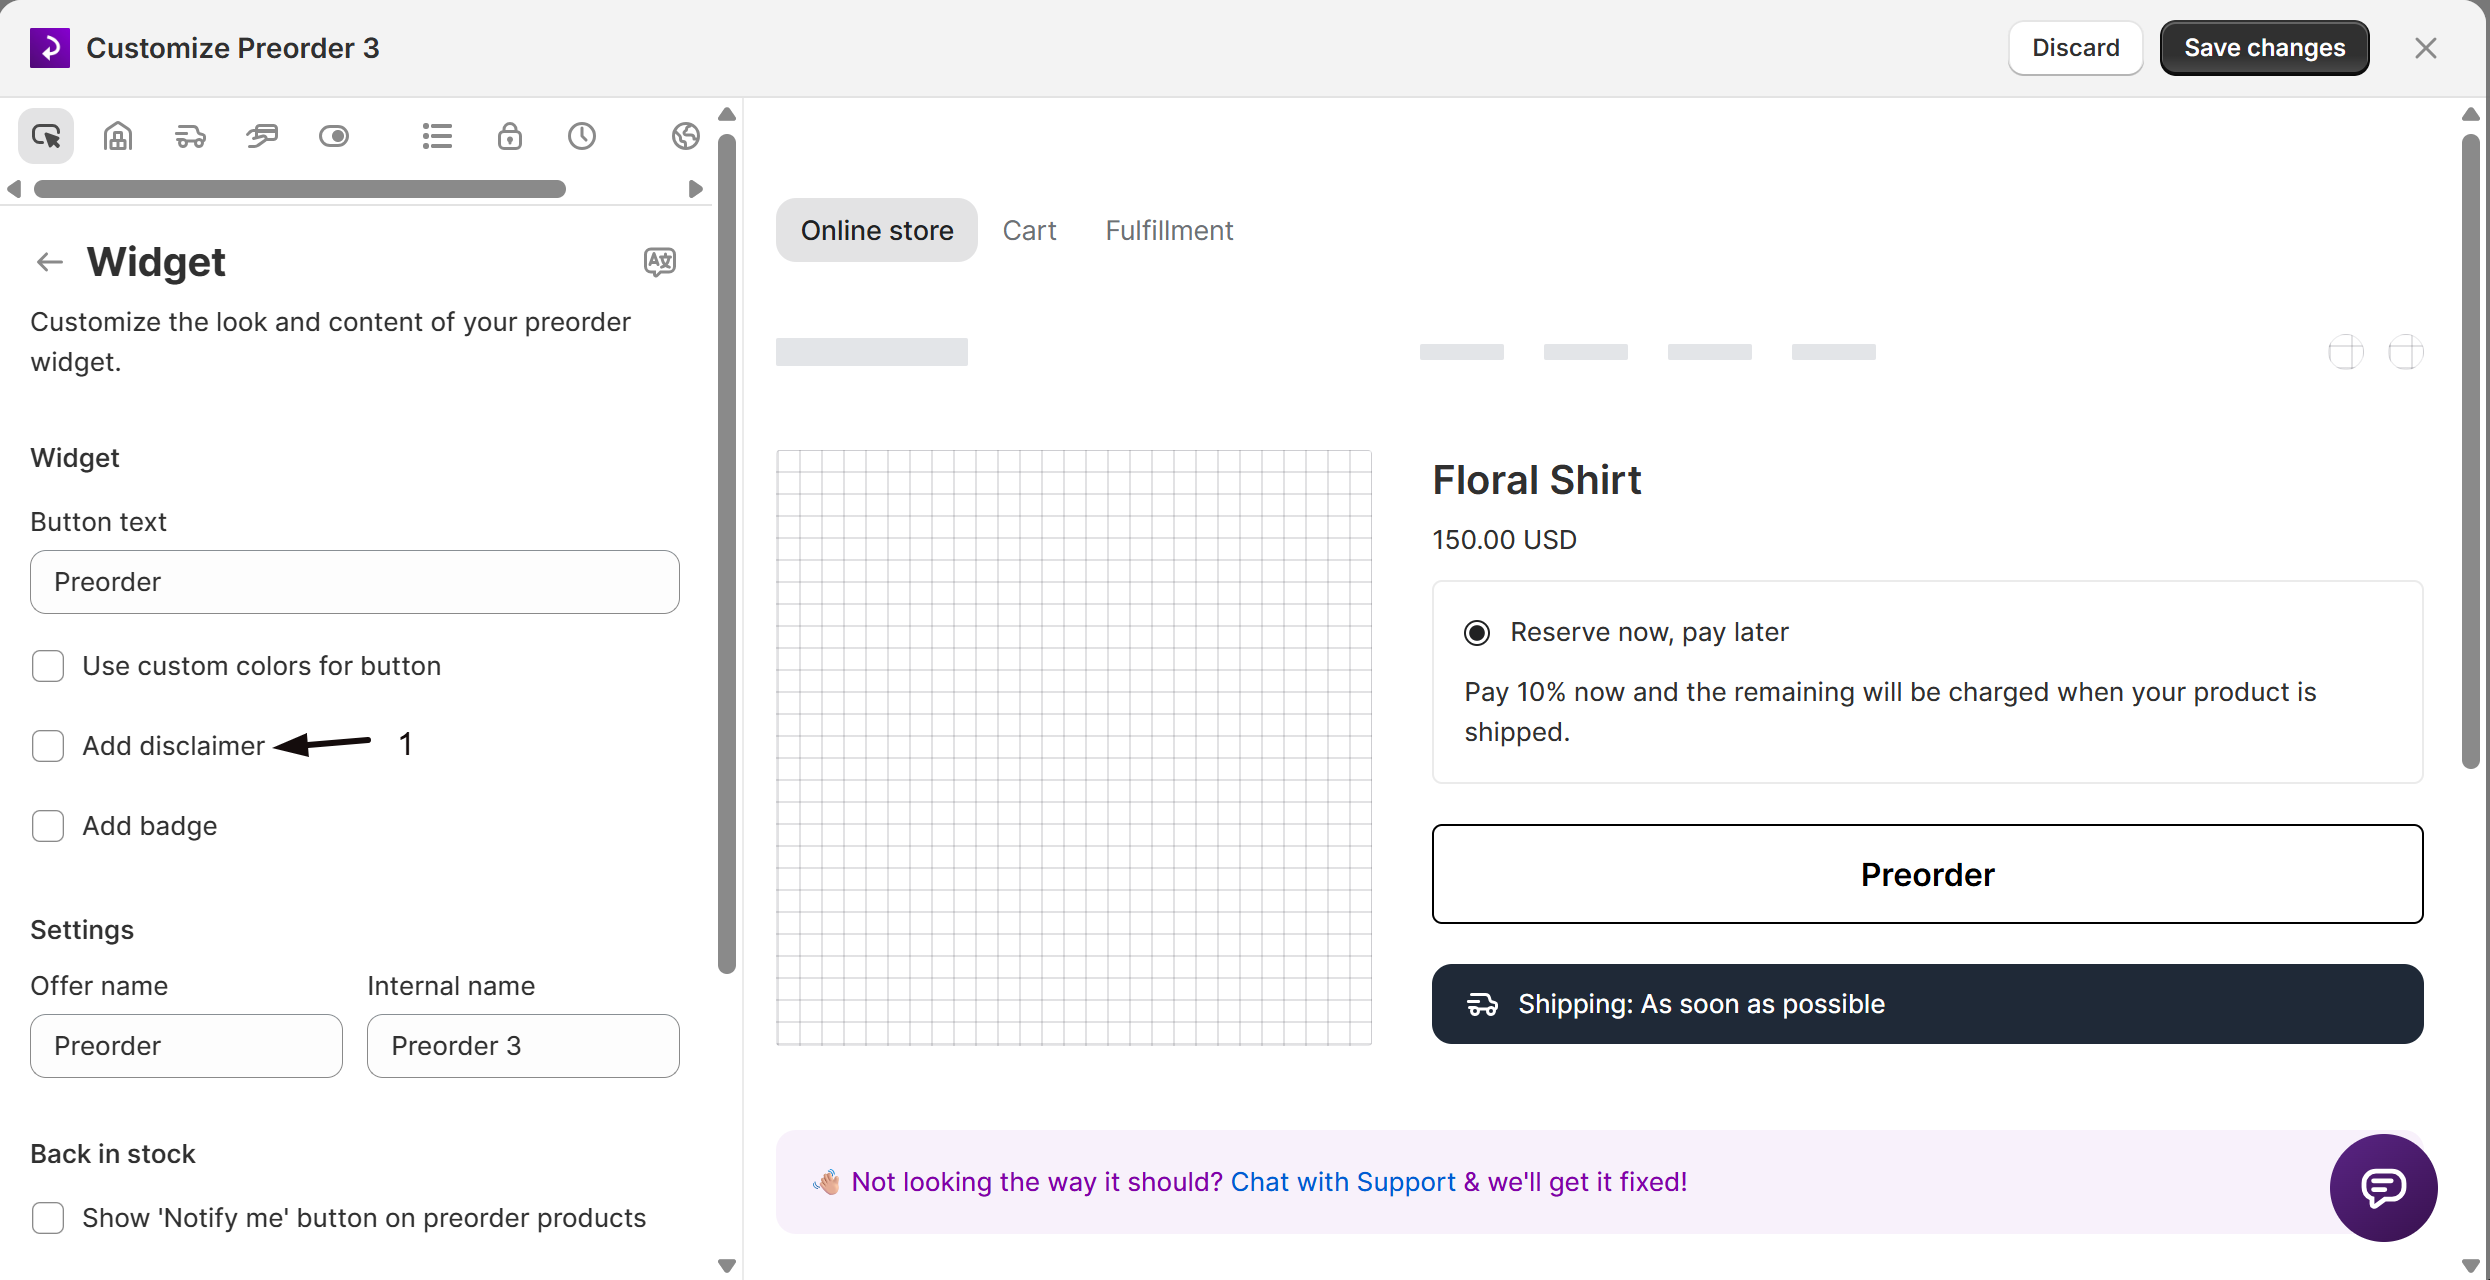
- Check Add disclaimer.
- Enter your message in the Disclaimer field that appears (for example, "This item will ship 30 days after you place the order"; the field supports multiple lines and is translatable via the language icon).
- Click Customize next to the disclaimer label to set:
| Control | What it does |
|---|---|
| Border radius | Rounds the corners of the disclaimer box (in pixels; default 10) |
| Text color | Sets the disclaimer text color |
| Background color | Sets the disclaimer box background color |
The Background color also fills the container behind a preorder progress bar, even when the disclaimer is turned off.
(Optional) Add a badge
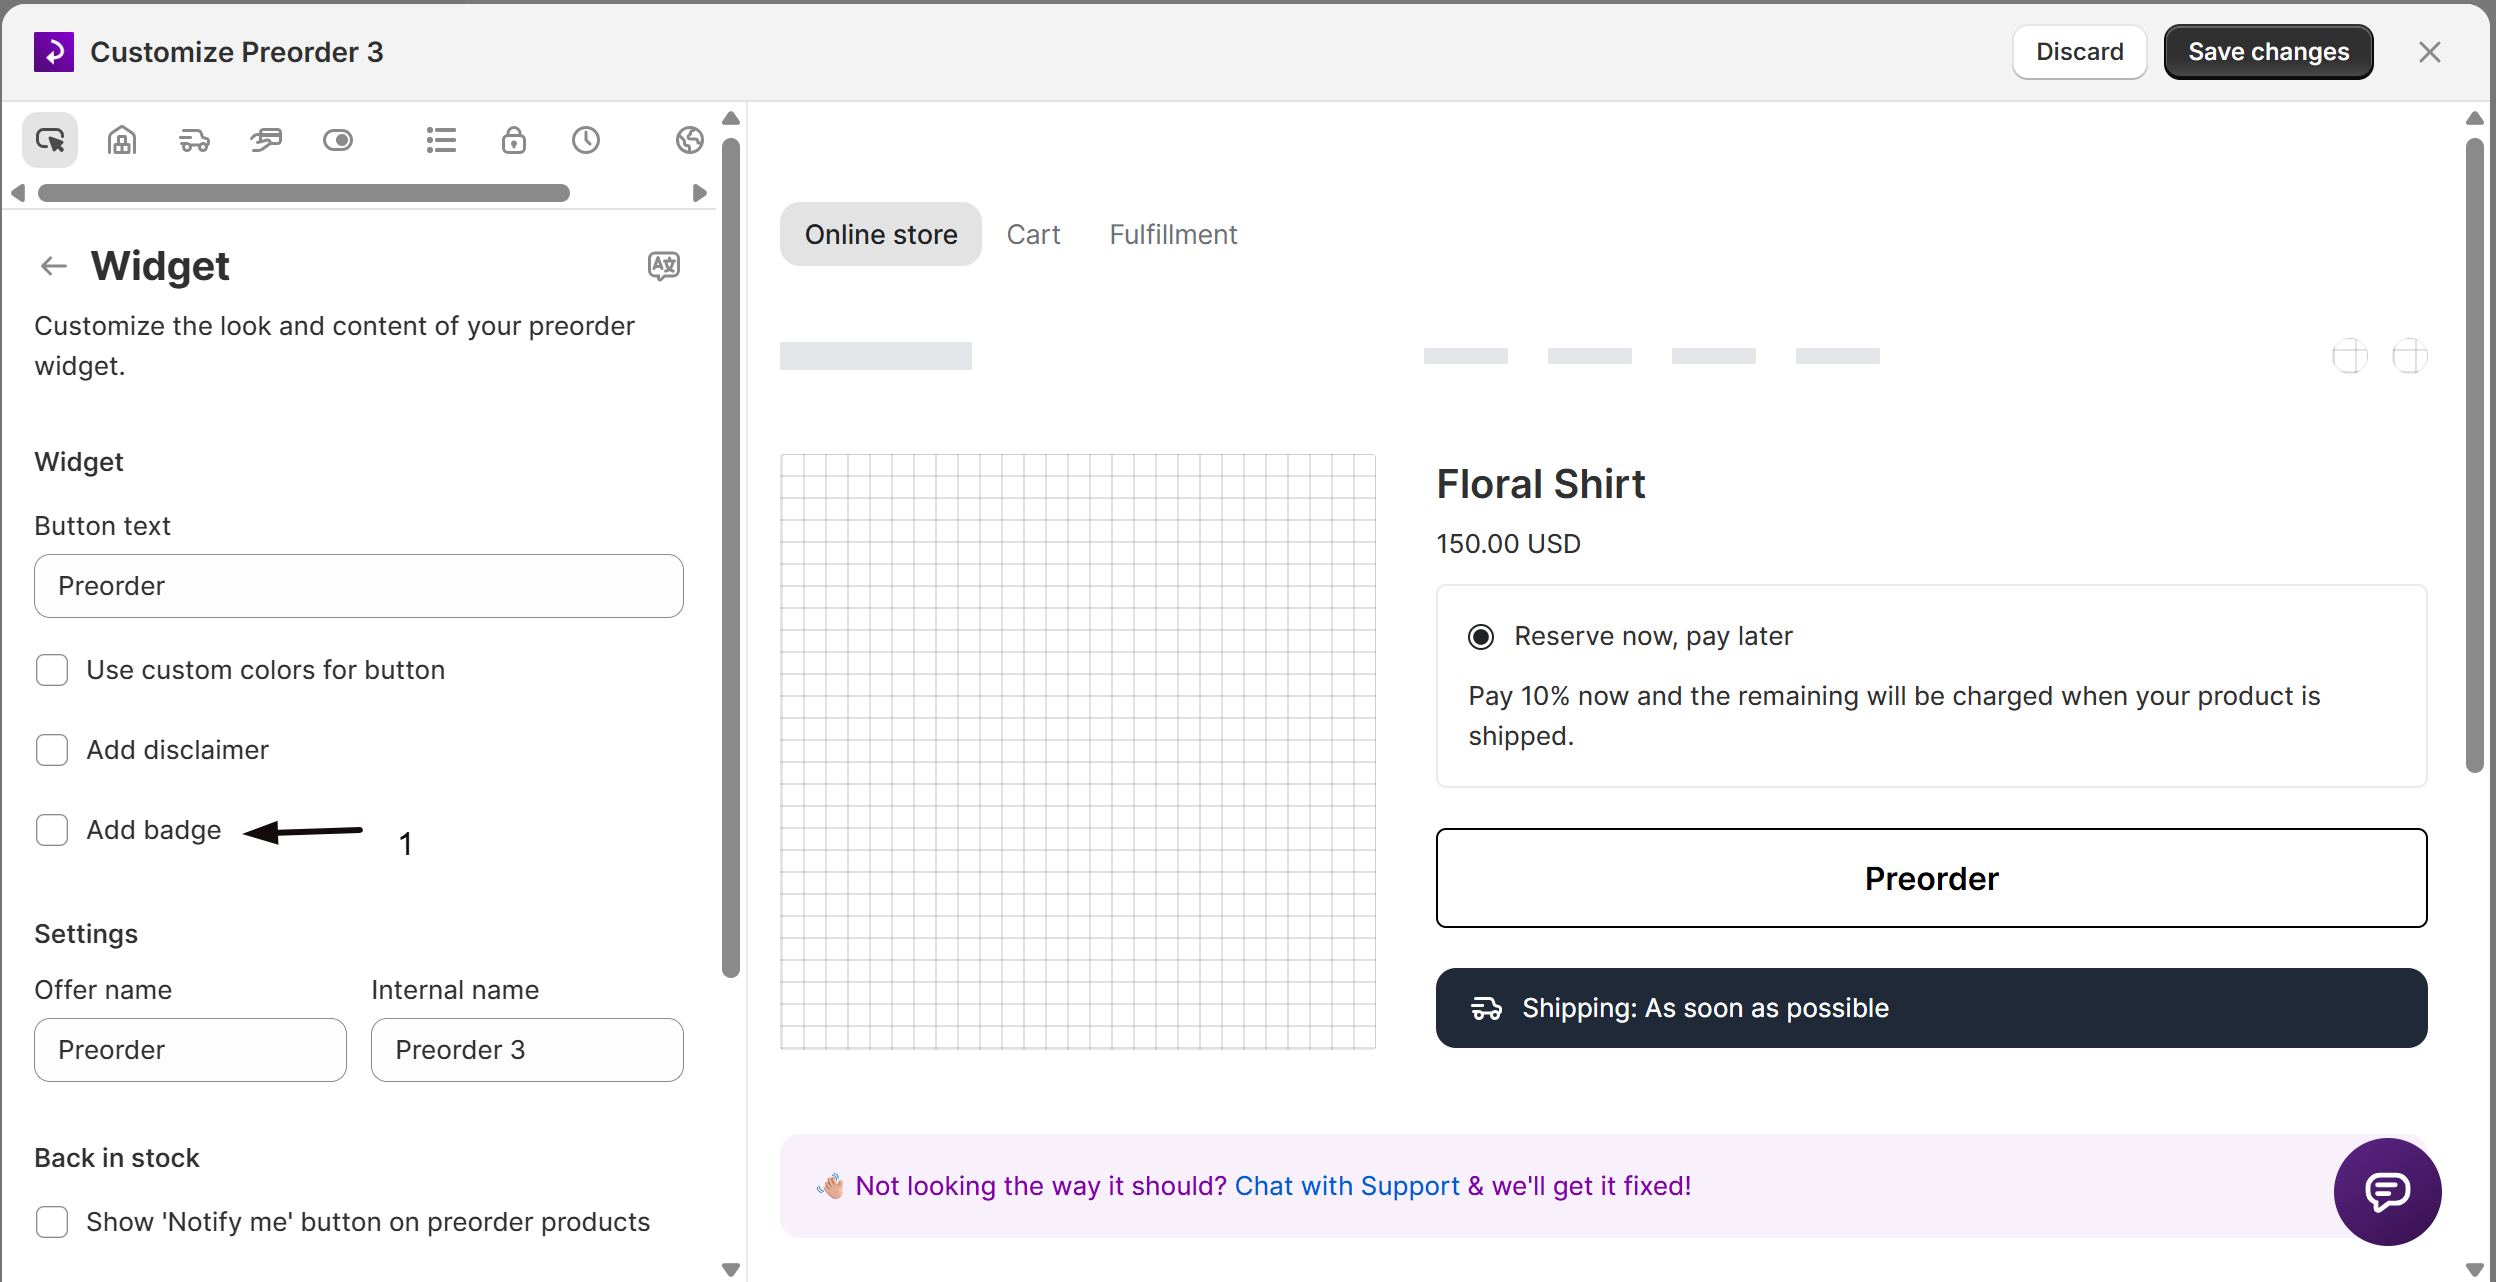
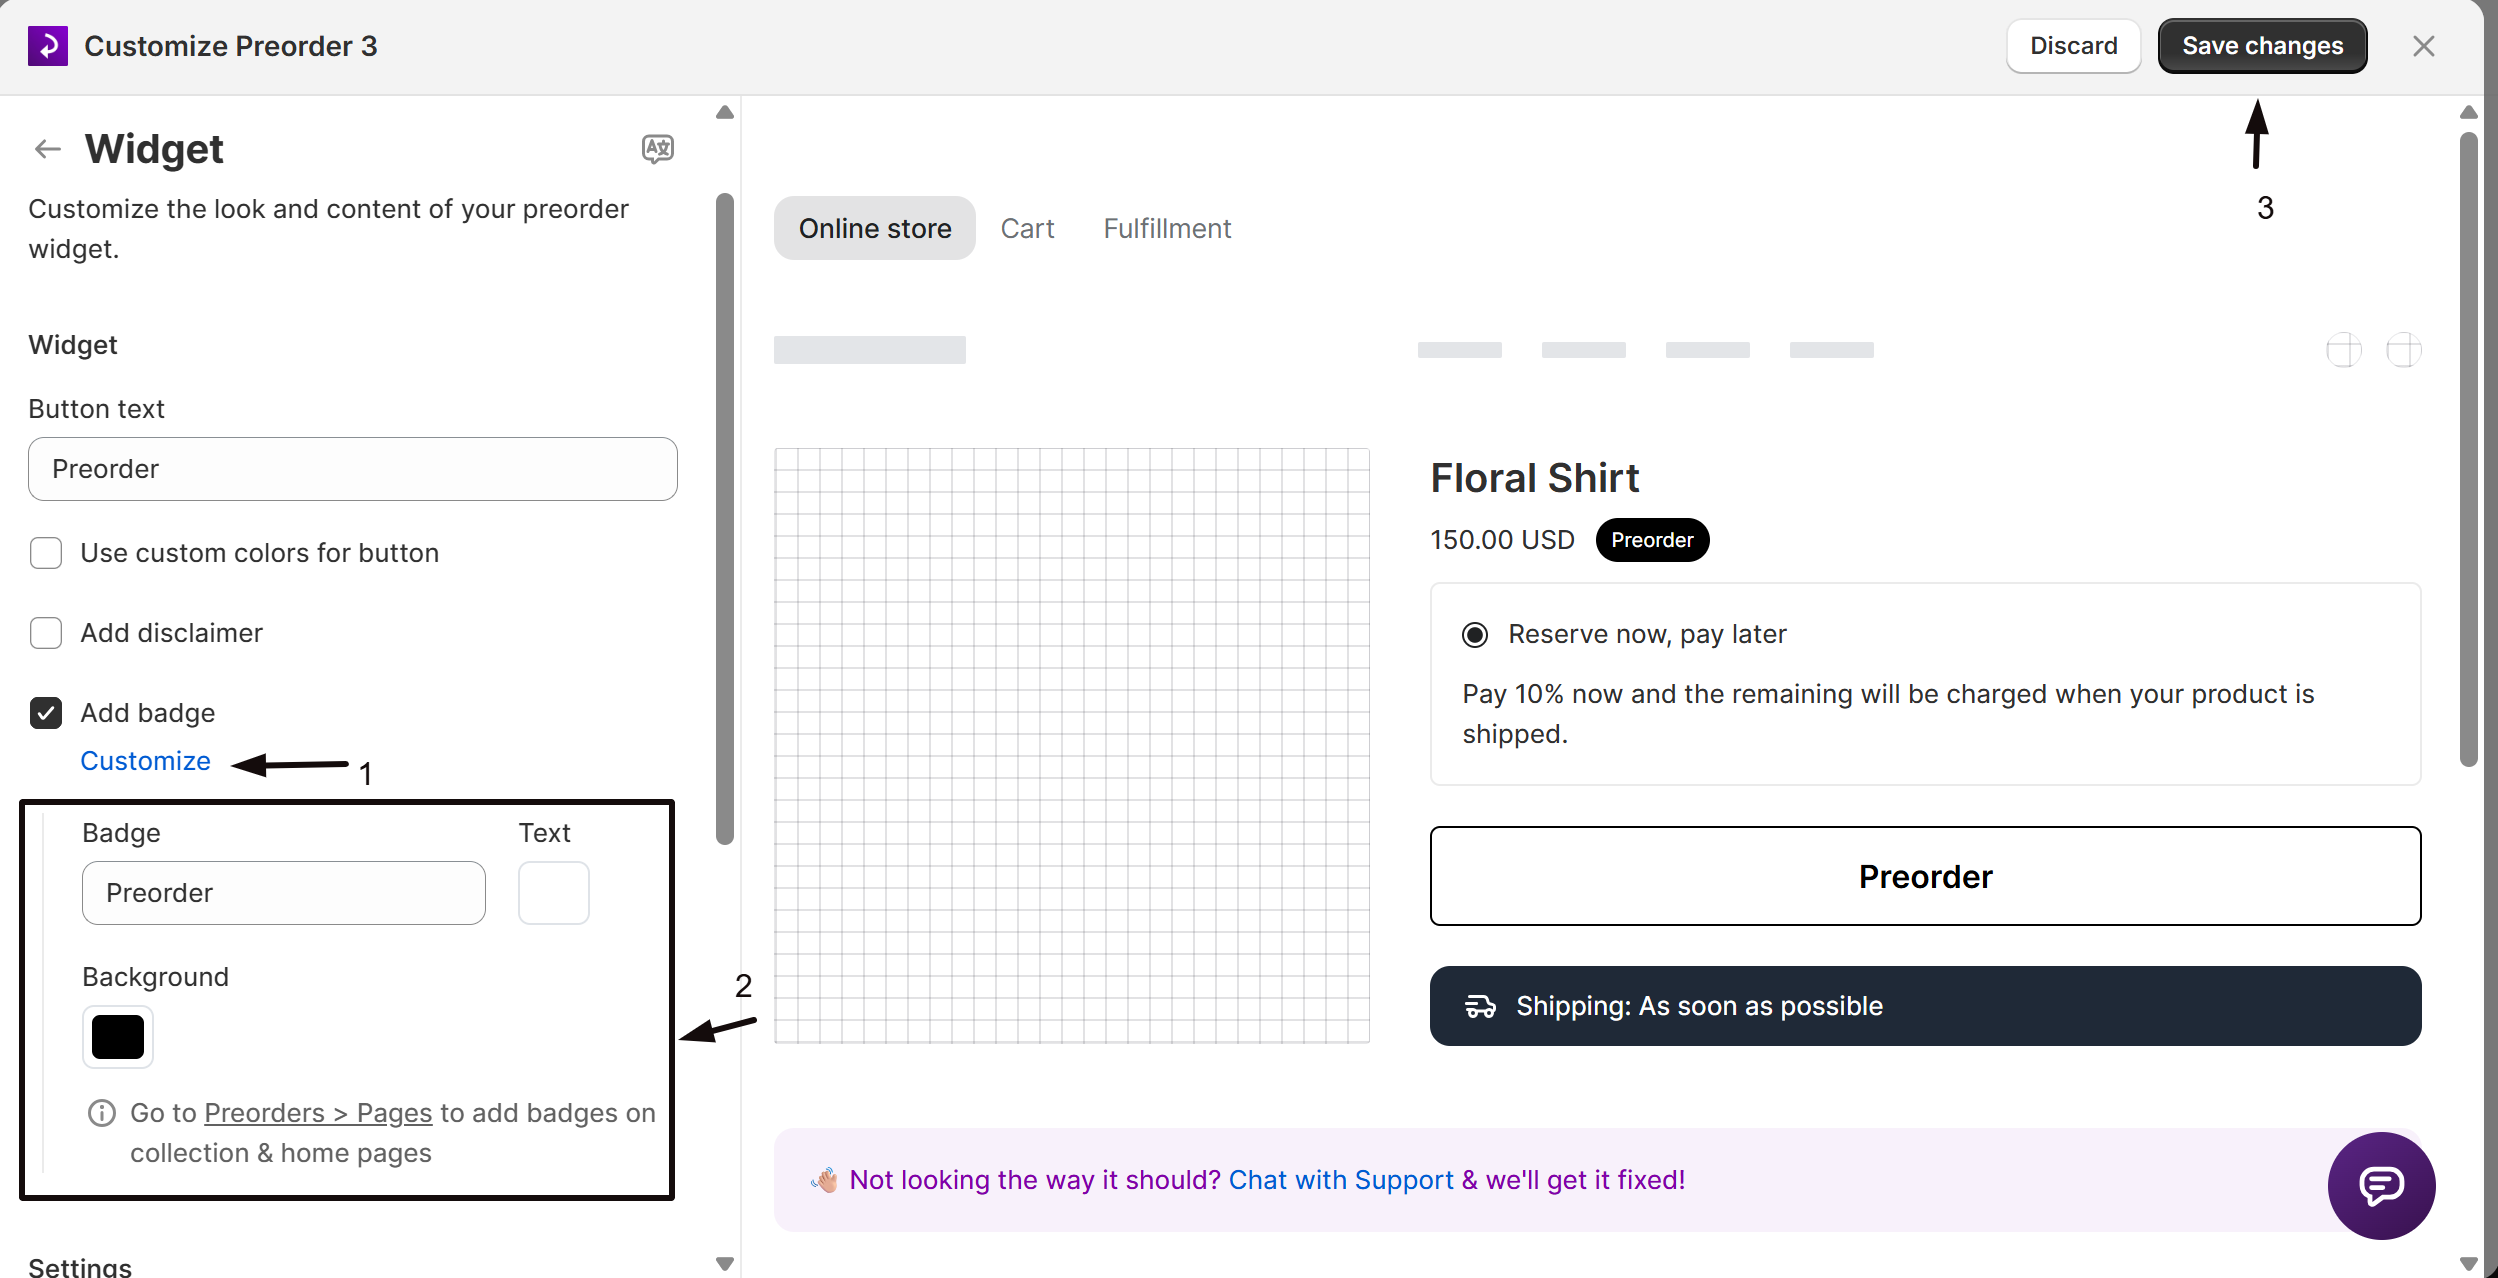
- Check Add badge.
- Click Customize to set:
| Field | Default | What it does |
|---|---|---|
| Badge text | Preorder | The label text shown in the badge |
| Text color | #FFFFFF | Badge text color |
| Background color | #000000 | Badge background color |
The badge text is translatable. This only shows the badge next to the product-page button; to also show it on collection and home pages, go to Preorders in the left menu → Settings tab → Pages.
Set offer names
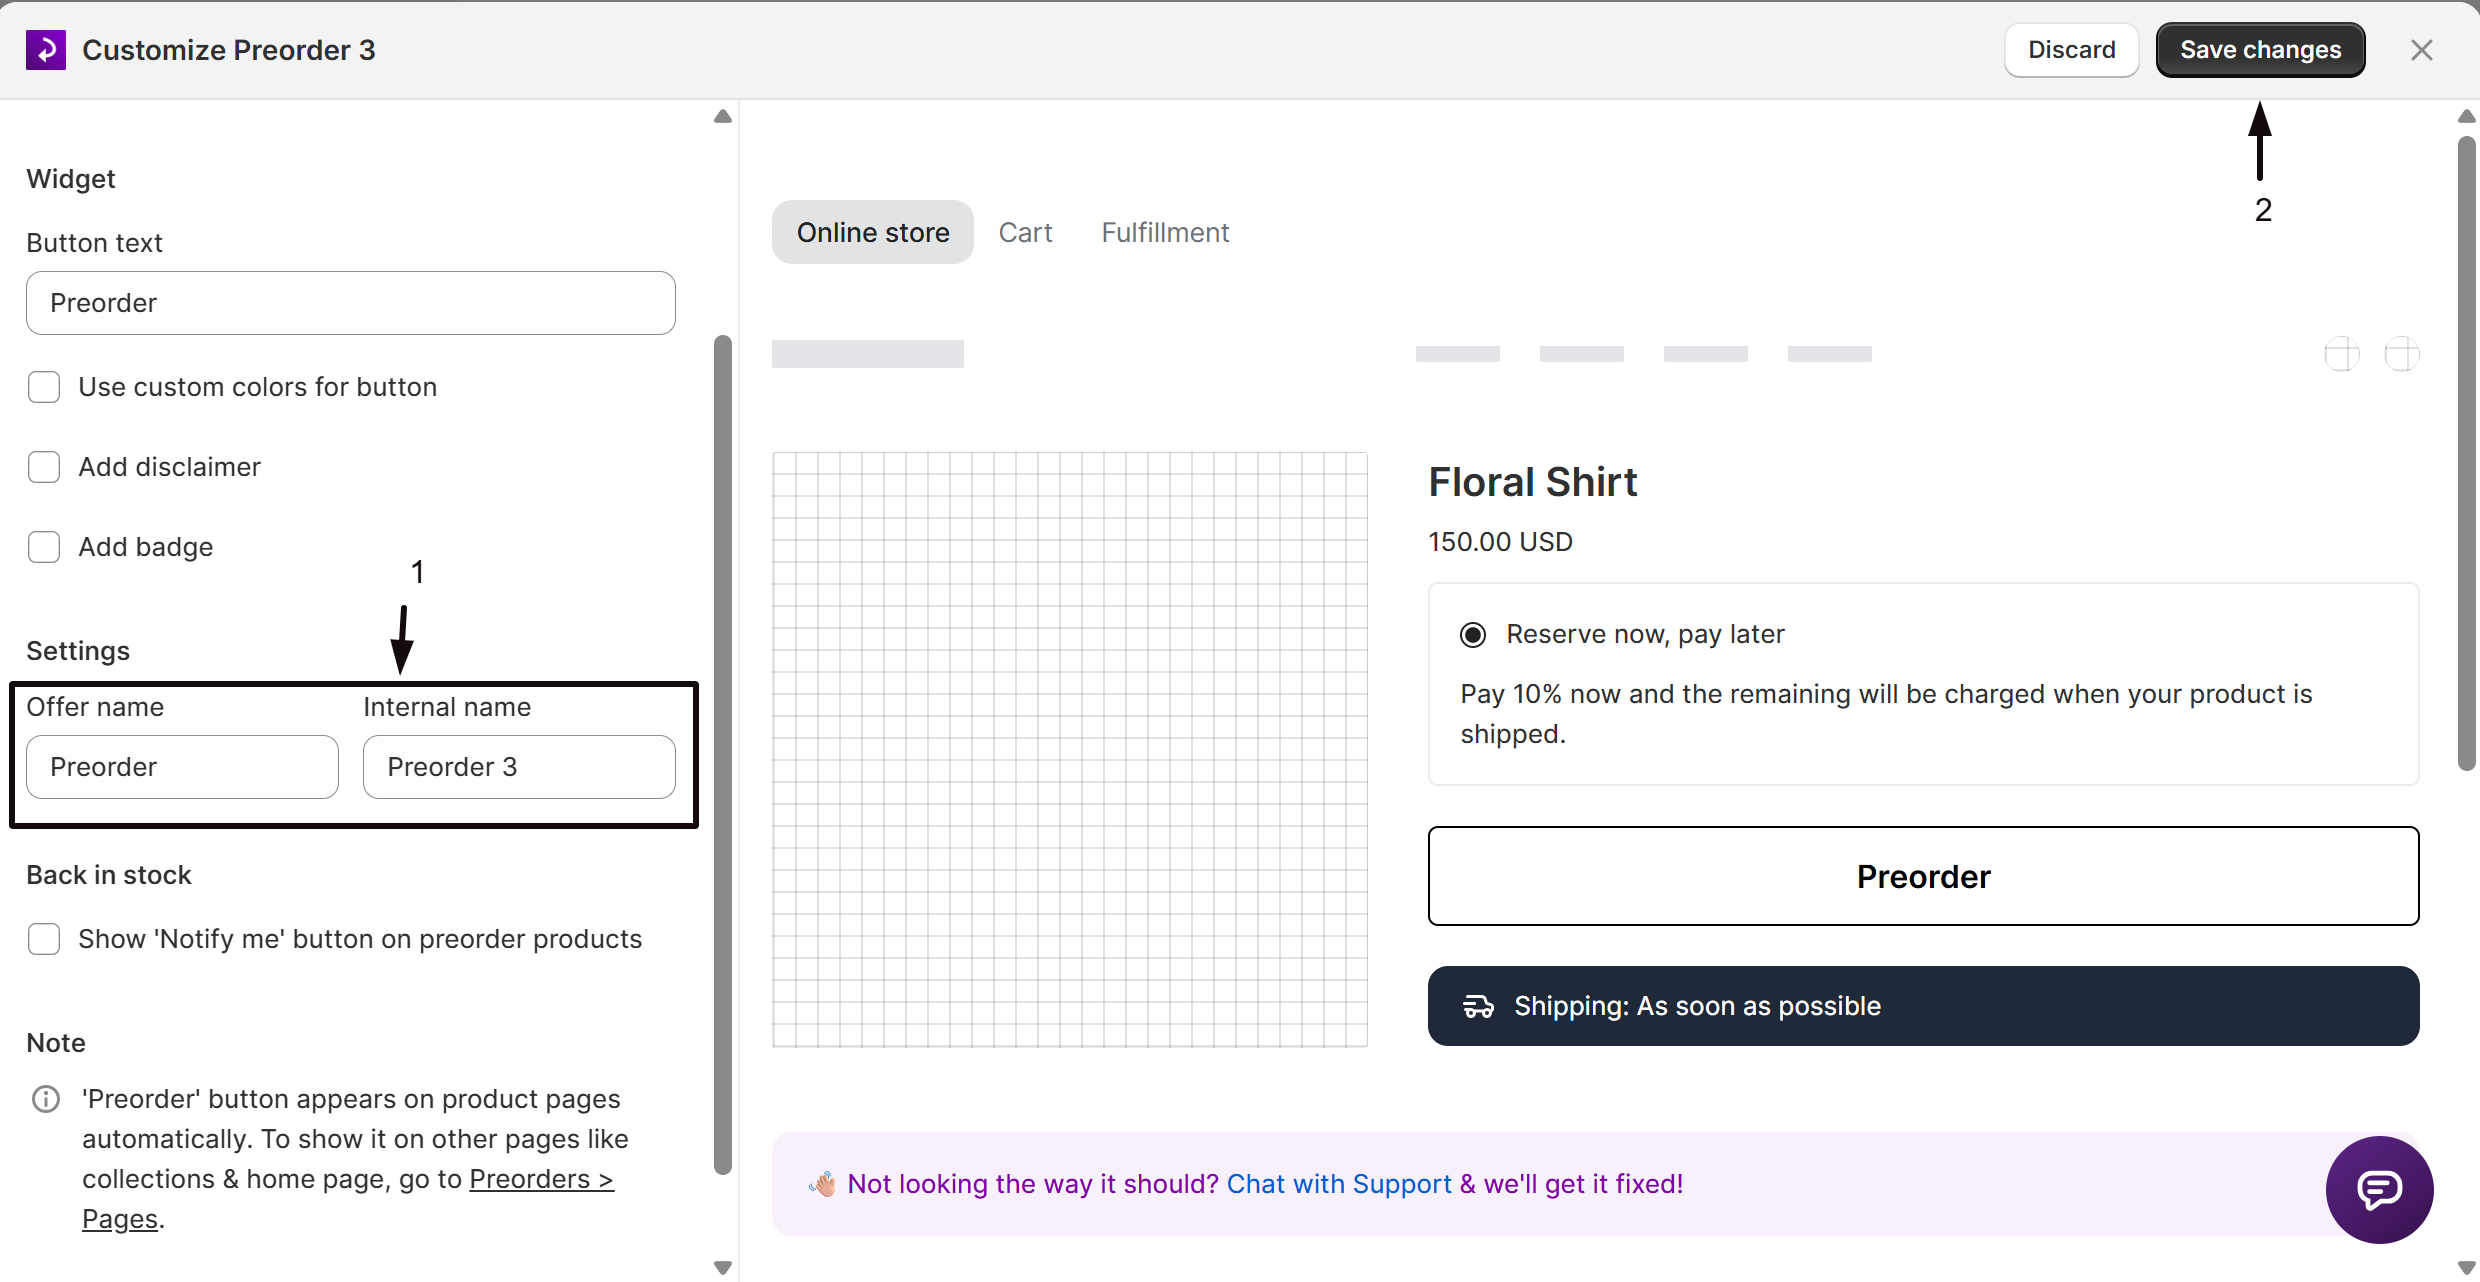
Under Settings, enter an Offer name (customer-facing, shown in cart and at checkout) and an Internal name (visible only inside STOQ, used to identify the offer, must be unique per shop).
(Optional) Show the Notify me button
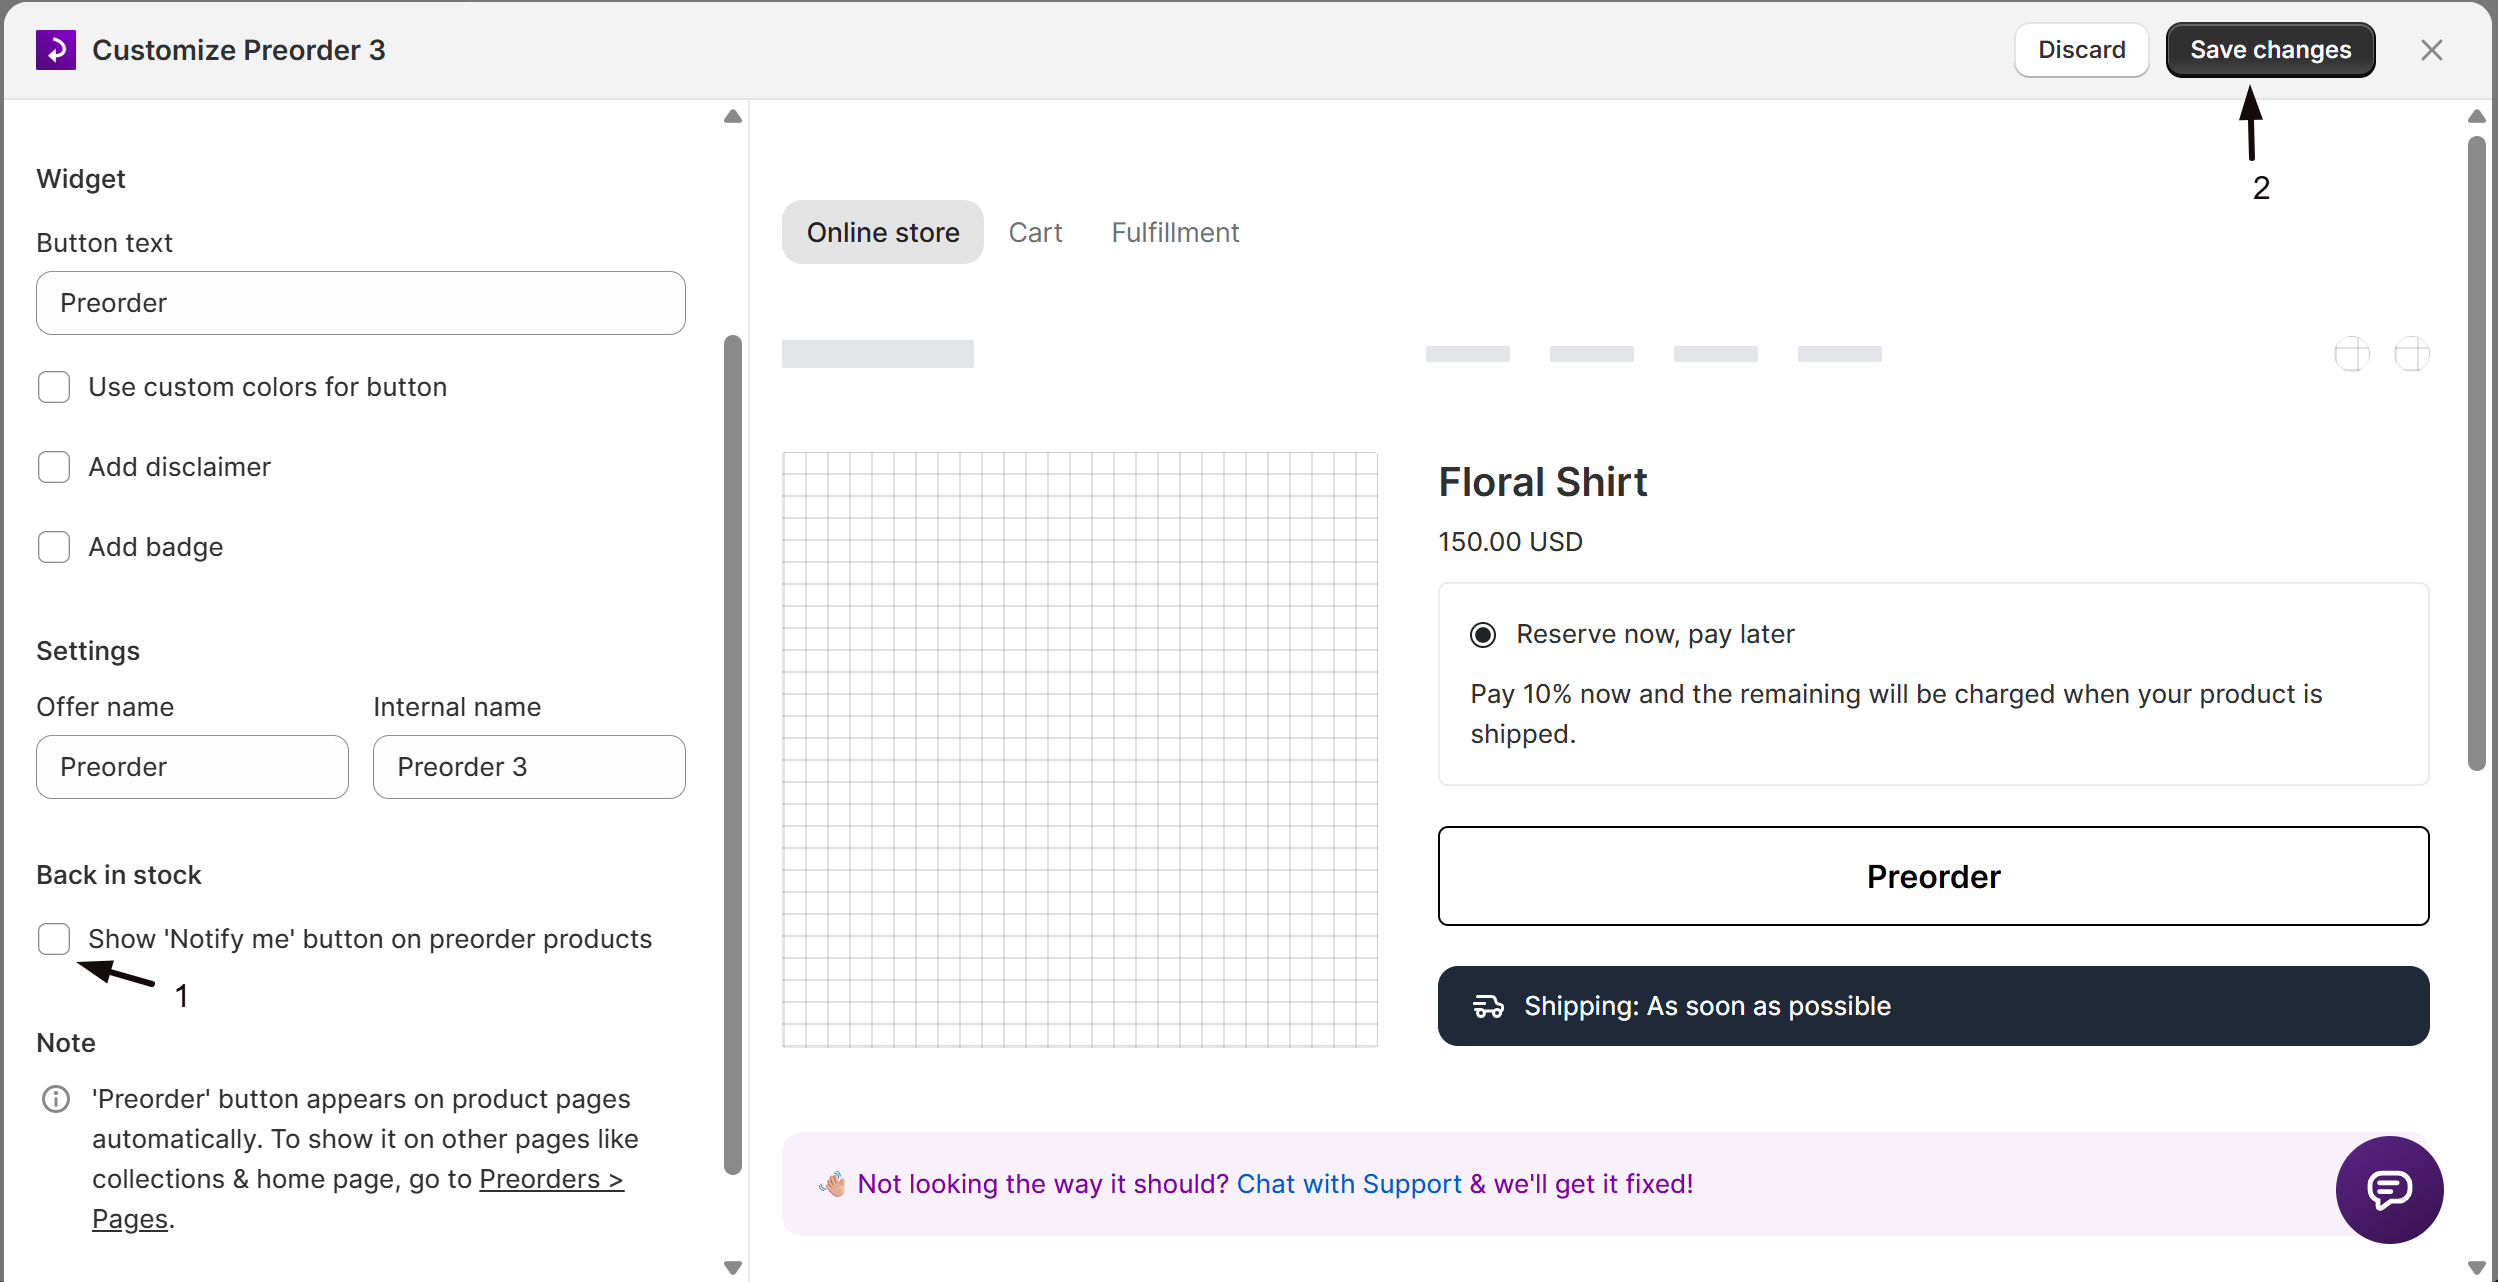
If STOQ manages your inventory tracking, a Back in stock section appears below the names.
- Check Show 'Notify me' button on preorder products to add a "Notify me when available" signup button alongside the Preorder button.
- Click the Customize link that appears to style it.
Save changes
Click Save changes at the top right of the editor. Changes apply immediately to the live storefront for all products in this offer.
Saving in the Shopify mobile app looks different. The Save changes bar you see at the top on desktop is part of the Shopify admin, and in the Shopify mobile app it appears as a + icon in the top-right of the editor's title bar (next to the ⋯ menu) instead of a labelled bar. If you don't see a Save changes bar on your phone, tap that + to save your changes.
Check your setup
Open one of the offer's products on your storefront and confirm:
- The Preorder button shows the text you entered in Button text
- If you set custom colors, the button reflects them
- If you enabled the disclaimer, the message appears below the button
- If you enabled the badge, the badge label is visible near the button
Troubleshooting
The button color doesn't match what you picked
Confirm Use custom colors for button is checked in the Widget section. If it's unchecked, the button color is fully controlled by your theme and can't be overridden from STOQ.
The badge or button isn't showing on your collection or home page
The Widget section only controls the product page. Enable them from Preorders in the left menu -> Settings tab -> Pages. See Show preorder button on store pages.
You expected the disclaimer in the cart, at checkout, or in an email
On the storefront it renders only directly below the Preorder button on the product page, not in the cart or at checkout. For cart and checkout messaging, use the payment section's billing title and description fields instead.
It does appear in emails, though: when Add disclaimer is on, the disclaimer is included per line item in both the STOQ and Klaviyo preorder confirmation emails, rendered as .offer-description. To hide it there, target td.preorder-product .offer-description with display: none !important; in the email's Custom CSS. See Preorder confirmation notification.
You want shipping info in the disclaimer
That's controlled from the offer's Shipping section, not Widget. Check Show shipping timeline there to add a shipping message block below the button; it shares the Widget section's text color, background color, and border radius, and appears even if Add disclaimer is off.
Translations aren't showing for your button, badge, or disclaimer text
Click the language icon at the top of the Widget panel to add or edit the translation for that locale.
FAQ
What is the difference between Offer name and Internal name?
Offer name is customer-facing: customers see it in their cart and at checkout as the purchase-option label. Internal name is only visible inside STOQ and must be unique across your shop's offers. Use the internal name to distinguish offers that might share a similar public name, for example "Preorder - Winter Drop" vs "Preorder - Spring Drop".
Does changing the button text affect anything else, like confirmation emails?
No. Button text only changes what's shown on the product-page button. Order confirmation email content is configured separately under Preorders in the left menu → Settings tab → Notifications, see Preorder confirmation notification.
My badge text needs to say something different in French, can I translate it?
Yes. The badge text, button text, and disclaimer text are all translatable fields. Click the language icon at the top of the Widget panel to open the translations editor for the offer. See Preorder multi-language for details on managing translations across 24 locales.
Related guides
Set up preorders
Create your first offer and go live end-to-end.
Preorder discounts
Add a percentage or fixed-amount discount in the Payment section.
Show preorder button on store pages
Add the Preorder button and badge to collections, home, and custom pages.
Preorder confirmation notification
Customize the email customers receive after placing a preorder.
Preorder countdown timer
Add a live countdown timer to create urgency on the product page.
Preorder multi-language
Translate button text, disclaimer, and badge text into other languages.