Customize the Notify me widget for specific products
Use this guide if you want a different Notify me button and signup form for specific products, instead of the same design everywhere. By the end, you can create a custom template and assign it to individual products or variants, while the rest of your catalog keeps your global design.
These per-product templates control the storefront Notify me button and signup form only. They do not change the back in stock alert email or its design. To edit the email customers receive when a product restocks, see Customize the back in stock email notification.
Before you begin
| You'll need | Why |
|---|---|
| Access to the Back in stock alerts section | Templates live on its Products tab |
| Per-product customization turned on | The first time you set a Button visibility or Template value on a product row, STOQ shows an Enable customization dialog. Click Enable to confirm. You can turn it off again later. |
Turning off per-product customization (via Disable per-product overrides under the Templates section) reverts every product to your global settings and stops using its assigned template on the storefront, but doesn't delete your templates or your saved per-product values.
What customers will see
A product with no template assigned uses your shop-wide Notify me button and signup form, set in Design the signup form and Design the Notify Me button. A product assigned a custom template shows that template's button text, colors, and form content instead, for that product only. Everything else, including which channels customers can sign up with, still comes from your global settings.
Set it up
On a phone, this menu is collapsed. In the Shopify mobile app, tap the STOQ logo at the top of the screen to open it, then choose the section named below. There is no hamburger icon. See Finding the STOQ menu.
Open the Products tab
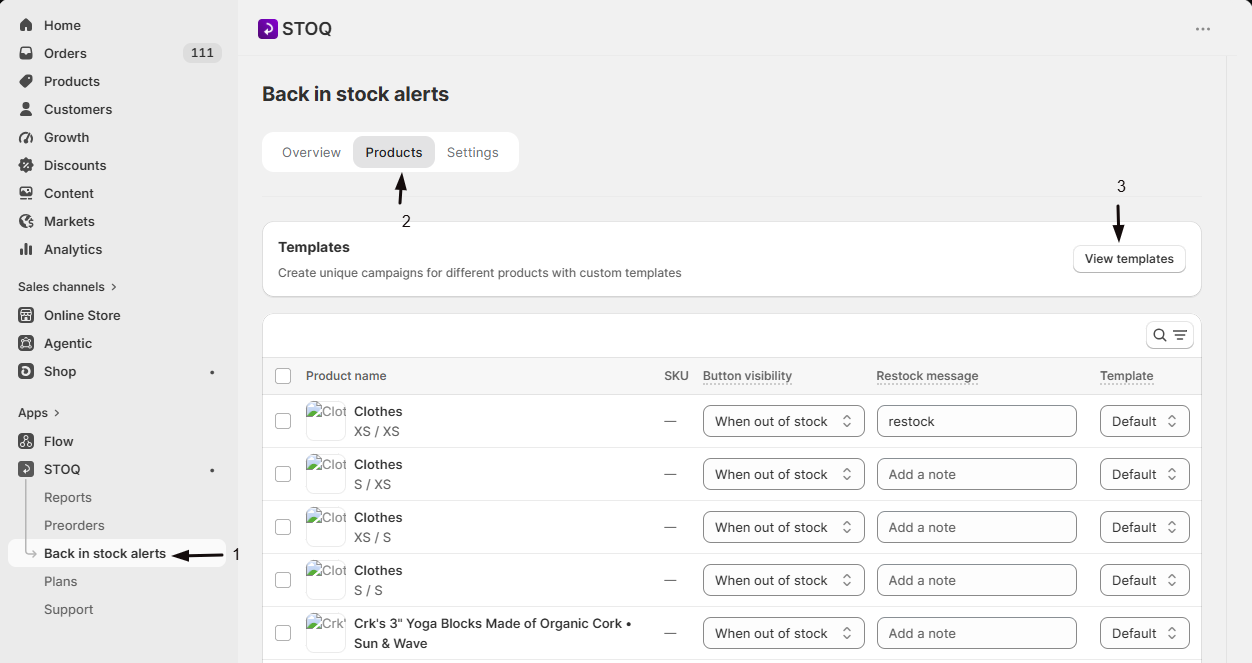
- In the left menu bar of the STOQ app, click Back in stock alerts.
- Click the Products tab.
- Under Templates, click View templates to expand the section.
Create a new template
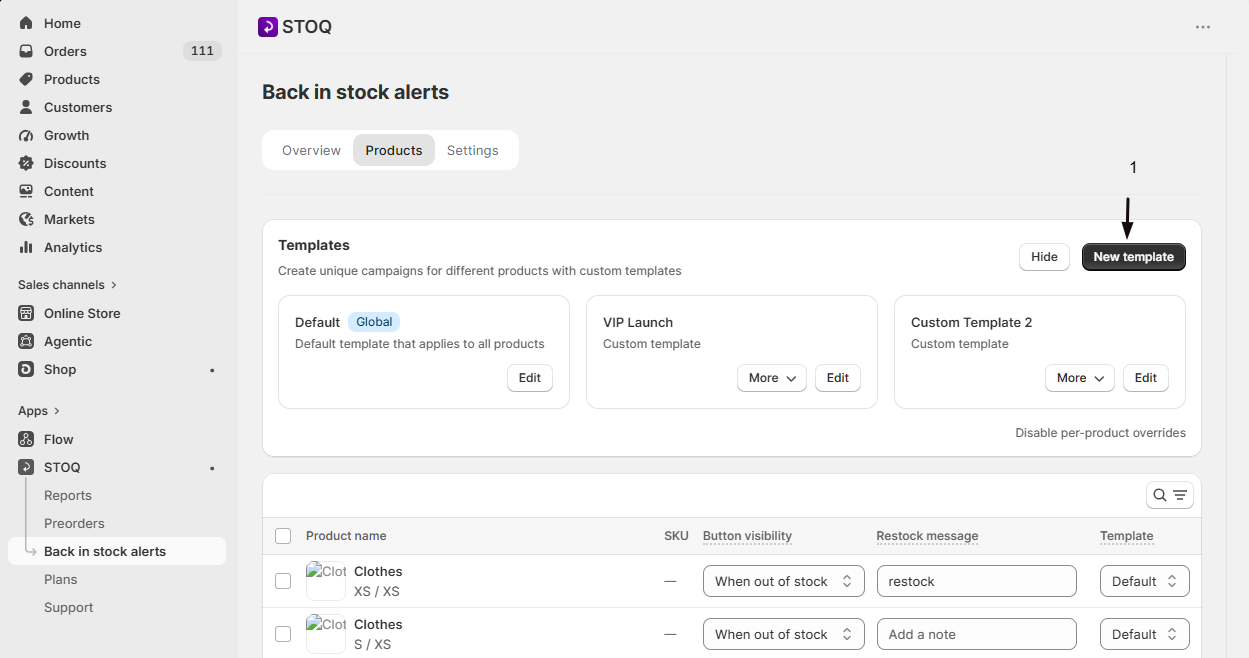
- Click New template. STOQ opens the template editor with a default name like "Custom Template 1".
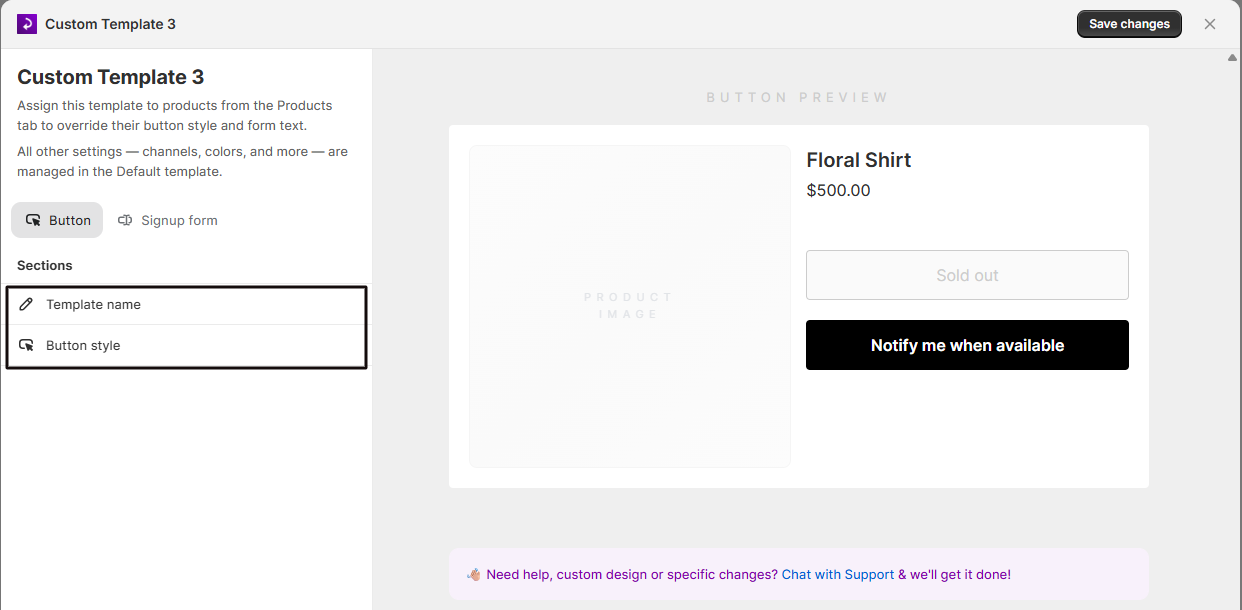
- On the Button tab, click Template name in the sidebar and enter a descriptive name in the Template name field.
- Click Button style in the sidebar to set the Button text, Border radius, and the button's Text and Background colors.
- Click the Signup form tab at the top, then click Form content in the sidebar to set the Header, Description, form Button text and its colors, and the Terms text.
- Click Save changes.
Edit or delete a template
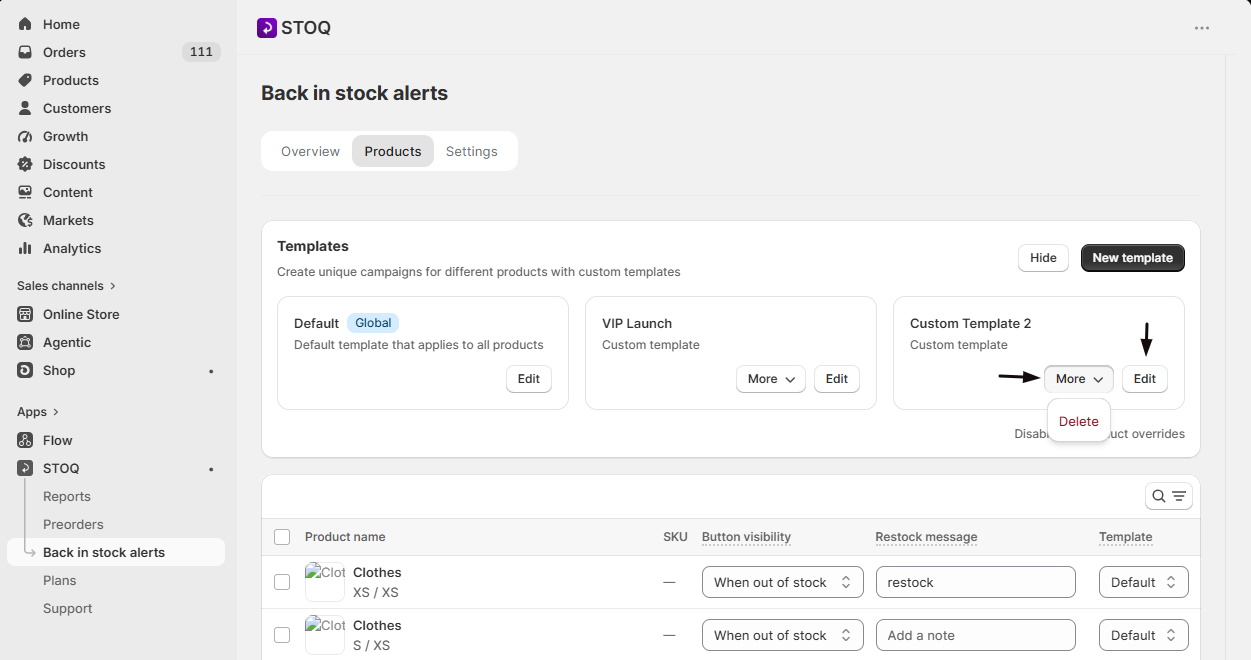
In the Templates section, find the template's card and click Edit to reopen it in the template editor, or click More then Delete to remove it. Deleting a template clears it from any product or variant it was assigned to, which then falls back to your global design.
Assign a template to a product or variant
Choose Variant or Product grouping
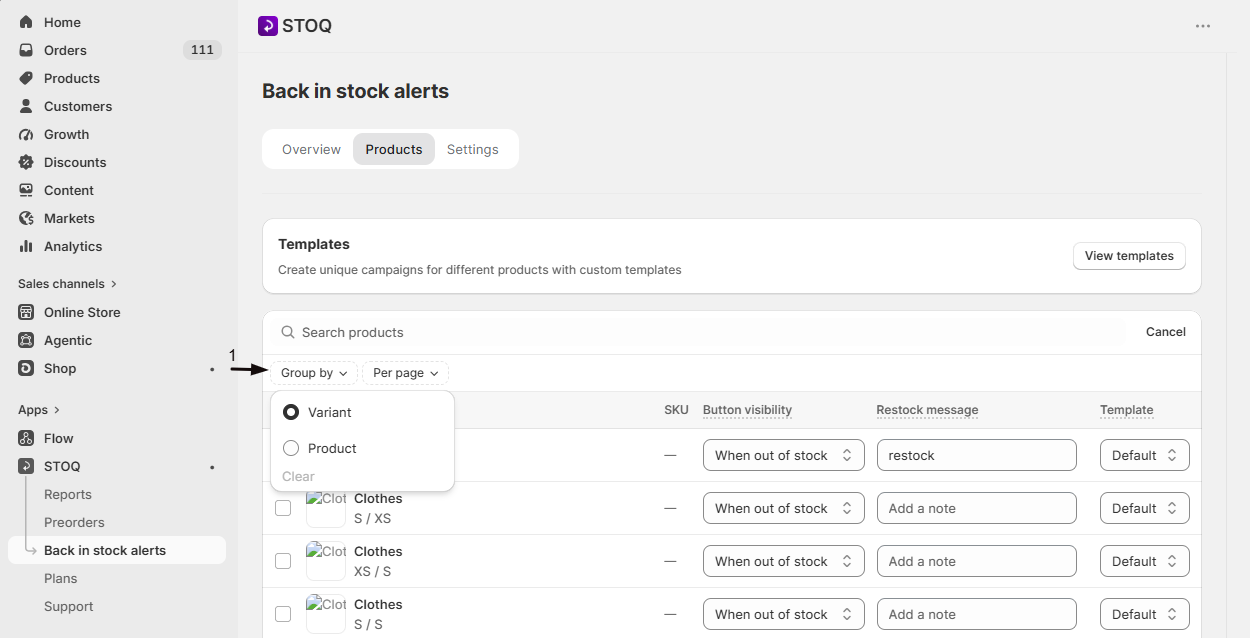
Above the product table, click the Group by filter and choose Variant to see every variant as its own row, or Product to see one row per product (expand a multi-variant product to see its variants underneath).
Set the template for a row
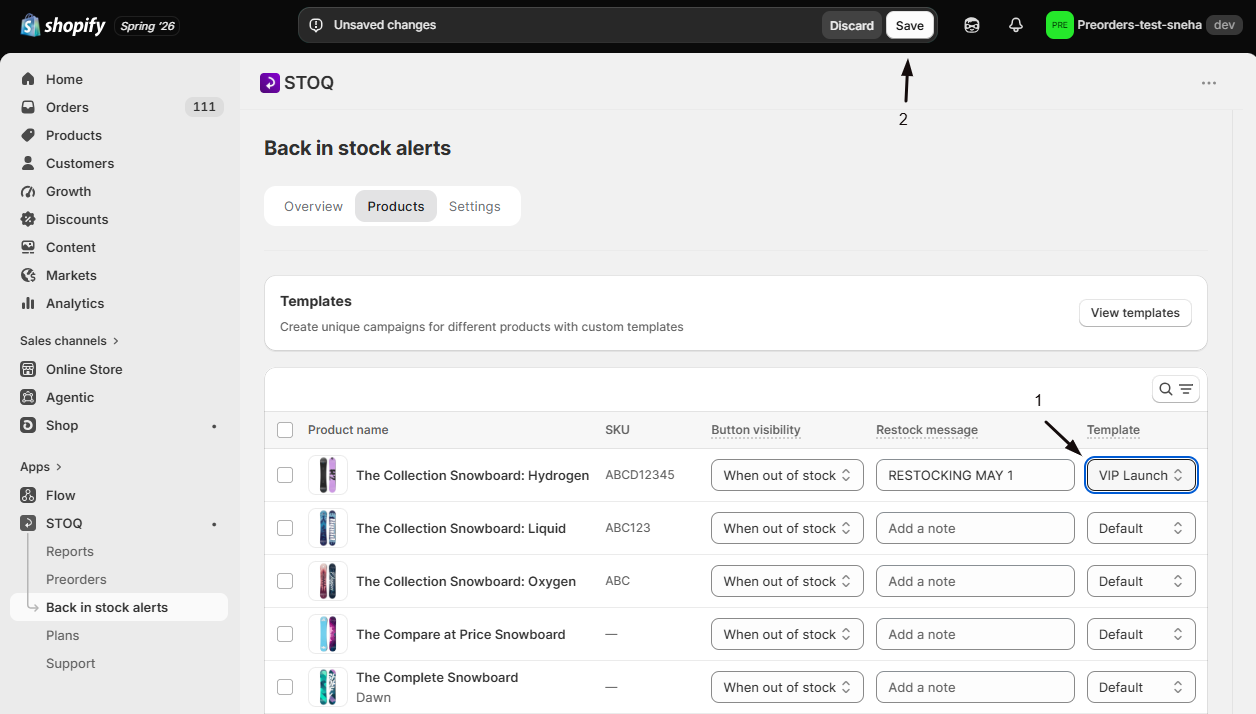
In the Template column for a product or variant, open the dropdown and choose Default to use your global design, or pick one of your custom templates. In Product grouping, choosing a template on a product row applies it to all of that product's variants; if its variants currently use different templates, the dropdown shows Mixed.
Save your changes
Click Save changes on the bar at the top of the page.
Set button visibility for a product or variant
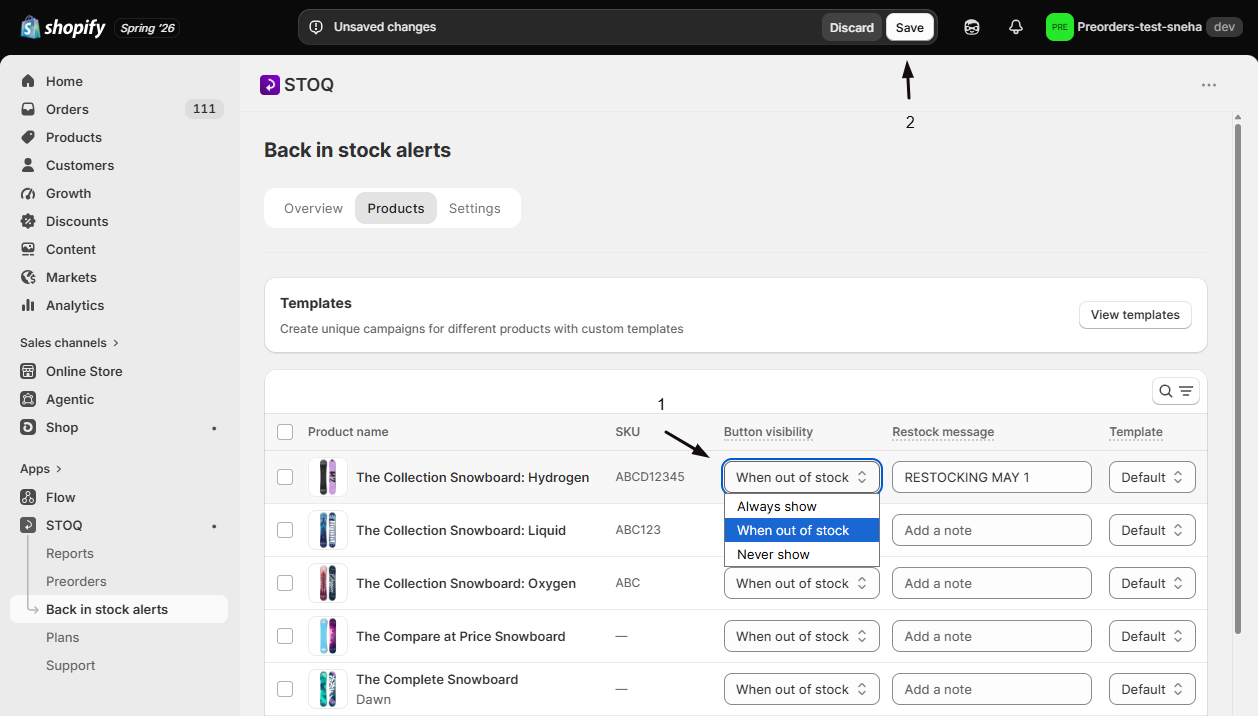
The Button visibility column on each row controls when the Notify me button shows for that product or variant, overriding your global rules:
| Option | What it does |
|---|---|
| When out of stock | Follows your global product eligibility rules. See Choose which products show the button. |
| Always show | Shows the button even while the item is in stock, so customers can sign up at any time. |
| Never show | Hides the button on that product or variant. |
Set the value in the row's Button visibility dropdown, then click Save changes on the bar at the top of the page. You can change several rows first and save them together.
Choosing Always show disables automatic back in stock alerts for those variants. STOQ confirms this with a Back-in-stock alerts will be disabled dialog: customers can still sign up while the item is in stock, but you'll need to notify them yourself, individually or with a bulk send. See Send back in stock alerts manually.
Set button visibility in bulk
You don't have to change rows one by one. To set the same visibility on many products or variants at once:
Select the rows
Use the Group by filter to choose Product or Variant, then check the box on each row you want, or the header checkbox to select all on the page.
Choose Set button visibility
Click Set button visibility in the bulk action bar above the table.
Pick a visibility and apply
In the Set button visibility for selected products dialog (Set button visibility for selected variants in Variant grouping), choose Always show, When out of stock, or Never show from the Button visibility dropdown, then click Apply. STOQ applies it to every selected row and saves right away, so there's nothing else to save. Choosing Always show shows the same alerts-disabled confirmation as above.
Filter the product list
In a long catalog, filter the table instead of scrolling it. You can show only products with a certain Button visibility, or only products that have (or don't have) a Restock message. You can also find a message by its text. This is the fastest way to update old restock dates: filter to the products still showing "March", for example, and edit just those rows.
Open the Products tab
- In the left menu bar of the STOQ app, click Back in stock alerts.
- Click the Products tab.
Show the filters
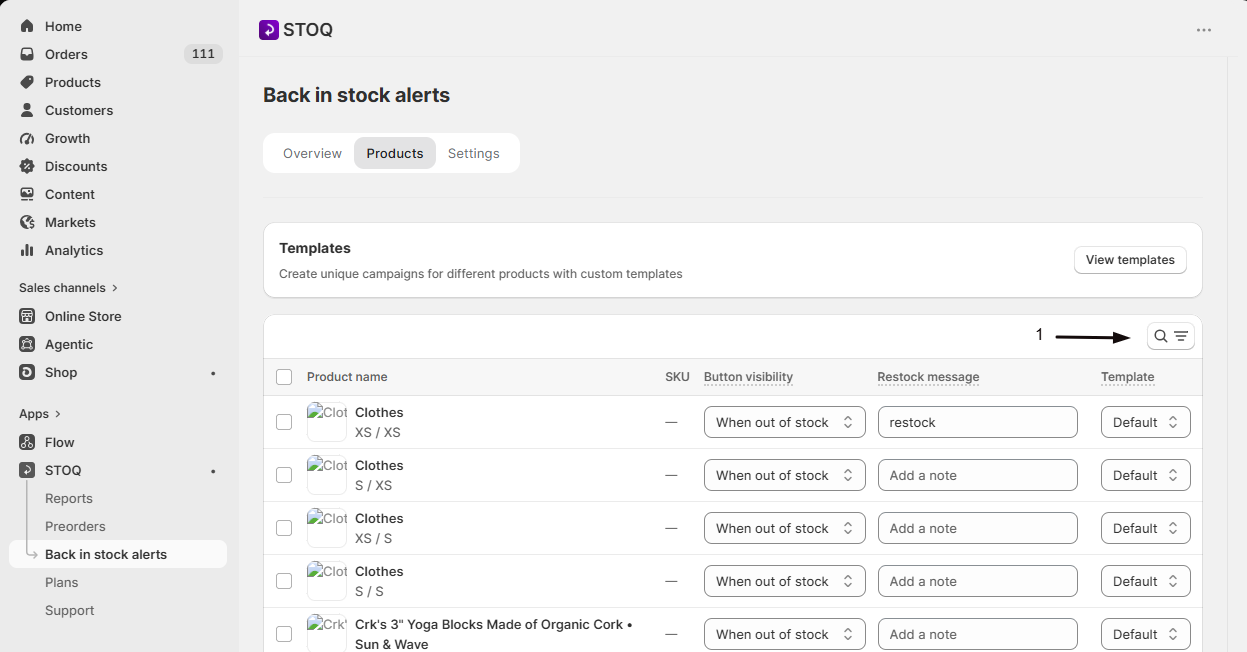
At the top right of the product table, click the Search and filter button (the magnifying glass icon). The Search products box opens with the Group by, Button visibility and Restock message filters below it.
Filter by button visibility
Click the Button visibility filter. Check one or more of Always show, When out of stock and Never show. For example, to hide every product set to Never show, check the other two.
Filter by restock message
Click the Restock message filter, then do either or both of these:
- Choose Has a restock message or No restock message.
- Type part of a message in the Message contains field, for example
March. Capitals don't matter.
Edit and save the matching rows
Change the Restock message, Button visibility or Template on the rows you need, then click Save changes on the bar at the top of the page.
Each active filter shows as a label below the filters, for example "Button visibility: Always show, Never show" or "Message contains "March"". Remove one filter from its label, or click Clear all to reset every filter, the search box and Group by at once. Filters work in both Variant and Product grouping, and together with the Search products box.
Bulk apply a template
Switch to Product grouping
Click the Group by filter and choose Product, since bulk apply works on selected products.
Select products and apply
Check the box next to each product you want to update, or the header checkbox to select all on the page.
Click Apply template in the bulk action bar above the table.
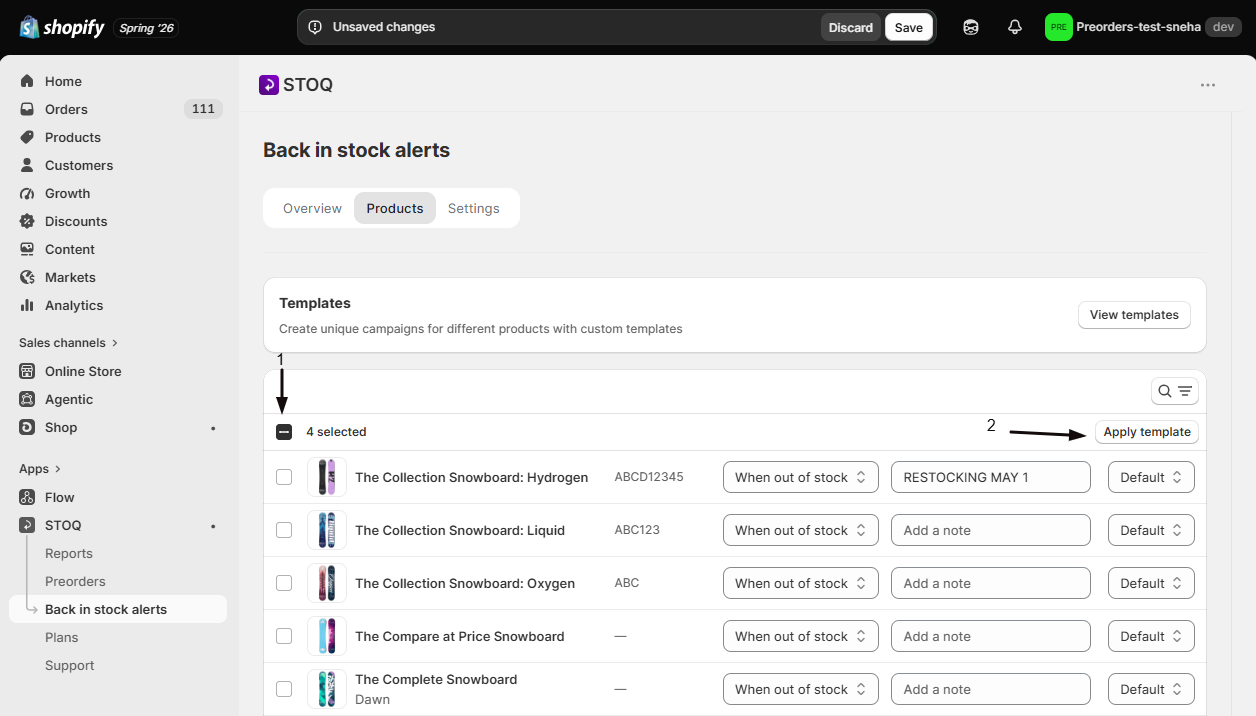
In the Apply template to selected products dialog, choose a template from the Template dropdown and click Apply.
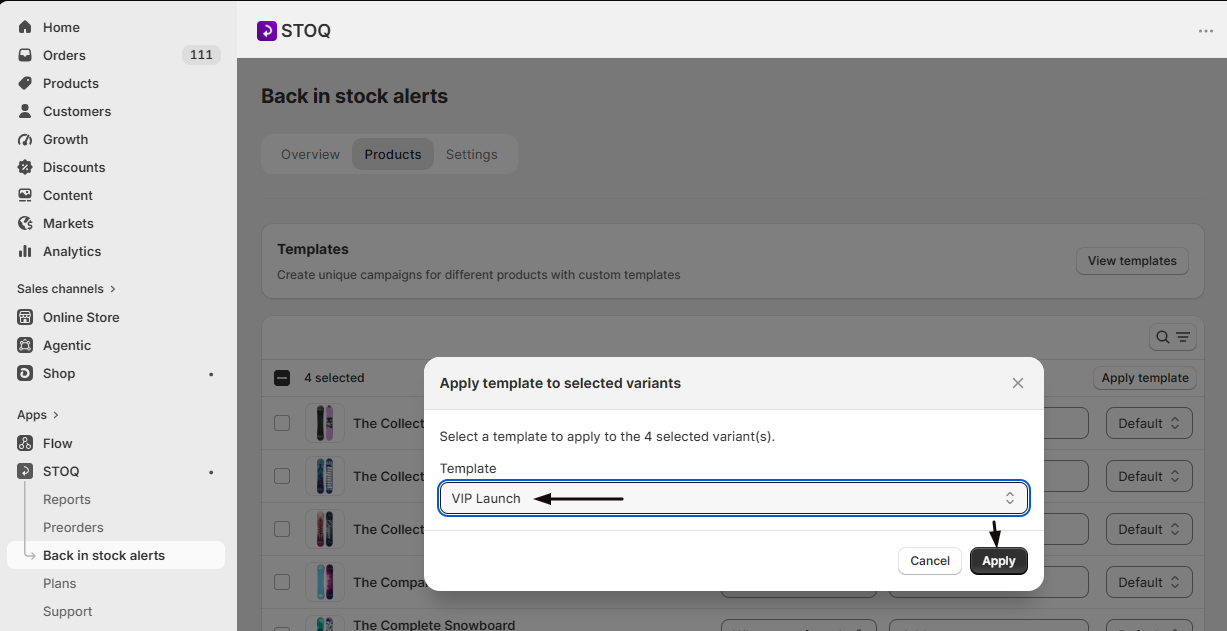
Bulk apply saves immediately to every variant of the selected products; you don't need to click Save afterward.
Check your setup
Open the product's page on your storefront (use an incognito window so you're not seeing an admin preview). Confirm the Notify me button and its popup or on-page form show your custom template's text and colors instead of your global design.
Troubleshooting
The Template dropdown does nothing when you change it
Per-product customization isn't turned on yet. Change the Template value once more and click Enable in the confirmation dialog that appears.
A product's Template dropdown shows Mixed
You're in Product grouping and the product's variants currently use different templates. Expand the product to set each variant individually, or pick a template on the product row to apply it to every variant at once.
Deleted template but the product still looks different
Deleting a template clears the assignment, which falls back to your global signup widget design. If the storefront still looks off, check that you saved your changes and that you're viewing a fresh page load rather than a cached one.
A product is missing from the filtered list
Filtered results only include products and variants STOQ has already saved for your shop. Brand-new variants may not appear yet, especially under When out of stock or No restock message. Click Clear all to remove the filters, then find the product with the Search products box instead.
Filters reset when you clear the search box or click Cancel
Clearing the Search products box, or clicking Cancel next to it, also clears the Button visibility and Restock message filters. Pick your filters again afterward, or change the search text rather than clearing it.
Editing the Default template card doesn't open the template editor
The Default template card's Edit button takes you to your global Signup widget settings instead, since the shop-wide design is managed there, not in the per-product template editor. See Design the signup form.
FAQ
Does a custom template change which channels customers can sign up with?
No. Channels, and everything not covered by the Button and Signup form tabs, still come from your global Default template.
Does assigning a template affect customers who already signed up?
No. It only changes what future visitors to that product's page see; existing signups and their pending alerts aren't affected.
Can I use the same template on more than one product?
Yes. A template isn't limited to one product; assign it to as many products or variants as you want, individually or with Apply template.
How do I find every product with an out-of-date restock date?
On the Products tab, click the Search and filter button at the top right of the table, click the Restock message filter, and type the old date in Message contains, for example March. Only the rows with that text stay in the list, so you can update each Restock message and save. See Show a restock note under the button.
Can I filter by more than one button visibility at once?
Yes. The Button visibility filter lets you check any combination of Always show, When out of stock and Never show. The list shows rows matching any of the ones you check.
Why does a filtered product show variants that don't match?
In Product grouping, a product appears if at least one of its variants matches your filters. When you expand it, you see all of its variants. Switch Group by to Variant to see only the matching variants.
Does filtering the list change anything on my storefront?
No. Filters only change which rows you see on the Products tab. Nothing changes on your store until you edit a row and click Save changes.
What happens if I turn off per-product customization?
Every product reverts to your global settings on the storefront. Your templates and each product's assigned template aren't deleted, so they're ready to use again if you turn it back on.
Related guides
Design the signup form
Customize the global signup form that products without a template use.
Design the Notify Me button
Customize the global button that products without a template use.
Back in Stock Overview
How the Back in Stock alerts feature works end to end.
Set up back in stock alerts
Turn on alerts and configure the essentials.