Change your sender (From) address
Use this guide to change who a back-in-stock email appears to come from: the From name customers see, and whether it sends from STOQ's default address or your own custom domain.
Before you begin
| You'll need | Why |
|---|---|
| Email alerts sent through STOQ's built-in sender | If you send through Klaviyo or Shopify Flow instead, the sending address is managed in that platform, not here |
| A paid plan, for a custom address | Free plans can only send from the default STOQ address |
What customers will see
On the default address, the email preview and inbox display show your From name with a "(STOQ)" label appended, for example "Big Great Future shop (STOQ)". Switching to your own custom address, once it's DKIM authenticated, removes the "(STOQ)" label so the email appears to come purely from your brand.
Set it up
On a phone, this menu is collapsed. In the Shopify mobile app, tap the STOQ logo at the top of the screen to open it, then choose the section named below. There is no hamburger icon. See Finding the STOQ menu.
Open the Address panel
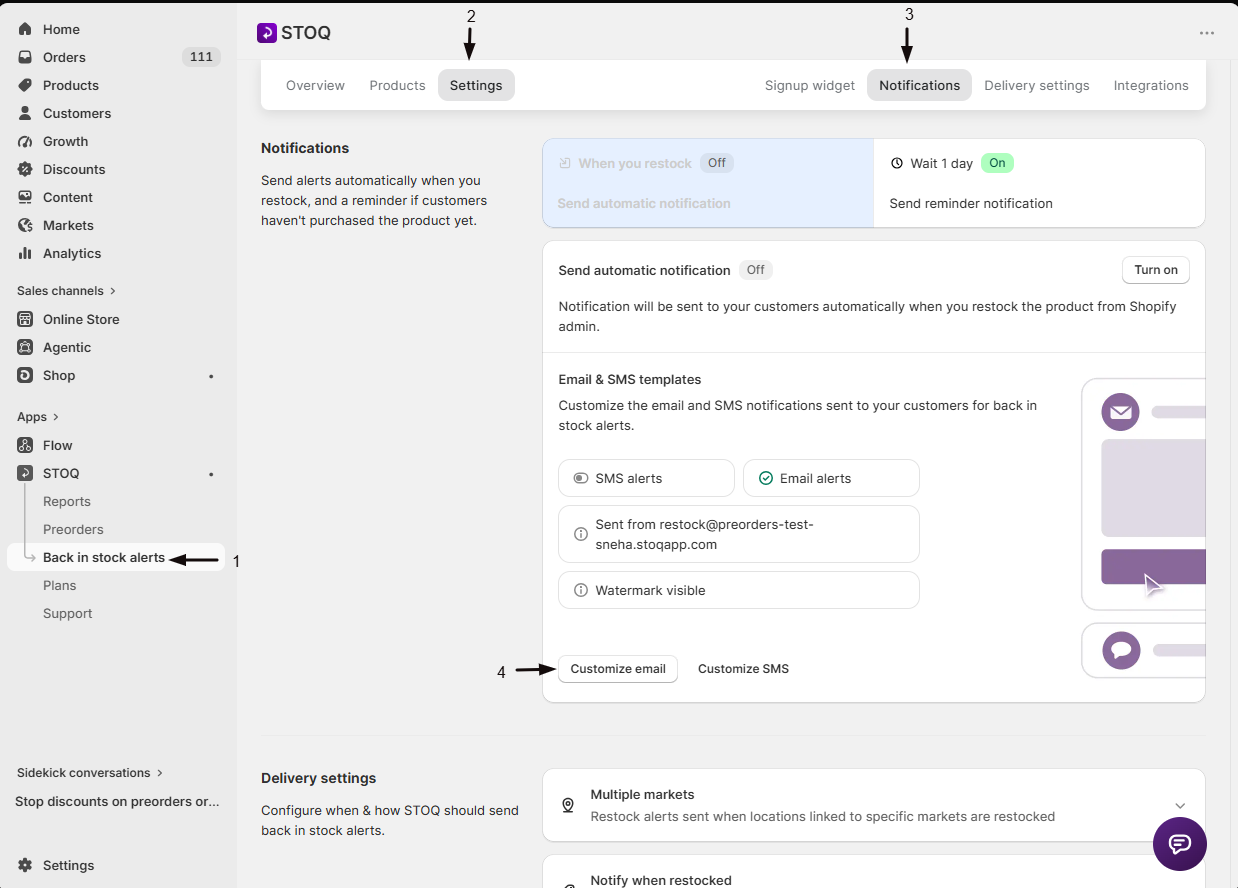
- In the left menu bar of the STOQ app, click Back in stock alerts.
- Click the Settings tab.
- Open the Notifications sub-tab.
- Select the notification you want to edit and choose Customize email.
- In the editor's sidebar, click Address.

Set the From name
Enter the sender name customers see in the From name field.
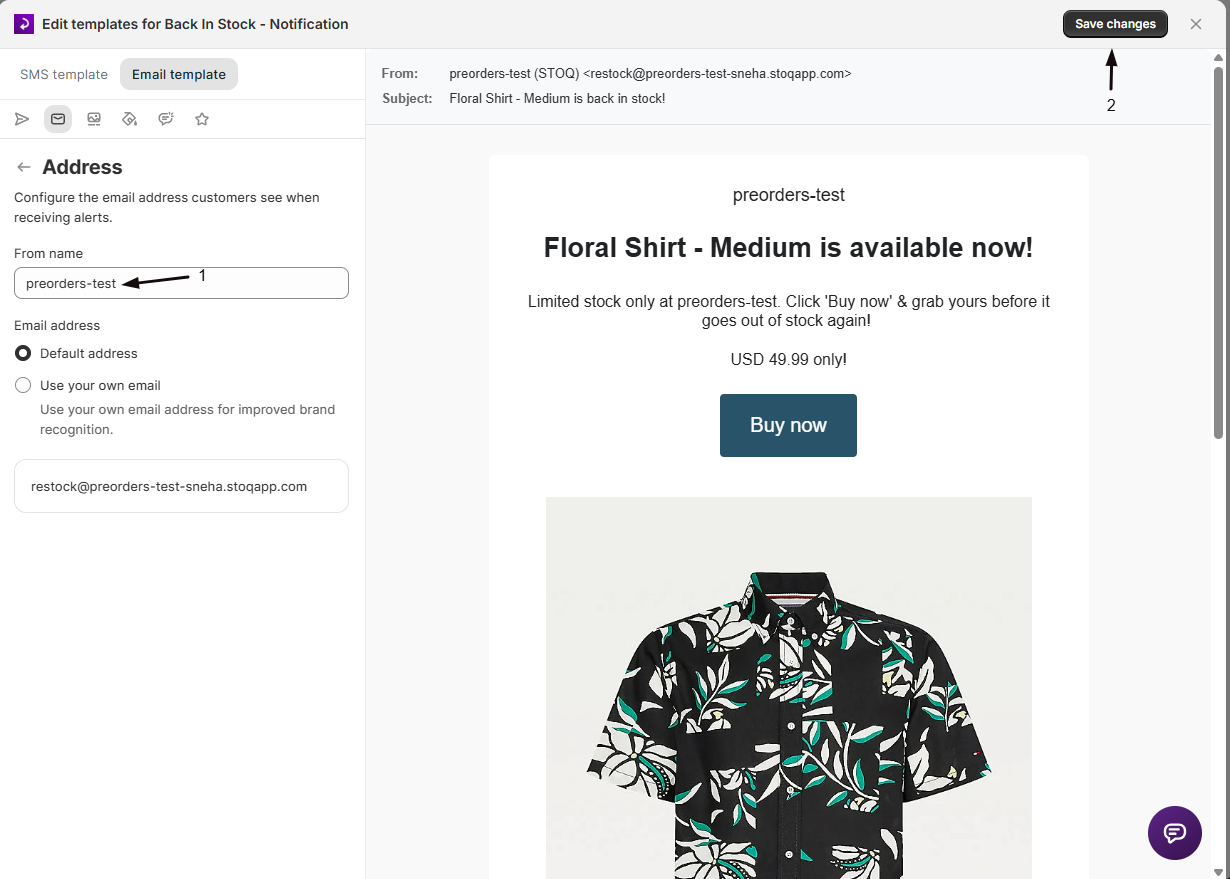
Choose the sending address
Select Default address to keep sending from STOQ's shared address, or select Use your own email to send from a custom domain address instead. Use your own email requires a paid plan; on a free plan it's disabled with an upgrade prompt.
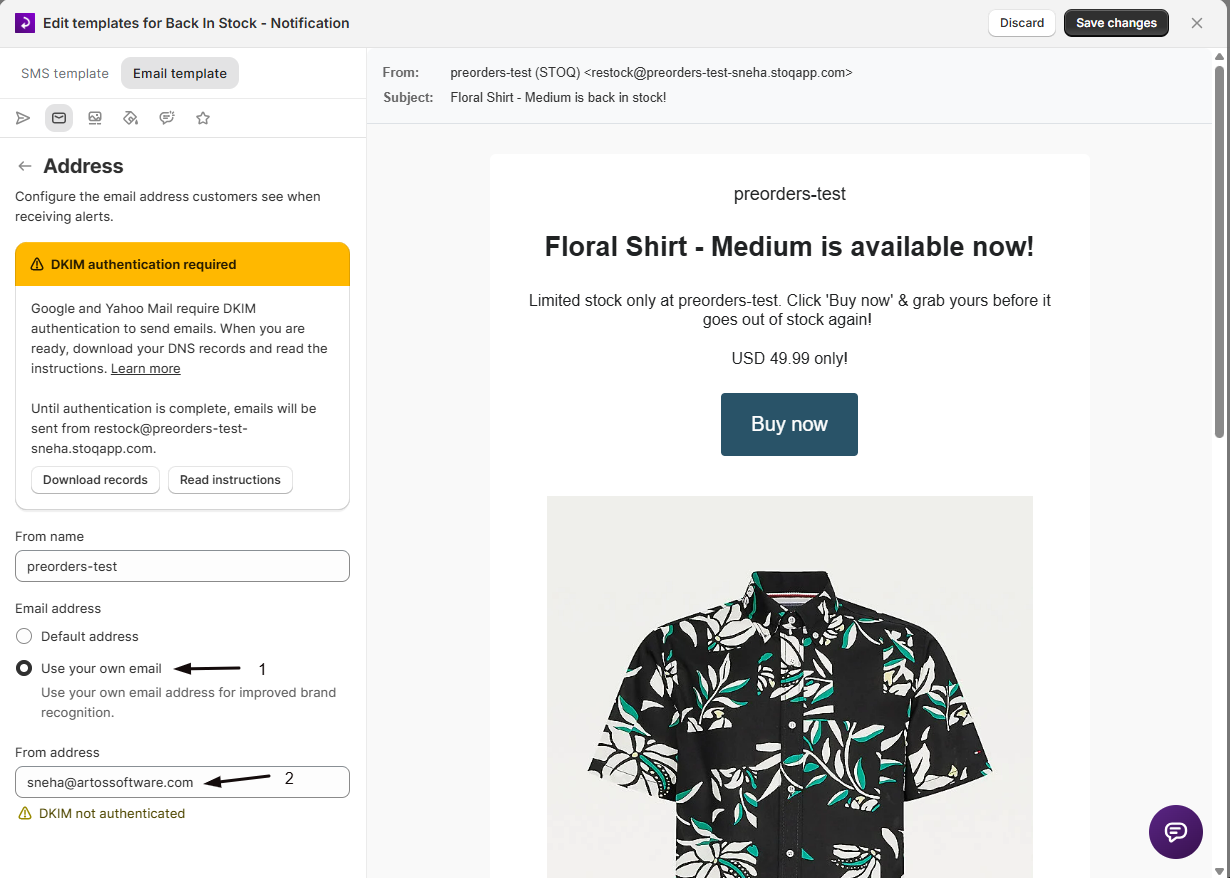
Enter your custom address, if used
With Use your own email selected, enter the address in the From address field.
Authenticate your custom address (DKIM)
A custom address must complete DKIM authentication before STOQ sends from it. DKIM (DomainKeys Identified Mail) adds a digital signature that proves your emails genuinely come from your domain, which is what lets them reach the inbox at Gmail, Yahoo, and other providers. Since February 2024, Google and Yahoo require it for bulk senders. Until authentication finishes, emails keep sending from the default STOQ address and show the "(STOQ)" label.
Which email addresses work
Your custom address must:
- Use a custom domain you own, for example
hello@yourstore.com. - Not be a free provider address (Gmail, Yahoo, Hotmail, Outlook, iCloud, and similar are not allowed).
- Be a valid address on a domain that can receive email.
If the address isn't eligible, STOQ shows an Email address ineligible for sending banner and keeps using the default address until you change it.
Download your DNS records
Open the DKIM banner
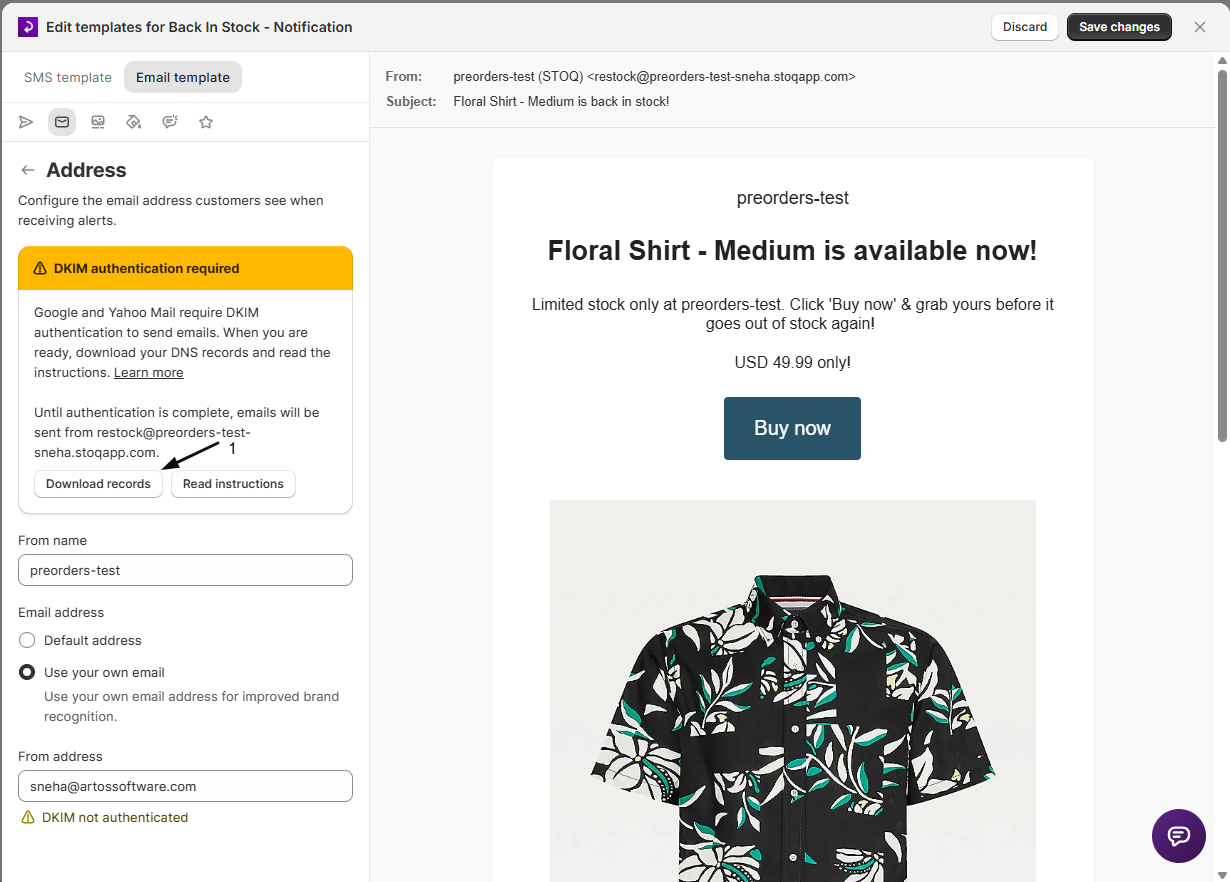
After you enter a custom address and save, a DKIM authentication required banner appears in the Address panel.
Download the records
Click Download records. STOQ generates a CSV file containing three CNAME records specific to your domain. Save it, you'll need it for the next steps. Click Read instructions any time to reopen the setup guide.
Understanding the DKIM record format
The CSV contains three CNAME records in this format:
| Name | Type | Value |
|---|---|---|
xxxxxxxx._domainkey.yourdomain.com | CNAME | xxxxxxxx.dkim.amazonses.com |
yyyyyyyy._domainkey.yourdomain.com | CNAME | yyyyyyyy.dkim.amazonses.com |
zzzzzzzz._domainkey.yourdomain.com | CNAME | zzzzzzzz.dkim.amazonses.com |
You must add all three. A partial setup will not authenticate.
Adding DKIM records to your DNS
Add each record at whichever provider hosts your domain's DNS (your domain registrar or host, for example GoDaddy, Cloudflare, Namecheap).
Open your DNS settings
Go to your domain's DNS management page and choose to add a new record, with the record type set to CNAME.
Enter the Name
Copy the value from the Name column of the CSV (for example myc2hajp4qreukhgkr6fvoidt6ilnd47._domainkey.yourdomain.com) and paste it into the Name, Host, or Label field.
Enter the Value
Copy the matching value from the Value column (for example myc2hajp4qreukhgkr6fvoidt6ilnd47.dkim.amazonses.com) and paste it into the Value, Target, or Destination field.
Save and repeat
Save the record, then repeat for all three CNAME records. DNS changes can take up to 72 hours to take effect, though they often propagate much sooner.
Provider-specific DNS setup
Some hosts want only the part before your domain in the Name field. Enter just the _domainkey portion, not the full yourdomain.com:
Google Domains
In the Name column, enter only xxxxxxxx._domainkey (leave off yourdomain.com).
Namecheap
In the Host field, enter only xxxxxxxx._domainkey (leave off yourdomain.com).
Shopify
In the Name field, enter only xxxxxxxx._domainkey (leave off yourdomain.com).
Squarespace
In the Host field, enter only xxxxxxxx._domainkey (leave off yourdomain.com).
Verifying DKIM setup
Wait for the records to propagate
After adding all three CNAME records, give DNS time to update, usually 15 minutes to 2 hours (up to 72 hours in some cases).
Refresh the Address panel
Return to the Address panel and refresh the page. STOQ checks your DNS automatically, no manual verify button is needed.
Confirm it's authenticated
When it's done, the status changes from DKIM not authenticated to DKIM authenticated. Emails then send from your custom address and the "(STOQ)" label is removed.
If DKIM isn't authenticated within 48 hours, contact STOQ support from the chat in the app, they can check your records and restart verification with the email provider (AWS).
Troubleshooting
Emails still show the (STOQ) label after switching to a custom address
DKIM authentication hasn't completed yet. Emails keep sending from the default address, with the "(STOQ)" label, until the 3 CNAME records are verified. Click Download records in the DKIM banner and confirm they're added at your domain host.
Use your own email is disabled
This requires a paid plan. Upgrade to unlock a custom sending address.
Email address ineligible for sending banner
The custom address you entered can't be used to send emails. Use an address on a custom domain, not a free email provider, or switch back to Default address. Emails keep sending from the default address until you fix this.
DKIM isn't authenticating after you added the records
Check these:
- All three CNAME records were added, not just one or two.
- Each record's Name and Value match the CSV exactly (some hosts want only the
_domainkeypart, see Provider-specific DNS setup above). - Enough time has passed for DNS to propagate (up to 72 hours).
If it still hasn't authenticated after 48 hours, contact STOQ support from the chat in the app so they can check your records and restart verification.
FAQ
Why does my email say '(STOQ)' after my shop name?
It's appended automatically whenever you're sending from the default STOQ address, so customers can tell the alert came through STOQ. It's removed once you switch to your own custom address and complete DKIM authentication.
Does changing the From name or address affect emails already sent?
No. It only applies to emails sent after you save; any alert already delivered keeps the sender details it was sent with.
Can I use any email address as my custom From address?
It needs to be on a domain you control, not a free provider address, and it must complete DKIM authentication. If the address is ineligible, STOQ shows a banner and keeps sending from the default address until you fix it.
Is the From name shared with the SMS channel?
No, SMS alerts don't use the From name or address, only email does.
Related guides
Customize the back in stock email notification
The full email hub: subject, content, styling, and sending.
Back in stock SMS alerts
Set up the text message version of the restock notification.
Back in stock email delivery channels
Choose between the built-in sender and third-party providers.
Test back in stock alerts
Send yourself a real restock alert before going live.