Advanced placement and custom CSS
Use this guide if you want to place the 'Notify me' widget somewhere the automatic options don't reach, or add your own CSS or JavaScript to it. It's code-facing: expect to know basic CSS, and for the JavaScript field, basic front-end scripting. Dev mode, Custom CSS, and Custom JavaScript are available on every plan, free or paid, and by the end customers will see the widget positioned, styled, or behaving exactly as you set it up.
Before you begin
| Requirement | Detail |
|---|---|
| The 'Notify me' widget is enabled | On the Back in stock alerts page, the 'Notify me' widget toggle must be on |
| Comfort with CSS selectors | Custom position and inline form placement require a .class or #id selector from your theme's HTML |
| A safe way to test | Changes in Dev mode's code fields cannot be previewed in the editor: you save, then check your live storefront |
If you're not comfortable identifying a CSS selector or writing CSS/JavaScript, leave Dev mode off and use the automatic positions instead, or contact STOQ support for help placing the widget.
Choose your setup
Turning on Dev mode reveals additional controls across the editor, not just the code fields on this page. Turn it on for any of these:
- Custom position for the button: in Button position & style, a Custom position option appears under Button position, letting you enter a CSS selector for your theme's "Sold out" button so STOQ can insert the 'Notify me' button next to it.
- Custom position for collection, home, search, and custom pages: similar selector-based placement options appear in those sections when Dev mode is on. See Notify me button on store pages.
- Inline form position: control exactly where an on-page signup form is inserted, set up below.
- Custom CSS and Custom JavaScript: the two code fields on this page, set up below.
What customers will see
Customers never see the Dev mode section itself: it's a merchant/developer-only editing surface. What they experience is the effect of what you configure here:
- Any custom position selectors take effect where the widget or inline form is inserted on the page.
- Custom CSS changes how the widget looks.
- Custom JavaScript runs whatever behavior you've coded into it on each storefront page load.
Set it up
On a phone, this menu is collapsed. In the Shopify mobile app, tap the STOQ logo at the top of the screen to open it, then choose the section named below. There is no hamburger icon. See Finding the STOQ menu.
Turn on Dev mode
Open the widget editor
- In the left menu bar of the STOQ app, click Back in stock alerts.
- Click the Settings tab.
- Open the Signup widget sub-tab.
- Click Customize widget.
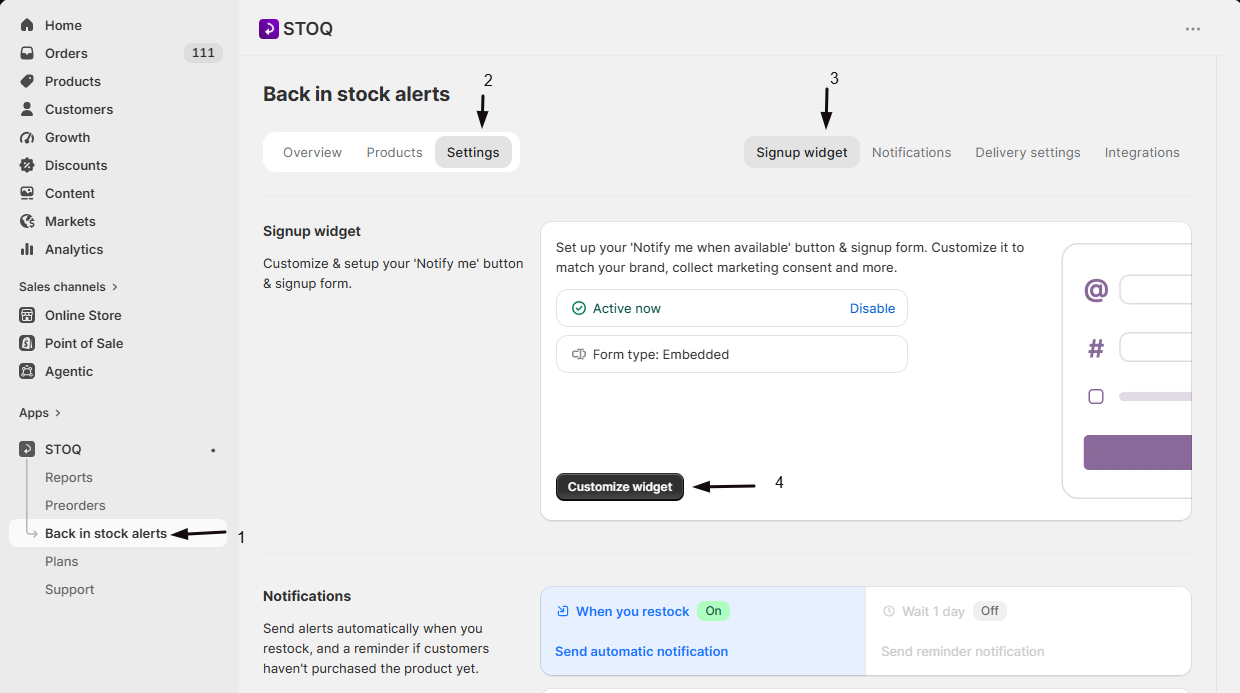
Open the Advanced (Dev mode) section
On the Button tab, click Advanced (Dev mode) in the sidebar. The Signup form tab has its own Advanced (Dev mode) section in its sidebar too.
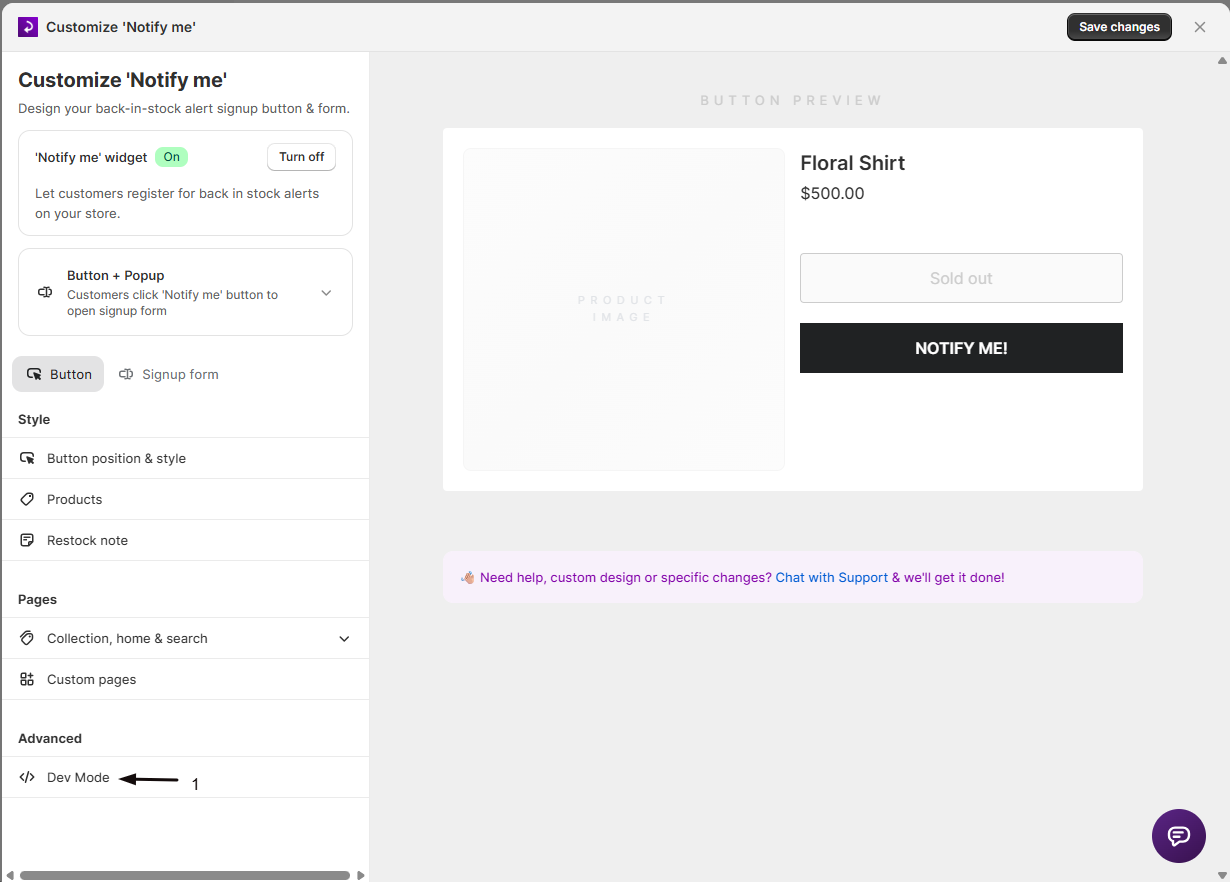
Turn on the Dev mode toggle
Switch on Dev mode. This doesn't change any of your current settings: it only reveals additional advanced controls across the other design sections.
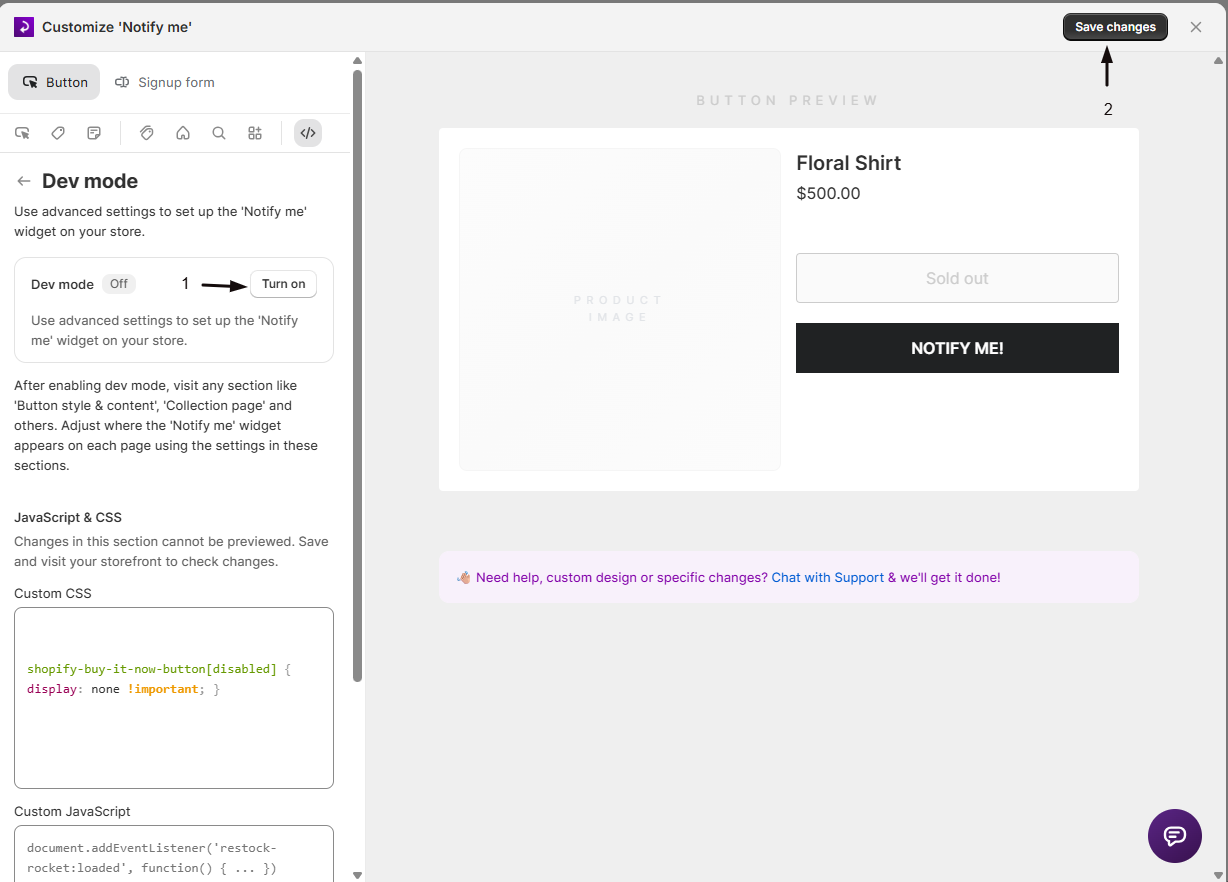
Turning Dev mode off again doesn't erase anything you set up: it just hides the advanced controls. Any custom CSS or JavaScript you saved keeps running on your storefront either way.
Set the inline form position
If you've switched your signup experience to an on-page (inline) form instead of the button-and-popup flow (see Design the signup form), Dev mode adds a way to control exactly where that form is inserted on the product page.
Enter a form container selector
In Form container selector, enter a .class or #id from your theme, for example .product-form, marking the element the form should be placed relative to.
Choose the position relative to that selector
In Position relative to selector, choose one of four insertion points:
- Add before container (beforebegin): form is inserted immediately before the selected element
- Add to start of container (afterbegin): form is inserted as the first child inside the selected element
- Add to end of container (beforeend): form is inserted as the last child inside the selected element
- Add after container (afterend): form is inserted immediately after the selected element, this is the default
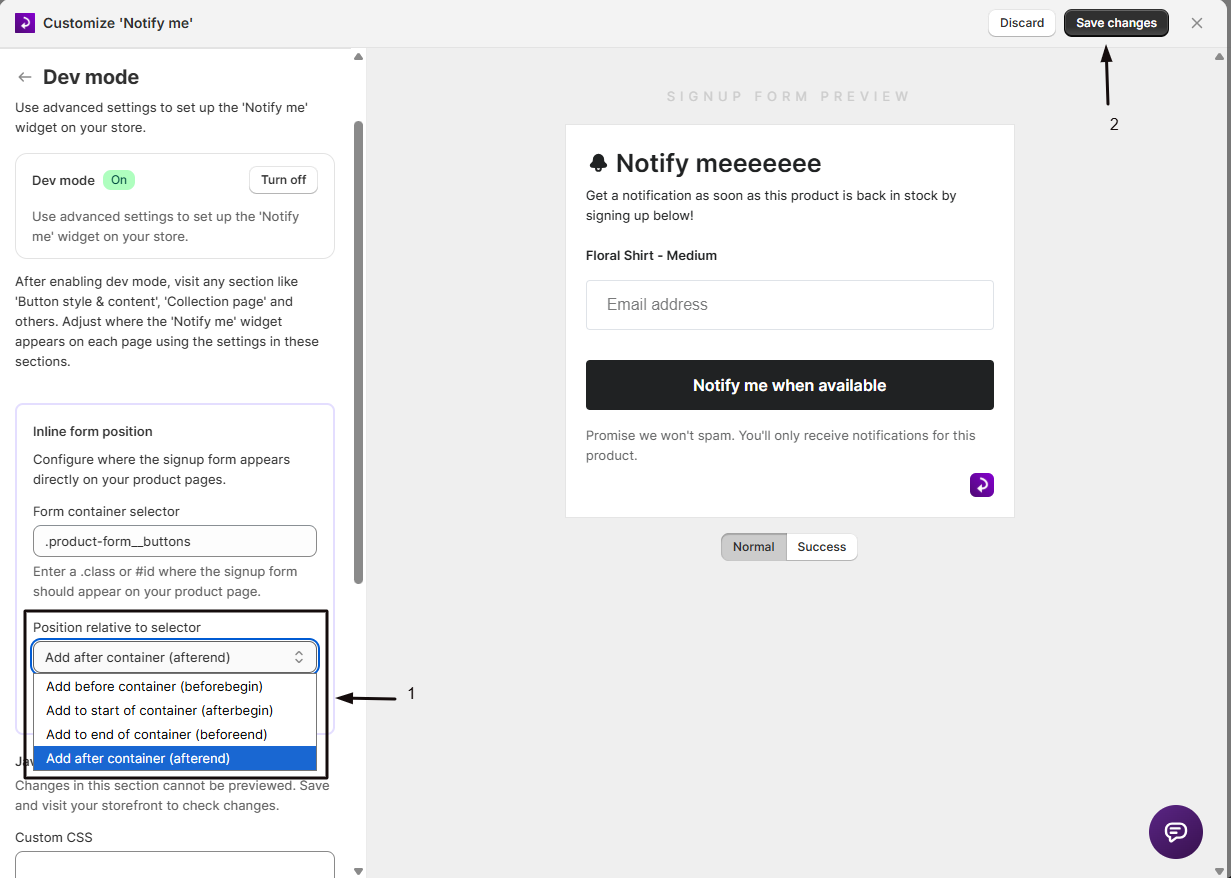
Add custom CSS
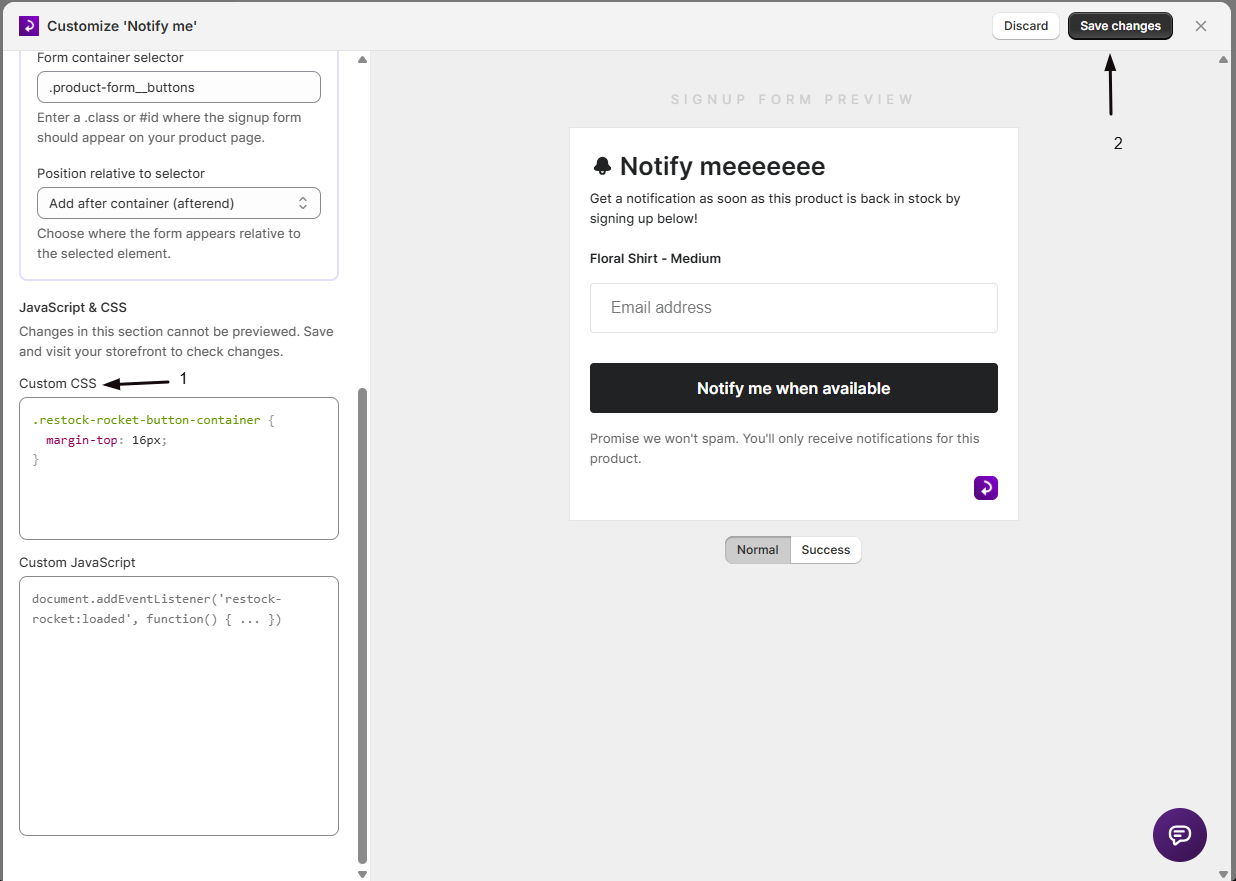
The Custom CSS field lets you write CSS that STOQ inserts into a <style> tag on every storefront page where the widget loads. Use it to override colors, spacing, fonts, or anything else the visual controls elsewhere in the editor don't expose.
.restock-rocket-button-container {
  margin-top: 16px;
}
STOQ adds its own class and id names to every element it puts on your storefront, so you can target them from the Custom CSS field. Because STOQ also applies its own styles, you often need !important to make an override stick.
The 'Notify me' button
| Selector | What it targets |
|---|---|
.restock-rocket-button | The button on any page |
.restock-rocket-button-product | The button on product pages |
.restock-rocket-button-collection | The button on collection pages |
.restock-rocket-button-container | The wrapper around the button |
.restock-rocket-button-float | The floating button |
.restock-rocket-button-container-float-right | The floating button container, right side |
.restock-rocket-button-container-float-left | The floating button container, left side |
.restock-rocket-button-hover | The button's hover state |
The restock note
| Selector | What it targets |
|---|---|
.restock-rocket-restock-note | The restock note container |
#restock-rocket-restock-note-container | The restock note container, by id |
.restock-rocket-restock-note-text | The restock note text |
The signup popup and form
| Selector | What it targets |
|---|---|
.restock-rocket-wrapper | The popup overlay background |
.restock-rocket-wrapper-inline | The inline form overlay |
#formContainer | The popup container |
#formContainer-Inline | The inline form container |
#restock-rocket-inline-container | The container STOQ creates for an inline (on-page) form |
#formContainer-Close | The close button |
#form-Header-Container | The header section |
#form-Header-Icon | The header icon (the bell) |
#form-Header-Text | The header text |
#form-Description | The description text |
#form-Product-Name | The product name |
#form-Select | The variant selector dropdown |
#form-Quantity-Container | The quantity field wrapper |
#form-Quantity-Label | The quantity label |
#form-Quantity | The quantity input |
#form-Email-Container | The email field wrapper |
#form-Email | The email input |
#form-Phone-Container | The phone field wrapper |
#form-Phone | The phone input |
#form-CountryCode | The country code dropdown |
#form-Name-Container | The name field wrapper |
#form-Name | The customer name input |
#form-Channels-Container | The channel tabs wrapper |
#form-Channel-Selected | The active channel tab |
#form-Channel-Available | An inactive channel tab |
.form-Channel-Name | The channel tab text |
#form-Consent-Container | The consent checkbox wrapper |
#form-Consent-Checkmark | The consent checkmark |
#form-Error-Message | The error message |
#form-Button | The submit button |
#form-Terms | The terms text |
#form-Promotion | The 'Powered by STOQ' text |
#form-Resubscribe-Banner | The resubscribe banner |
The success state
| Selector | What it targets |
|---|---|
#form-Success-Content | The success confirmation wrapper |
#form-Success-Container | The success container |
#form-Success-Icon | The success icon |
#form-Success-Text | The success message |
Field validation states
| Selector | What it targets |
|---|---|
.form-Input-Error | A field with a validation error |
.form-Input-Success | A field that passed validation |
You can also use Custom CSS to hide your theme's native Sold out button on out-of-stock products, so only the 'Notify me' button shows. The selector for that button belongs to your theme, not STOQ, so it varies from theme to theme. If you're not sure which selector to target, STOQ support can set it up for you: open the purple chat icon in the bottom-right of the STOQ app and choose Talk to a human.
Add custom JavaScript
The Custom JavaScript field runs the code you enter directly on your storefront pages, early in the page load, before the 'Notify me' button or restock note are added to the page. Use it for behavior the standard settings don't cover, such as integrating with another script on your theme. This is placeholder text shown in the field to illustrate the kind of code it expects:
document.addEventListener('restock-rocket:loaded', function () { ... })That placeholder is only an example of the syntax the field accepts, not a documented integration point, so confirm any event names or hooks you rely on by testing on your live storefront.
This field executes whatever you enter as live JavaScript on every storefront page load. A mistake here can prevent the 'Notify me' button or restock note from appearing on that page, and can break your storefront for customers more broadly: test on a duplicate theme or during low-traffic hours, and keep a copy of your working code before making changes.
Check your setup
- Save your changes in the editor.
- Open your live storefront in a new tab (Dev mode changes are not shown in the editor's preview pane).
- For selector-based placement: confirm the button or form appears in the expected spot, next to the element you targeted.
- For custom CSS: confirm the visual change appears as expected.
- For custom JavaScript: open your browser's developer console to confirm your code ran without errors.
Troubleshooting
You can't see your CSS or JavaScript changes in the editor preview
This is expected. Custom CSS and JavaScript are injected only on the live storefront, not the editor preview. Save your changes and check your live store instead.
A custom position selector doesn't insert the widget or form in the expected spot
Your CSS selector doesn't match anything on your theme's page. Double-check the class or ID and test again on your live storefront after saving.
Your custom JavaScript broke something on your storefront
Go back to the widget editor, open Advanced (Dev mode), and remove or fix the problematic code in the Custom JavaScript field, then save. Keep a backup of any working script outside STOQ before you edit it, since there's no built-in validation. If the 'Notify me' button or restock note stopped appearing at the same time, a JavaScript error in this field is a likely cause, since it runs before they're added to the page.
FAQ
Can I hide the theme's 'Sold out' button?
Yes, with custom CSS. On out-of-stock products you can hide your theme's native Sold out button so only the 'Notify me' button shows. The button belongs to your theme, so its CSS selector varies from theme to theme, there's no single rule that works everywhere. If you're not sure which selector to target, STOQ support can set it up for you: open the purple chat icon in the bottom-right of the STOQ app and choose Talk to a human.
What does turning on Dev mode actually change?
By itself, turning on Dev mode doesn't change anything visible to customers. It reveals extra controls across the editor, hidden by default to keep the editor simple:
- Custom position fields for the button and store pages.
- Inline form position fields.
- This page's Custom CSS and Custom JavaScript fields.
I turned off Dev mode: did I lose my custom CSS or JavaScript?
No. Turning Dev mode off only hides the advanced controls from view; it doesn't clear or disable anything you've already saved. Your custom CSS and JavaScript keep running on the storefront. Turn Dev mode back on any time to edit them again.
What's the difference between the inline form selector here and the Custom position selector on the button?
They control different things. The button's Custom position selector (in Button position & style) places the 'Notify me' button itself. The inline form selector here (Form container selector / Position relative to selector) only applies when you've switched to the on-page form layout, and it places the embedded signup form instead of a button.
Can I use Dev mode without writing any custom CSS or JavaScript?
Yes. Many merchants turn on Dev mode only to use the Custom position selector fields (for the button or store pages) or the inline form position fields, without ever touching the Custom CSS or Custom JavaScript fields.
Is there a list of class names I can target in Custom CSS?
The two most useful are .restock-rocket-button-container (the 'Notify me' button's wrapper) and #restock-rocket-inline-container (the inline form's container). Other elements can be targeted too, but you'll need to inspect your storefront's rendered HTML to find their class names, since they aren't otherwise documented.
Related guides
Design the 'Notify me' button
Set the button's automatic position options, or find the Custom position control that Dev mode unlocks.
Design the signup form
Switch between the popup form and the on-page (inline) form layout.
'Notify me' button on store pages
See the Custom position selectors Dev mode adds for collection, home, search, and custom pages.
Back in stock alerts overview
See how widget placement fits into the full back-in-stock flow.