Design the Notify me button
Use this guide to set the text, colors, border radius, and position of the 'Notify me' button that appears on out-of-stock product pages. By the end, customers will see a button that matches your theme and sits where you want it on the page.
Before you begin
| Requirement | Detail |
|---|---|
| The 'Notify me' widget is enabled | On the Back in stock alerts page, the widget toggle at the top must be on, or the button won't appear anywhere on your storefront |
| Access to the widget editor | You'll open it from Back in stock alerts → Settings → Signup widget → Customize widget |
| The popup button-and-form experience | This guide applies to the popup button-and-form signup experience. If your store uses the "On page" signup experience instead, there's no separate button to style |
Choose your setup
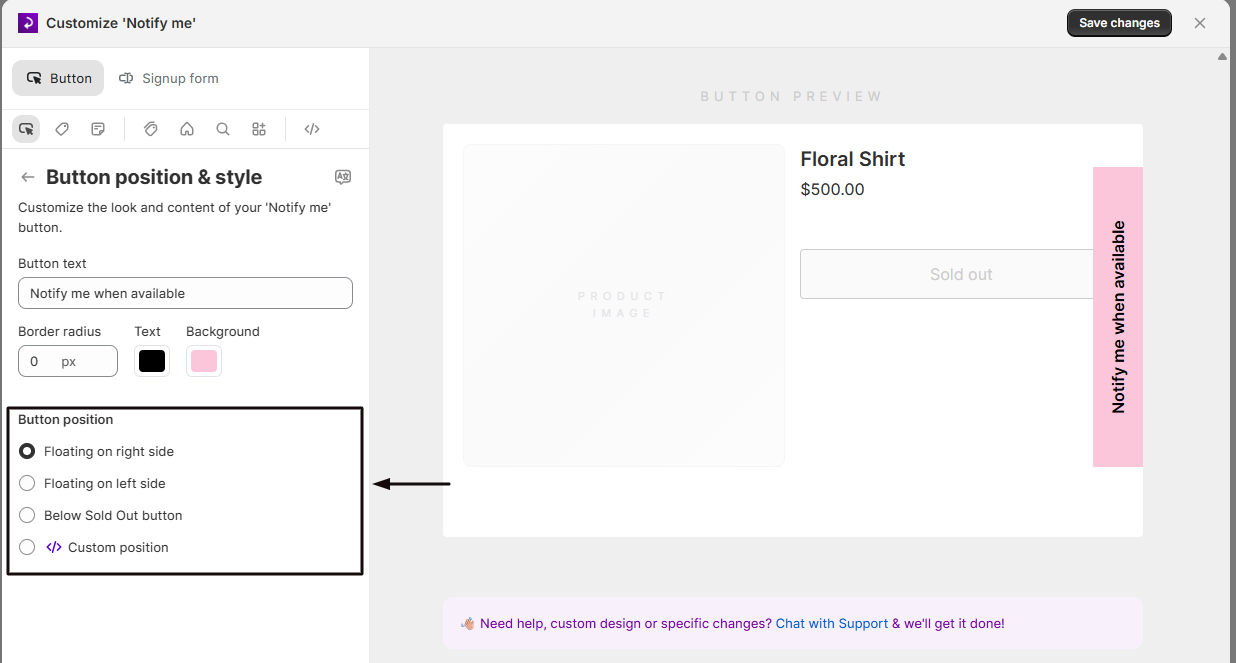
Button position determines where the button is inserted on the product page. Up to four choices are available, depending on your account:
- Below Sold Out button: STOQ automatically inserts the button directly after your theme's "Sold out" button. Works for most themes without any extra setup, and is the option to start with.
- Floating on right side: the button is pinned to the right edge of the page, rotated vertically. This is the default for new shops.
- Floating on left side: the button is pinned to the left edge of the page, rotated vertically.
- Custom position: only available in Dev mode. Lets you specify exactly where on the page the button should be inserted using a CSS selector from your theme's code, useful for themes STOQ can't auto-detect correctly.
Some accounts don't get the radio options above at all; instead they see a status message saying the button is placed automatically, with a Change position button that opens a chat with STOQ support to request a change.
What customers will see
On the storefront, the 'Notify me' button appears on out-of-stock product pages, subject to the product-level eligibility rules configured in the Products section, in the position, text, and colors you configured:
- If Below Sold Out button is selected, the button appears directly under the disabled "Sold out"/"Add to cart" button, styled full-width to match the layout around it.
- If Floating on right or Floating on left is selected, the button appears as a vertical tab fixed to that edge of the screen.
- If Custom position is selected, the button is inserted immediately after the HTML element matching your selector.
Clicking the button opens the signup form, styled separately, see Design the signup form.
Set it up
On a phone, this menu is collapsed. In the Shopify mobile app, tap the STOQ logo at the top of the screen to open it, then choose the section named below. There is no hamburger icon. See Finding the STOQ menu.
Open the widget editor
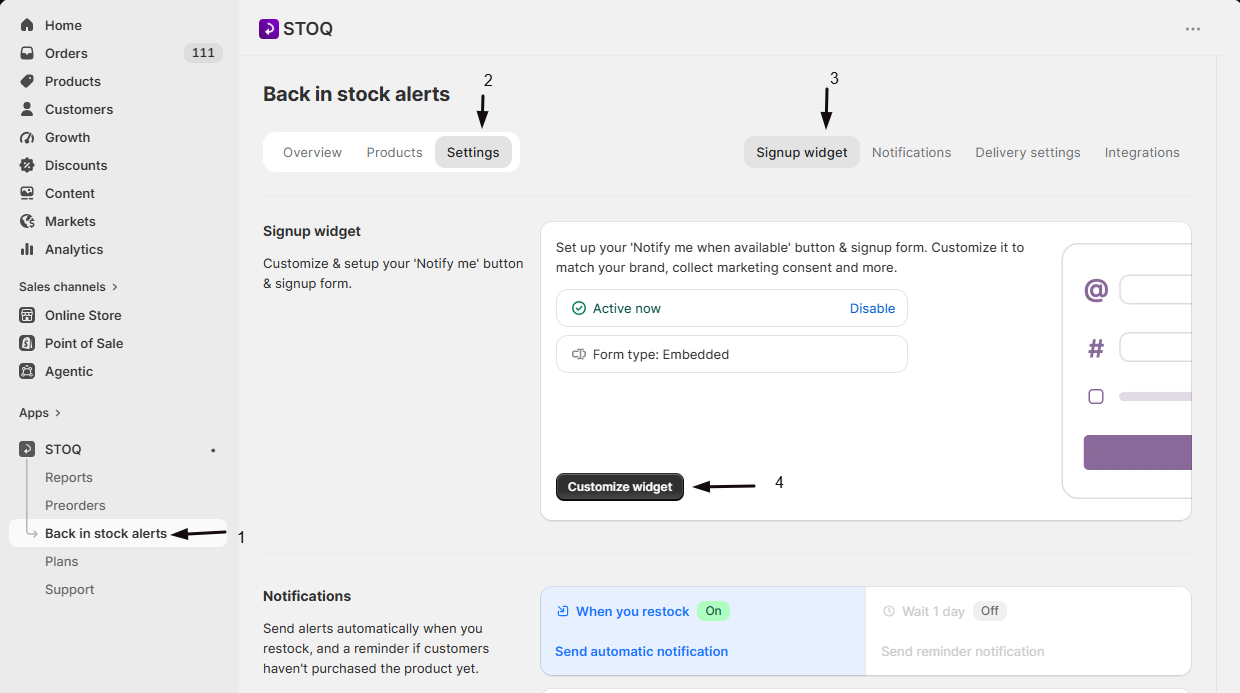
- In the left menu bar of the STOQ app, click Back in stock alerts.
- Click the Settings tab.
- Open the Signup widget sub-tab.
- Click Customize widget to open the editor.
Open Button position & style
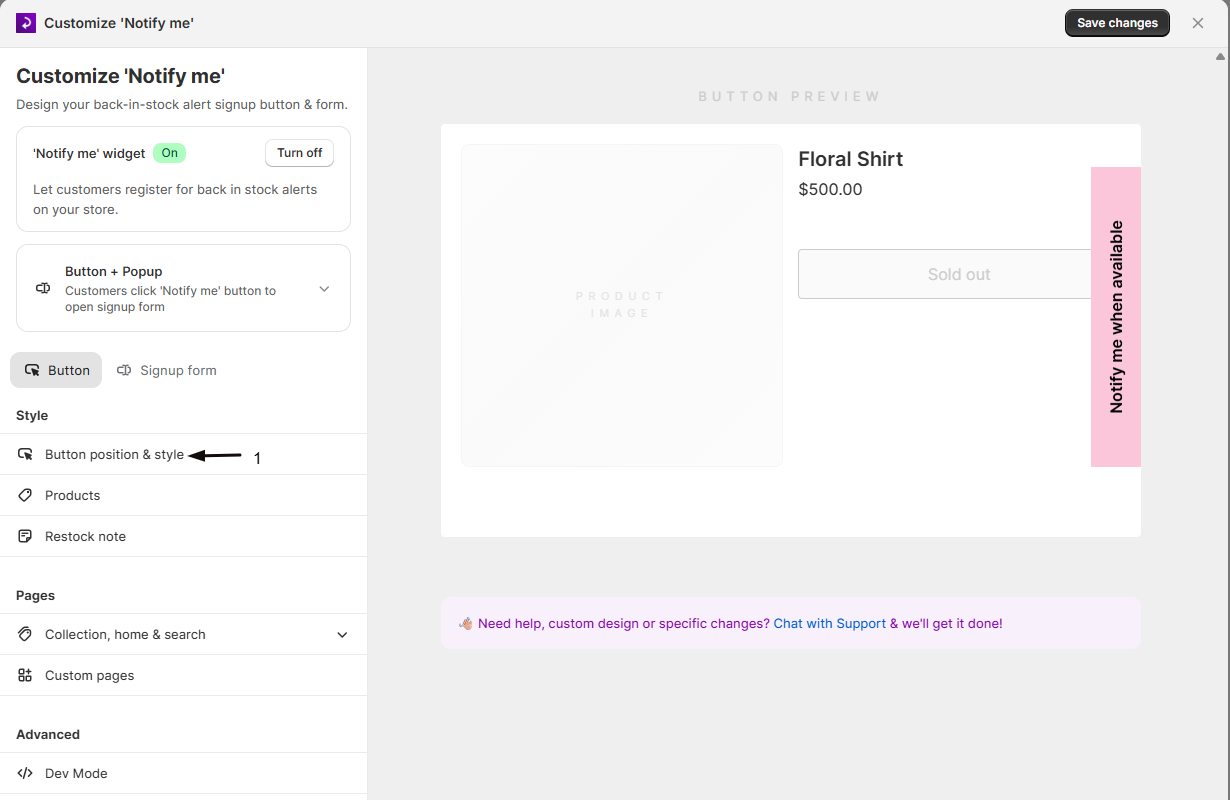
- In the editor, open the Button tab (it opens by default when you enter the editor).
- Under the Style heading in the sidebar, click Button position & style (a live preview of the button appears alongside the controls).
Set the button text
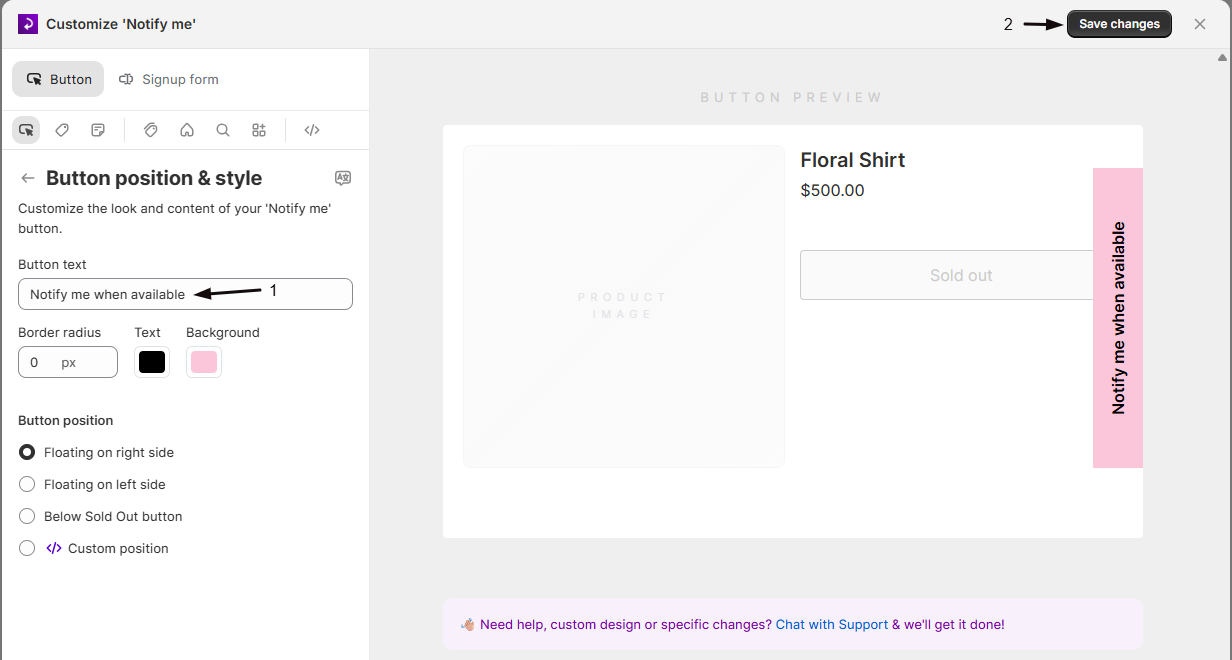
In Button text, enter the label for the button. The default is "Notify me when available". This field is required, if it's left blank, STOQ shows an inline validation error and the button has no visible label on the storefront. This text is translatable: click the language icon at the top of the panel to add translations for other languages your store supports.
Set border radius and colors
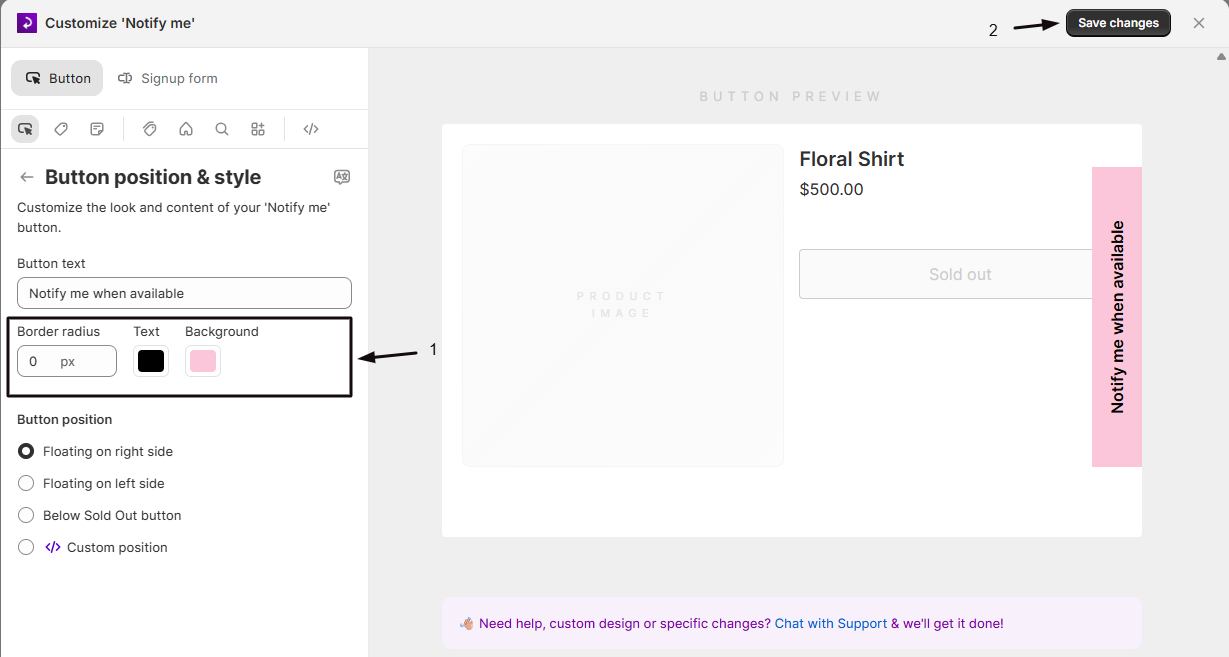
Below the button text, three controls style the button's appearance:
| Control | Default | What it does |
|---|---|---|
| Border radius | 0px | Rounds the corners of the button, in pixels |
| Text color | #FFFFFF | The button label's text color |
| Background color | #202223 | The button's background color |
Click a color swatch to open the color picker and choose a custom color, or enter a hex code directly.
Choose the button position
Below the style controls, select Below Sold Out button, Floating on right side, or Floating on left side using the radio buttons. See Choose your setup above for how these differ. If your account shows a status message instead of radio options, click Change position to request a change from STOQ support.
Confirm placement on your storefront
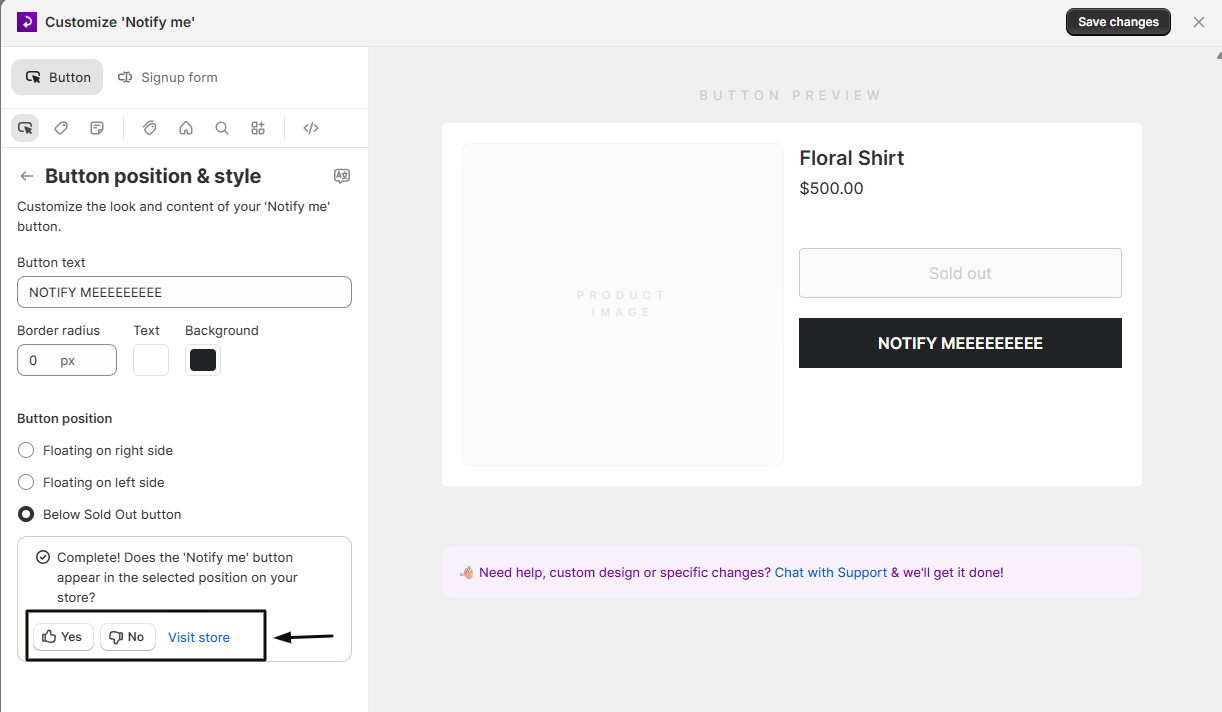
After choosing Below Sold Out button, STOQ shows a confirmation prompt asking whether the button appears correctly on your store.
- Visit your storefront to check.
- Click Yes or No in the prompt.
Get help if it's not positioned correctly
If you click No, a Chat with Support option appears so STOQ's support team can fix the placement for you. If you'd rather adjust it yourself, click I'll do it myself to reveal the custom position controls.
(Optional) Set a custom position with Dev mode
In the sidebar, under the Advanced heading, click Dev Mode and turn it on (this reveals a Custom position radio option under Button position & style).
- Select Custom position to reveal a 'Sold out' button selector field.
- Enter a CSS class or ID from your theme's code, for example
.product-buttons. STOQ inserts the 'Notify me' button immediately after that element.
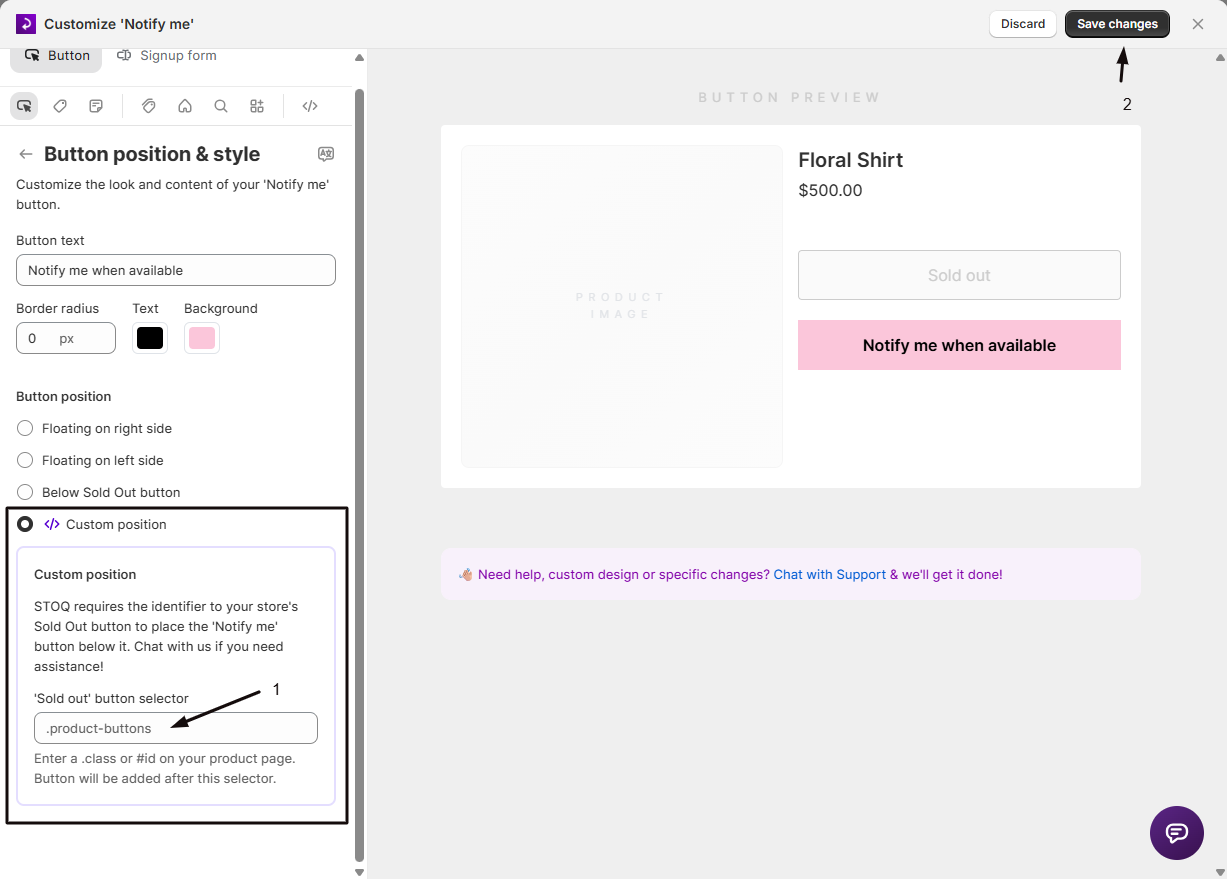
Custom position requires knowing your theme's HTML structure. If you're not comfortable identifying a CSS selector, leave Dev mode off and use Below Sold Out button instead, or contact STOQ support for help placing the button.
Check your setup
- Save your changes in the widget editor.
- Visit an out-of-stock product page on your live storefront.
- Confirm the button shows your configured text, colors, border radius, and appears in the position you selected.
Troubleshooting
The button isn't showing on your product page at all
Check that the widget toggle at the top of the Back in stock alerts page is on. If it's on and the button still isn't visible, the product or variant may not meet the eligibility rules in the Products section, for example it may not be marked out of stock, or it may be excluded by a tag. See Notify me product eligibility.
You don't see Button position radio options, just a status message
Button position is managed automatically on your account. Click Change position to chat with STOQ support and request a change.
You selected 'Below Sold Out button' but the button appears in the wrong spot
Click No in the confirmation prompt, then Chat with Support so the team can fix the placement for you, or click I'll do it myself to switch to Custom position and specify the exact CSS selector yourself.
Custom position doesn't insert the button
Your CSS selector doesn't match anything on your theme's product page. Double-check the class or ID and test again on your live storefront after saving.
Limitations
Custom position requires Dev mode and a CSS selector you provide yourself, this is more setup than the automatic options and assumes some familiarity with your theme's HTML.
FAQ
Does changing the button text here also change the signup form title?
No. Button text only changes the label on the clickable button itself. The form that opens after a customer clicks it, including its title, fields, and messaging, is styled separately in the signup form section. See Design the signup form.
I turned on Dev mode by accident, will it break my button?
No. Turning on Dev Mode only reveals additional advanced controls, like Custom position, across the editor sections, it doesn't change your current button settings. You can turn it back off at any time from Dev Mode under the Advanced heading in the sidebar without losing your existing configuration.
Can I make the button float on both sides, or show two buttons?
No. Button position is a single choice (Below Sold Out button, Floating on right side, Floating on left side, or Custom position), and only one option applies at a time across your storefront.
Can I set a different button color for different products?
No. Button text, colors, and border radius are shop-wide settings that apply to every eligible product page. To control which products show the button at all, use the rules in the Products section rather than styling.
Related guides
Back in stock alerts overview
See how the 'Notify me' button fits into the full back-in-stock flow.
Design the signup form
Style the form that opens when a customer clicks the 'Notify me' button.
Notify me product eligibility
Control which products and variants show the 'Notify me' button.
'Notify me' button on store pages
Add the button to collection, home, search, and custom pages.
Notify me dev mode & custom CSS
Use advanced settings to fine-tune widget placement and styling.
Notify me restock note
Show a note below the button when a restock date is set.