Import your waitlist from another app
If you're moving to STOQ from another back in stock app, you can bring your existing waitlist with you. You upload a CSV of who is waiting on which product, and STOQ recreates those requests so those customers still get notified when the product restocks. STOQ doesn't connect to your old app directly, so you move the data yourself using a template.
Before you begin
| Requirement | Detail |
|---|---|
| App installed | STOQ is installed on your Shopify store |
| Your old waitlist exported | A list of pending requests from your previous app, with at least each customer's email and the product or variant they want |
| Admin access | Go to STOQ → Back in stock alerts in your Shopify admin |
What customers will see
Importing doesn't email anyone. Each imported row just joins the waitlist for its product or variant, exactly as if the customer had signed up on your store. Those customers get your normal restock alert later, when the product comes back in stock and meets your delivery settings.
Set it up
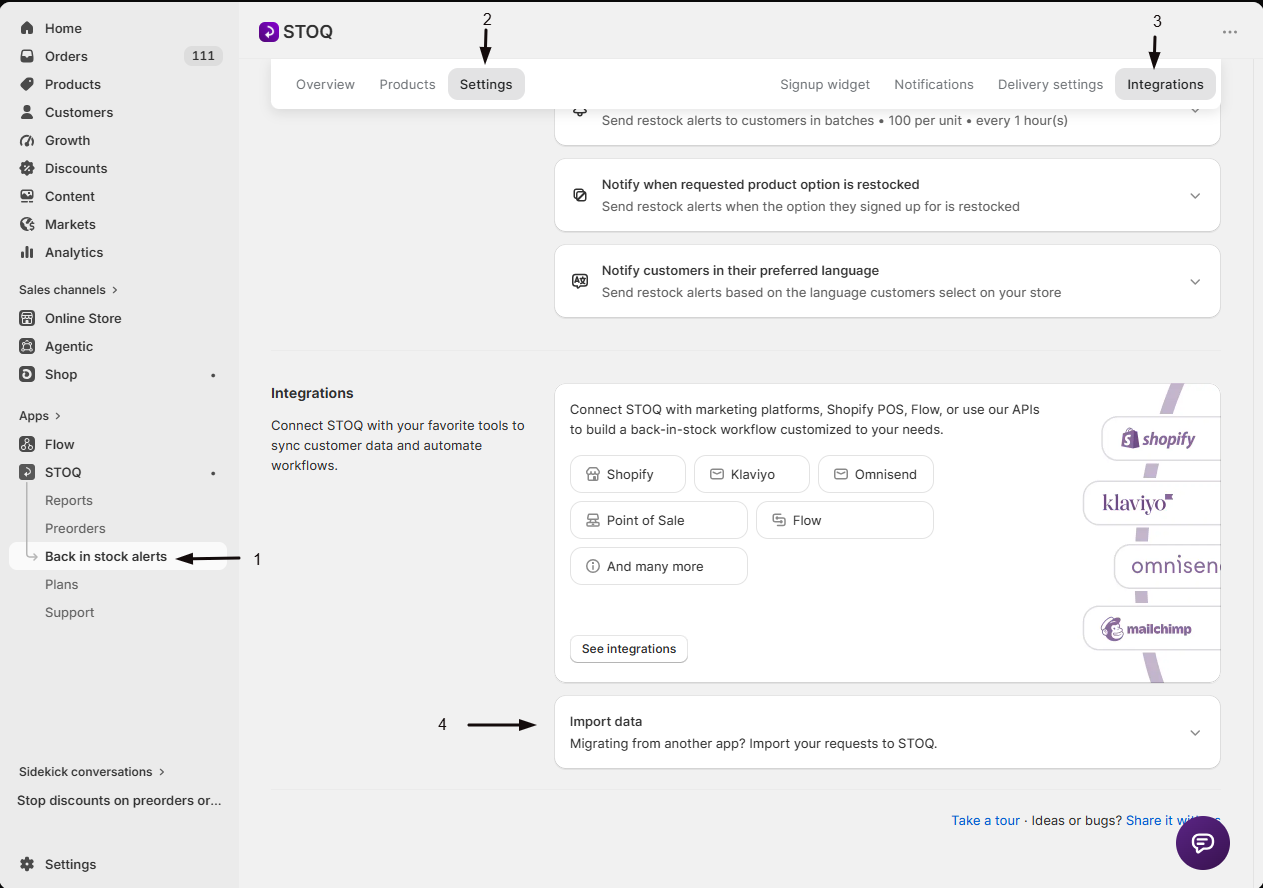
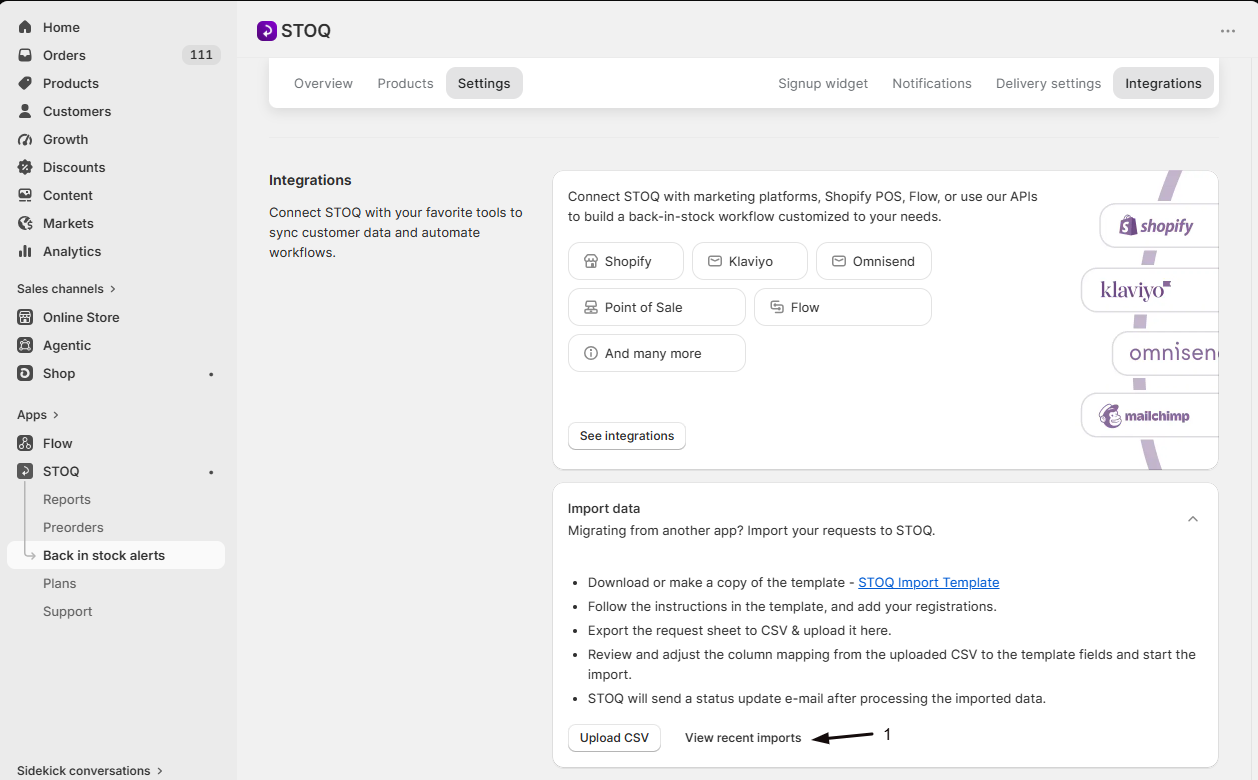
Open the Import data card
- In the STOQ admin, go to Back in stock alerts.
- Click the Settings tab.
- Open the Integrations sub-tab.
- Below the integrations section, find the Import data card and click it to expand the instructions.
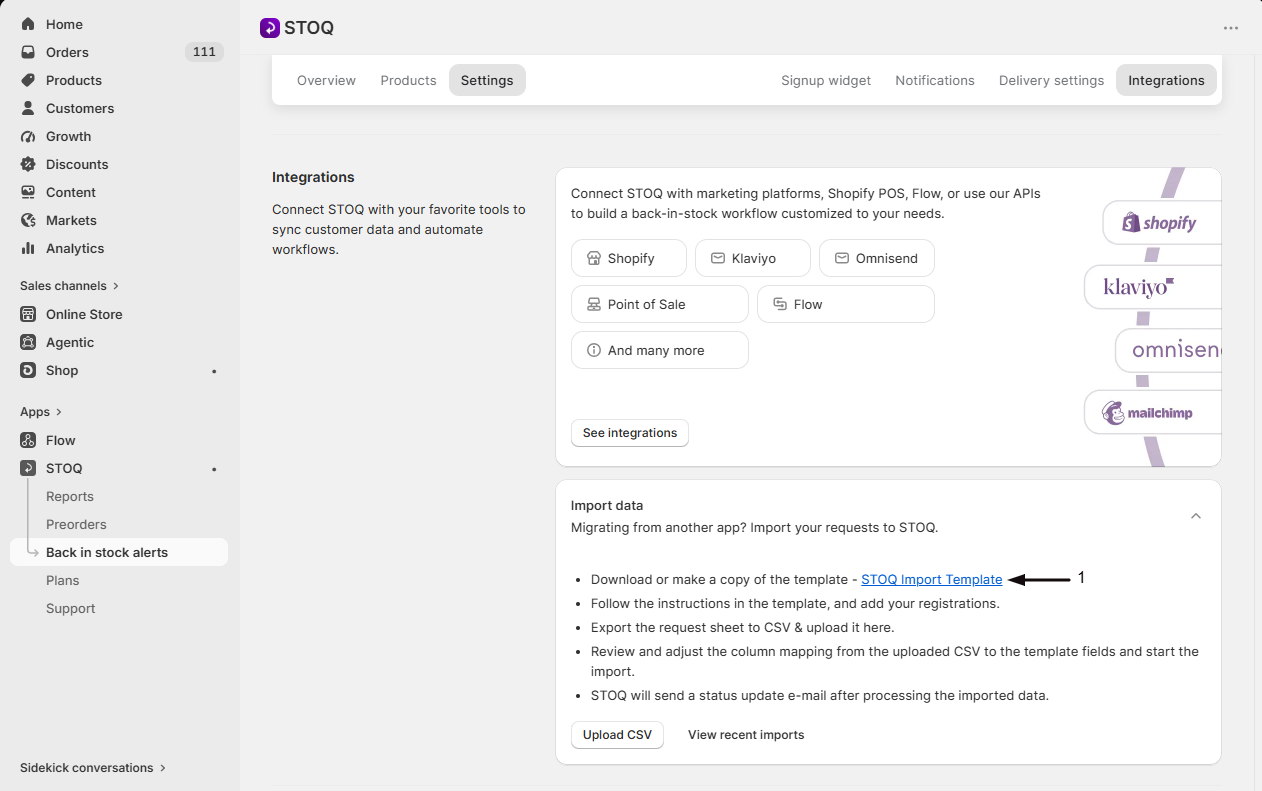
Copy the STOQ Import Template
- Click the STOQ Import Template link in the instructions to open the template.
- Make your own copy of the template so you can edit it (it has the columns STOQ expects and notes on how to fill each one in).
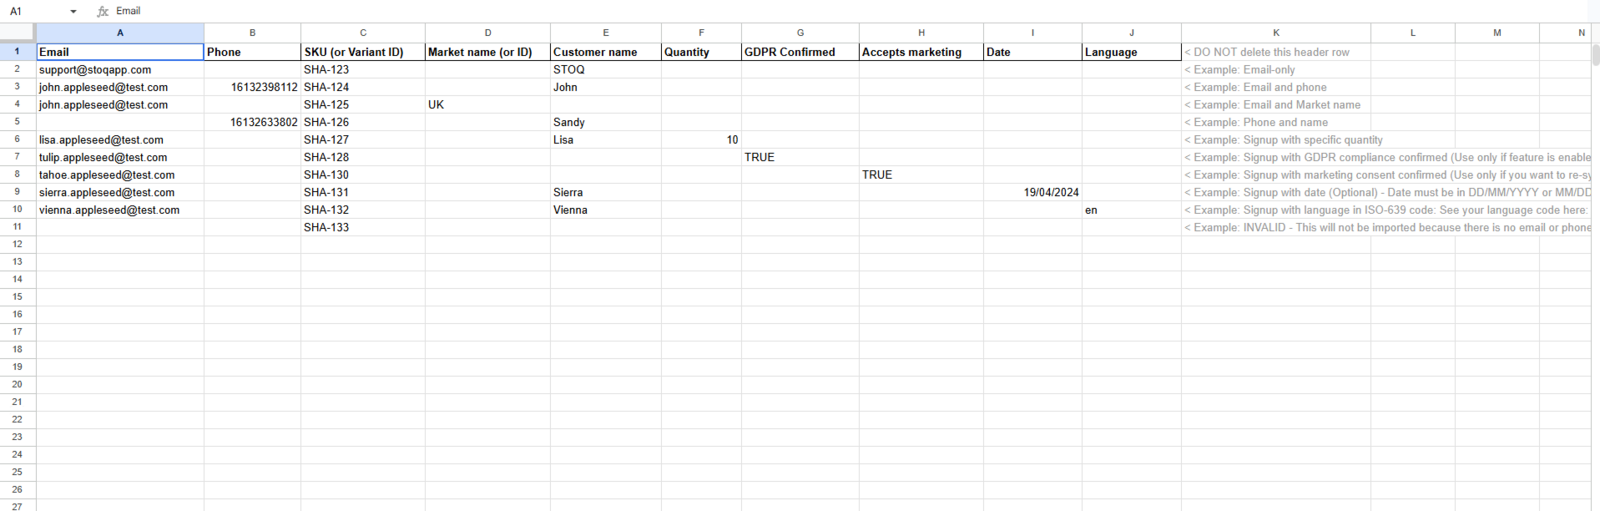
Add your requests to the template
Add one row per waiting customer: their email address and the product or variant they signed up for. Export the waitlist from your old app and move the data into the matching columns. See What goes in the CSV below for what each column expects.
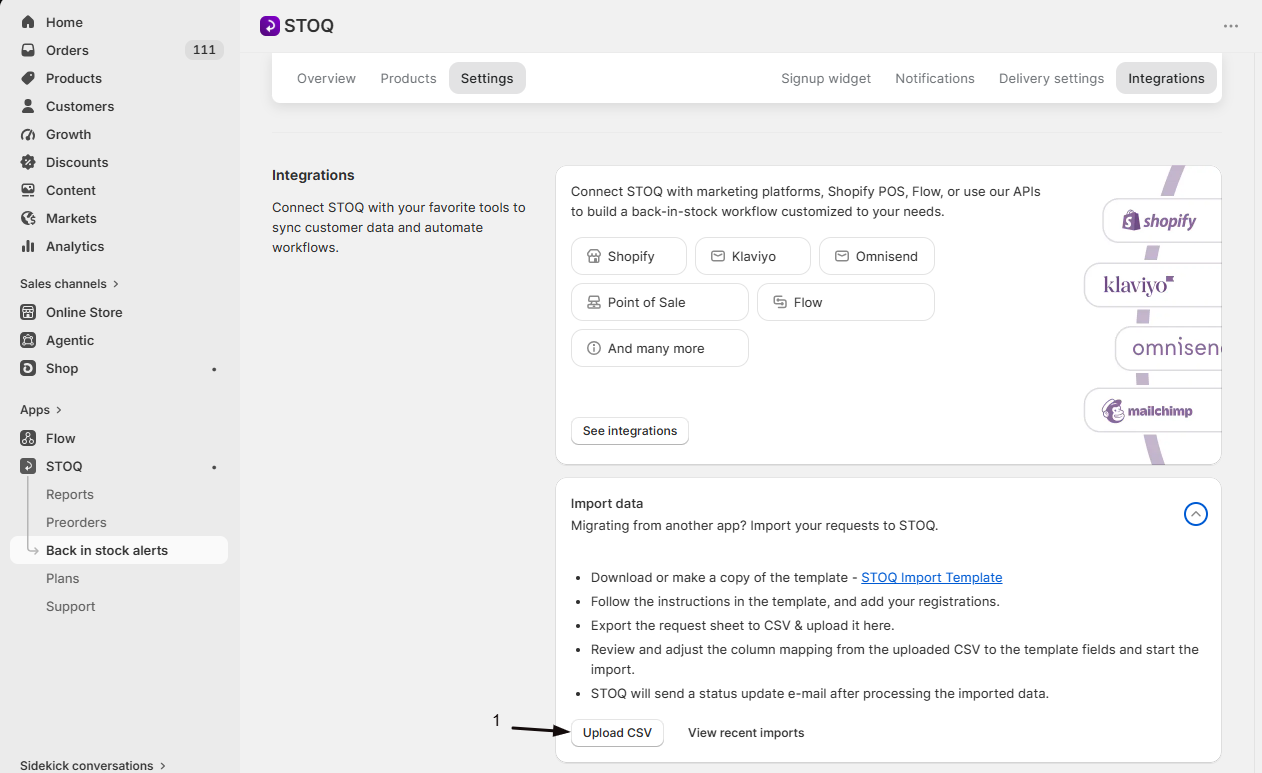
Export to CSV and upload it
- Export the finished sheet as a CSV file.
- Back in the Import data card, click Upload CSV.
- Choose your file.
Map the columns and start the import
STOQ lines up the columns from your CSV against the template fields and shows you the mapping. Adjust anything that didn't match, then start the import.
What goes in the CSV
The file must be a CSV (.csv), not an Excel file. Keep the header row: if your column names match the template's, STOQ maps them automatically, and you can fix any that don't in the mapping step. Each row is one customer waiting on one variant.
| Column | Required | What to put |
|---|---|---|
| SKU | Yes | The variant's SKU, or its Shopify variant ID. STOQ uses this to match the request to the right product variant. |
| One of email or phone | The customer's email, so they can get email alerts. | |
| Phone | One of email or phone | The customer's phone in international format, like +14155551234, so they can get SMS alerts. |
| Name | No | Customer name, for your own reference. |
| Market | No | The market the request belongs to. Must match a market name or ID in your Shopify admin. |
| Quantity | No | How many units they want. Defaults to 1 if left blank. |
| GDPR confirmed | No | true or false, whether the customer gave consent. Defaults to false. |
| Accepts marketing | No | true or false, whether they opted into marketing. Defaults to false. |
| Language | No | The customer's locale code, like en, fr, or de, so alerts send in their language. |
| Date | No | The original signup date, to keep customers in the right order. Use dd/mm/yyyy or mm/dd/yyyy. |
Check your setup
The import runs in the background. STOQ emails a status update to your report email address when it finishes. You can also click View imports on the Import data card at any time to see recent imports and their status. Confirm the customers you added now appear on the waitlist for the right product or variant.
Troubleshooting
Your file won't upload
Make sure it's saved as a CSV (.csv), not an Excel file.
Some rows don't import
Rows are skipped so they don't block the rest. Check for:
- A missing email or phone.
- A SKU or variant ID that doesn't match your catalog.
- An unreadable date or phone number.
- A blocked test or disposable email, like test@example.com or a mailinator.com inbox. The status report shows "Email address is blocked" for these rows. If the row also has a phone number, it imports as an SMS signup without the email.
Columns didn't map automatically
Your header names probably don't match the STOQ Import Template. Rename them to match the template, or fix the mapping manually before you start the import.
You don't see the status email
Check the report email address in your STOQ settings, then resend it from View imports on the Import data card.
FAQ
Which apps can I import from?
Any app, as long as you can export your pending requests to a spreadsheet. STOQ doesn't integrate with other back in stock apps to pull the data automatically, so you copy your export into the STOQ Import Template and upload it as a CSV.
Do imported customers get an alert right away?
No. Importing only recreates the pending requests on the waitlist. Alerts go out later, when the product restocks and meets your delivery settings, the same as for someone who signed up directly on your store.
Will re-uploading the same file create duplicate signups?
No. A customer who is already on the waitlist for that same variant is skipped on a later import, so re-uploading a file, or importing overlapping lists, won't create duplicates.
Where is the status email sent?
To the report email address configured in your STOQ settings. If it didn't arrive, open View imports on the Import data card and resend the status report from there.
Can I run more than one import?
Yes. You can upload additional CSVs, for example to add customers you missed the first time. Each import is listed with its own status under View imports.
Why did some rows fail with a blocked email message?
Those rows use a test, placeholder or disposable email, such as test@example.com, an example.com address, or a yopmail.com or mailinator.com inbox. STOQ blocks these on every store because they aren't real shoppers, and the list can't be changed. The rest of your file still imports as normal.